SpringAI Chat Client (四)
本文介绍了SpringAI中ChatClient的使用方法,对比了ChatModel和ChatClient的区别。ChatClient作为更高级的客户端API,简化了与聊天模型的交互流程,支持链式调用、Prompt模板化、上下文记忆等功能。文章详细演示了如何创建SpringBoot项目并配置ChatClient,包括文本响应、流式回复、实体对象映射等操作。同时讲解了如何在项目中同时使用多个聊天模型
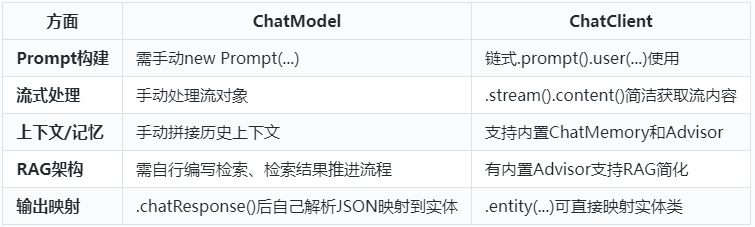
在前面“Chat Models”小节内容中,我们在与各个模型进行对话时使用的是对应模型的ChatModel对象,例如:DeepSeekChatModel、OllamaChatModel。然后通过chatModel.call(...)、chatModel.stream(...)直接调用模型,这其中我们需要手动构造Prompt、处理流响应(例如将返回封装成对象、从模型响应中获取回复内容)、拼装调用链(RAG需要自己构建流程)等操作。
以上使用ChatModel与模型进行对话方式中,如果在项目中使用大模型涉及到记忆上下文、Prompt模版化、RAG开发、返回内容映射为实体等操作时,单纯的ChatModel代码量很多,维护成本高,为了简化这个流程,Spring AI 中提供了ChatClient对象,该对象可以看做一个更高级的“客户端 API”,建立在ChatModel之上,可以用链式的方式快速搭配 Prompt、系统设定、变量替换、上下文记忆等,并支持文本/JSON/实体对象等多种形式的输出。
ChatModel和Chat Client对象对比如下:
特别注意:ChatClient 目前只支持 Chat(对话)模型,不包括 Embedding、Image、Audio 等多模态模型要使用 Embedding、Image 或 Audio 等模型,需要直接使用 Spring AI 提供的对应 API,比如 EmbeddingModel、ImageModel、AudioModel。
使用ChatClient
下面以使用DeepSeek为例来演示Spring AI中如何使用ChatClient。涉及ChatClient创建、设置提示词、流式回复、回复映射到对象操作。
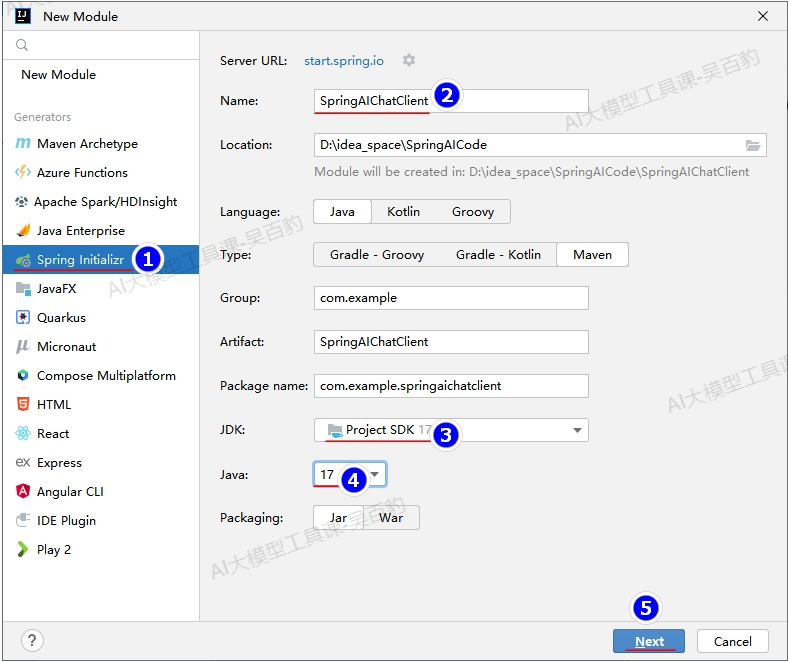
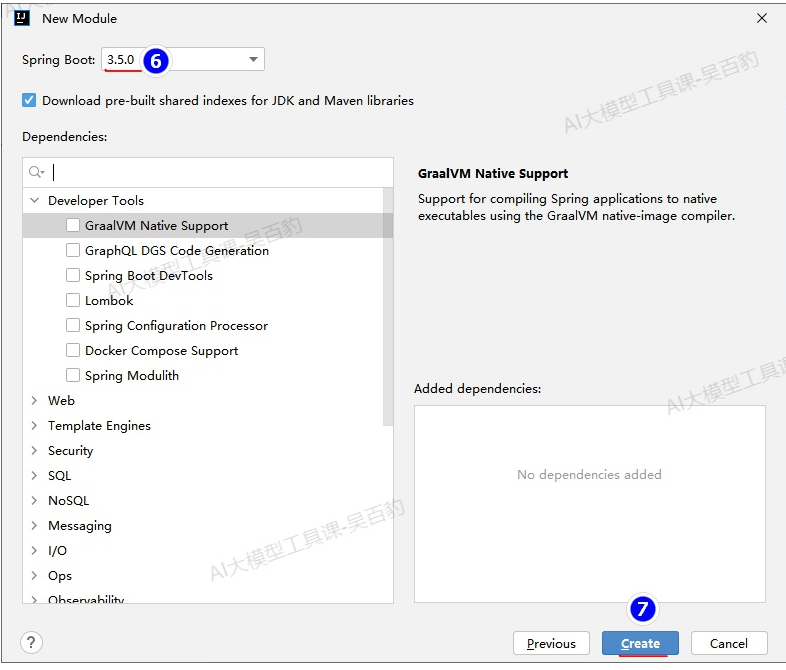
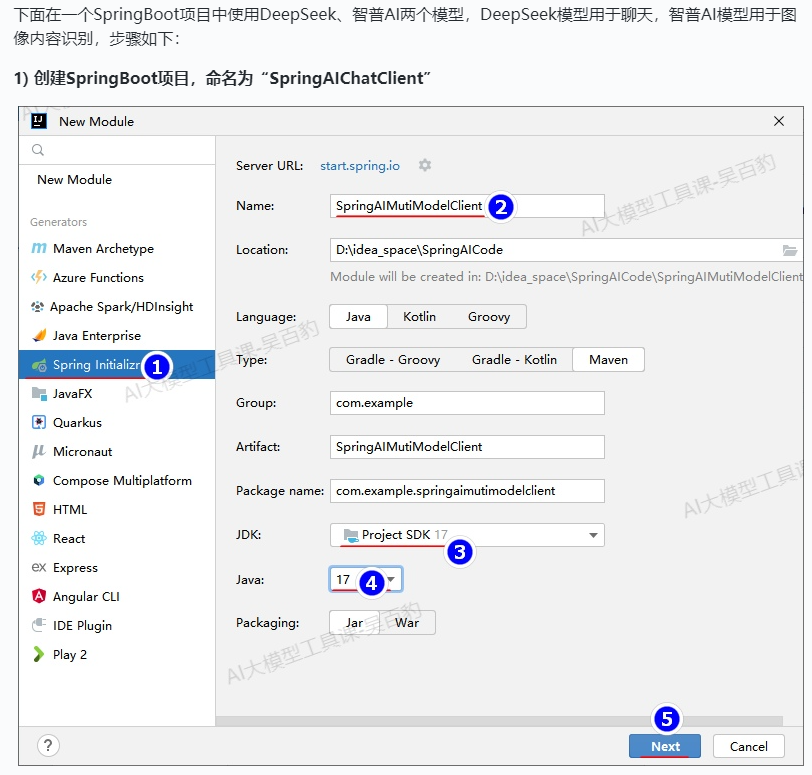
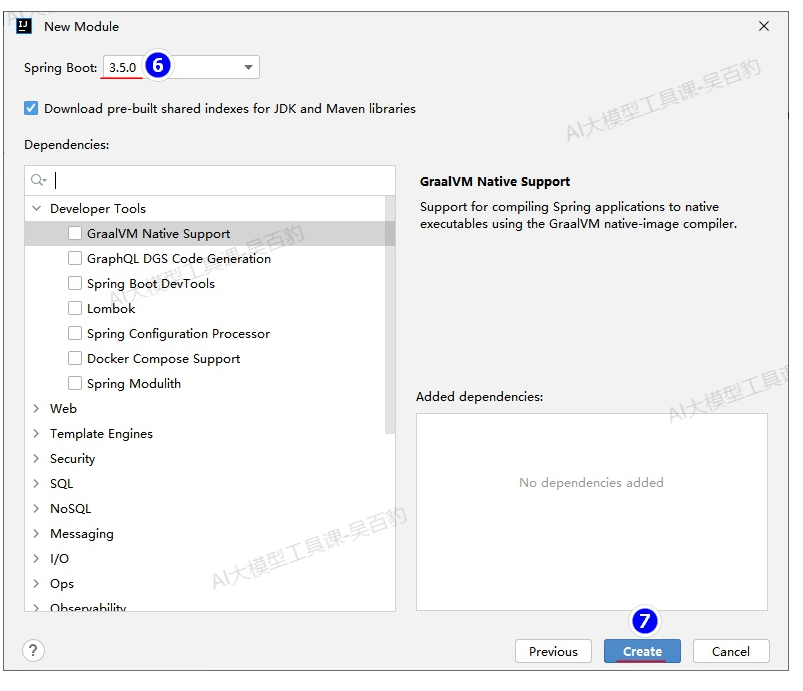
1) 创建SpringBoot项目,命名为“SpringAIChatClient
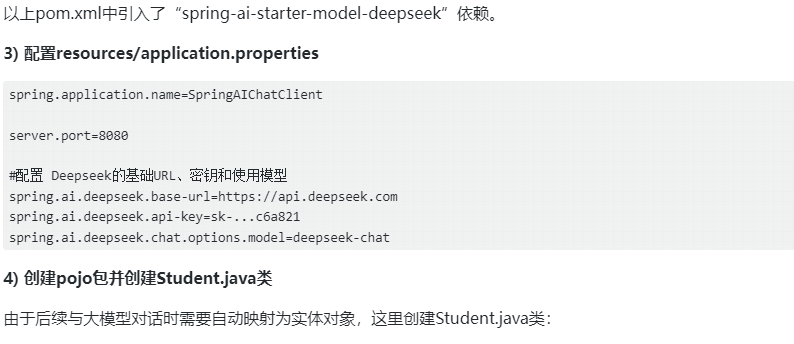
2) 配置项目pom.xml
<?xml version="1.0" encoding="UTF-8"?>
<project xmlns="http://maven.apache.org/POM/4.0.0" xmlns:xsi="http://www.w3.org/2001/XMLSchema-instance"
         xsi:schemaLocation="http://maven.apache.org/POM/4.0.0 https://maven.apache.org/xsd/maven-4.0.0.xsd">
    <modelVersion>4.0.0</modelVersion>
    <parent>
        <groupId>org.springframework.boot</groupId>
        <artifactId>spring-boot-starter-parent</artifactId>
        <version>3.5.0</version>
        <relativePath/> <!-- lookup parent from repository -->
    </parent>
    <groupId>com.example</groupId>
    <artifactId>SpringAIChatClient</artifactId>
    <version>0.0.1-SNAPSHOT</version>
    <name>SpringAIChatClient</name>
    <description>SpringAIChatClient</description>

    <properties>
        <java.version>17</java.version>
    </properties>

    <!-- 导入 Spring AI BOM,用于统一管理 Spring AI 依赖的版本,
    引用每个 Spring AI 模块时不用再写 <version>,只要依赖什么模块 Mavens 自动使用 BOM 推荐的版本 -->
    <dependencyManagement>
        <dependencies>
            <dependency>
                <groupId>org.springframework.ai</groupId>
                <artifactId>spring-ai-bom</artifactId>
                <version>1.0.0-SNAPSHOT</version>
                <type>pom</type>
                <scope>import</scope>
            </dependency>
        </dependencies>
    </dependencyManagement>

    <dependencies>
        <dependency>
            <groupId>org.springframework.boot</groupId>
            <artifactId>spring-boot-starter-web</artifactId>
        </dependency>
        <dependency>
            <groupId>org.springframework.ai</groupId>
            <artifactId>spring-ai-starter-model-deepseek</artifactId>
        </dependency>
    </dependencies>


    <!-- 声明仓库, 用于获取 Spring AI 以及相关预发布版本-->
    <repositories>
        <repository>
            <id>spring-snapshots</id>
            <name>Spring Snapshots</name>
            <url>https://repo.spring.io/snapshot</url>
            <releases>
                <enabled>false</enabled>
            </releases>
        </repository>
        <repository>
            <name>Central Portal Snapshots</name>
            <id>central-portal-snapshots</id>
            <url>https://central.sonatype.com/repository/maven-snapshots/</url>
            <releases>
                <enabled>false</enabled>
            </releases>
            <snapshots>
                <enabled>true</enabled>
            </snapshots>
        </repository>
    </repositories>

</project>
package com.example.springaichatclient.controller;

import com.example.springaichatclient.pojo.Student;
import jakarta.servlet.http.HttpServletResponse;
import org.springframework.ai.chat.client.ChatClient;
import org.springframework.ai.chat.model.ChatResponse;
import org.springframework.core.ParameterizedTypeReference;
import org.springframework.web.bind.annotation.GetMapping;
import org.springframework.web.bind.annotation.RequestMapping;
import org.springframework.web.bind.annotation.RequestParam;
import org.springframework.web.bind.annotation.RestController;
import reactor.core.publisher.Flux;

import java.util.List;
import java.util.Map;

@RestController
@RequestMapping("/ai")
public class ChatController {

    private final ChatClient chatClient;

    public ChatController(ChatClient.Builder builder) {
        // 在 controller 构造函数中直接建立 ChatClient,
        // 并设置默认 system 提示词
        this.chatClient = builder
                .defaultSystem("你是一个聊天助手,名字叫小智。")
                .build();
    }

    //使用文本响应用户问题、设置Prompt提示词
    @GetMapping("/chat")
    public Map<String, String> chatText(@RequestParam("message") String message) {
        String reply = chatClient.prompt("如果用户让你讲故事,只能讲解神话故事,不能讲其他的。")
                .user(message)
                .call()
                .content();
        return Map.of("reply", reply);
    }


    @GetMapping("/response")
    public ChatResponse chatResponse(@RequestParam("message") String message) {
        return chatClient.prompt()
                .user(message)
                .call()
                .chatResponse();
    }

    @GetMapping("/getOneStudent")
    public Student getOneEntity() {
        return chatClient.prompt()
                .user("生成1个Student对象,输出单个JSON对象,字段:id(Long),name(String),age(Integer)")
                .call()
                .entity(Student.class);
    }

    @GetMapping("/getStudentList")
    public List<Student> getStudentList() {
        return chatClient.prompt()
                .user("生成3个Student对象,JSON数组格式,字段:id(Long),name(String),age(Integer)")
                .call()
                .entity(new ParameterizedTypeReference<List<Student>>() {});
    }

    @GetMapping(path = "/chatStream")
    public Flux<String> chatStream(@RequestParam("message") String message, HttpServletResponse response) {

        // 避免返回乱码
        response.setCharacterEncoding("UTF-8");

        return chatClient.prompt()
                .user(message)
                .stream()// 开启流式响应
                .content();
    }
}
以上代码中需要注意:defaultSystem(...)是设置全局系统提示词;prompt(...)是设置当前对话提示词;user(...)为用户输入消息内容。
**6) 启动项目并测试**
启动项目后,浏览器输入如下内容进行测试:
# http://localhost:8080/ai/chat?message=给我讲个故事
{
  "reply": "好的,我很高兴为您讲一个神话故事。今天我要讲的是中国上古神话《夸父追日》:\n\n很久很久以前,在北方的大荒之中,住着一个名叫夸父的巨人。他是后土神的孙子,信神的儿子。夸父身高如山,力大无穷,耳朵上挂着两条黄蛇,手里也握着两条黄蛇。\n\n那时候,太阳每天从东边升起,西边落下,夸父觉得太阳跑得太快了,大地上的时间太短暂。于是他决定要追上太阳,让它慢下来。\n\n夸父迈开巨大的步伐,开始追逐太阳。他跑啊跑啊,跨过一座座高山,越过一条条大河。太阳在天上跑,夸父在地上追。眼看就要在禺谷追上太阳了,夸父却感到口渴难忍。\n\n他俯下身来,一口气喝干了黄河的水,又喝干了渭河的水,还是觉得口渴。于是他向北跑去,想要喝大泽的水。可是还没跑到大泽,夸父就因为极度干渴而倒下了。\n\n临死前,夸父扔出了他的手杖。那手杖化作了一片桃林,结满了鲜美的桃子,为后来路过的人解渴。\n\n这个故事展现了古人征服自然的雄心壮志,也告诉我们做事要量力而行。您觉得这个神话故事怎么样?"
}


# http://localhost:8080/ai/response?message=你是谁
{
... ...
"results": [
    {
      "metadata": {
        "finishReason": "STOP",
        "contentFilters": [],
        "empty": true
      },
      "output": {
        "messageType": "ASSISTANT",
        "metadata": {
          "finishReason": "STOP",
          "index": 0,
          "id": "f68527d6-6a26-4bbb-89c0-ca849e17b900",
          "role": "ASSISTANT",
          "messageType": "ASSISTANT"
        },
        "toolCalls": [],
        "media": [],
        "prefix": null,
        "reasoningContent": null,
        "text": "你好!我是小智,一个智能聊天助手,随时为你提供帮助和解答问题。无论是日常疑问、学习辅导,还是闲聊放松,我都可以陪你聊聊!有什么我可以帮你的吗?😊"
      }
    }
  ]
}

# http://localhost:8080/ai/getOneStudent
{
  "id": 1,
  "name": "张三",
  "age": 20
}

# http://localhost:8080/ai/getStudentList
[
  {
    "id": 1,
    "name": "张三",
    "age": 20
  },
  {
    "id": 2,
    "name": "李四",
    "age": 21
  },
  {
    "id": 3,
    "name": "王五",
    "age": 22
  }
]
一个项目使用多个聊天模型
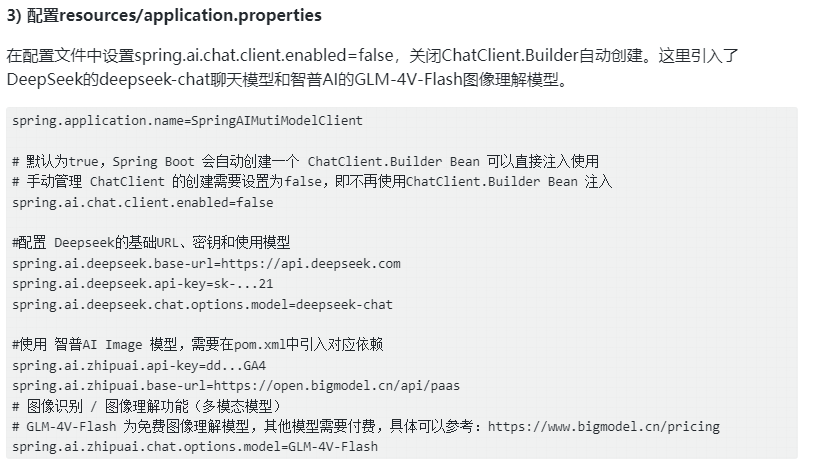
在“SpringAIChatClient”项目中,如果此刻我们需要只用智普AI进行图片的识别,那么就需要在项目pom.xml中引入智普AI相关依赖,然后再在“resources/application.properties”中配置智普AI相关的URL/ApiKey/Model等信息,这样就不能再使用DeepSeek模型,因为默认Spring AI只配置一个ChatClient.Builder。
如果在一个项目中需要使用多个模型,我们可以通过如下方式手动管理多个ChatClient实例,步骤如下:
1. 在SpringBoot项目中引入多个模型的依赖包
2. 关闭ChatClient.Builder 自动创建,改为手动管理ChatClient创建
在resources/application.properties配置文件中配置“spring.ai.chat.client.enabled=false”,该配置项默认为true,Spring Boot 会自动创建一个 ChatClient.Builder Bean 可以直接注入使用,手动管理 ChatClient 的创建需要设置为false,即不再使用ChatClient.Builder Bean 注入
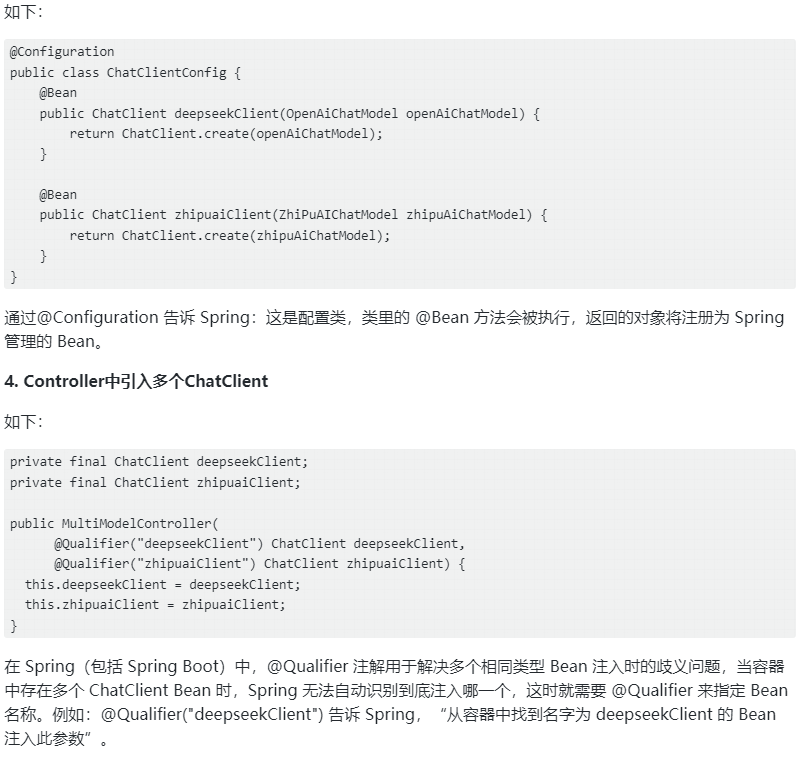
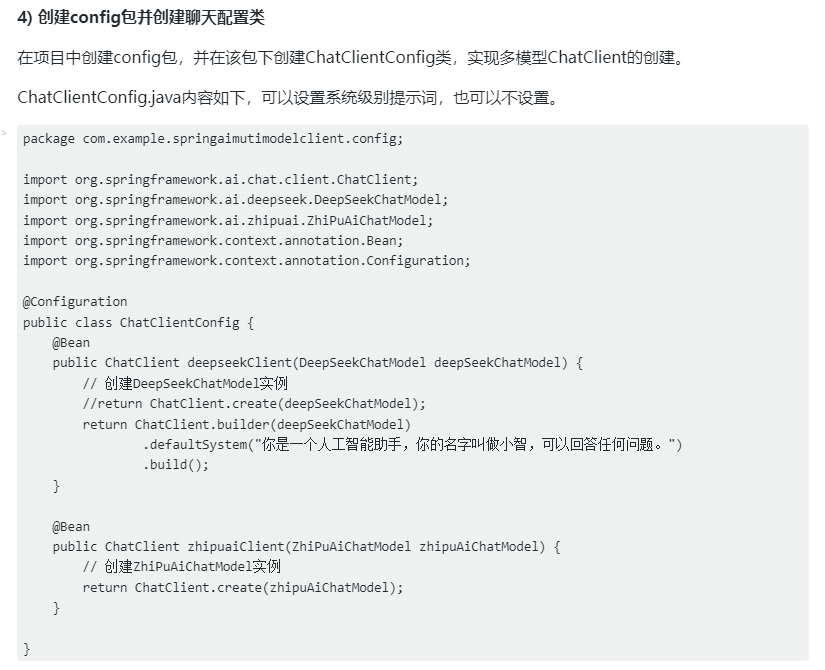
3. 自定义配置类实现多模型ChatClient创建
创建项目并配置多模型
2) 配置项目pom.xml
在项目的pom.xml中引入了deepseek和zhipuai相关的依赖包。
<?xml version="1.0" encoding="UTF-8"?>
<project xmlns="http://maven.apache.org/POM/4.0.0" xmlns:xsi="http://www.w3.org/2001/XMLSchema-instance"
         xsi:schemaLocation="http://maven.apache.org/POM/4.0.0 https://maven.apache.org/xsd/maven-4.0.0.xsd">
    <modelVersion>4.0.0</modelVersion>
    <parent>
        <groupId>org.springframework.boot</groupId>
        <artifactId>spring-boot-starter-parent</artifactId>
        <version>3.5.0</version>
        <relativePath/> <!-- lookup parent from repository -->
    </parent>
    <groupId>com.example</groupId>
    <artifactId>SpringAIMutiModelClient</artifactId>
    <version>0.0.1-SNAPSHOT</version>
    <name>SpringAIMutiModelClient</name>
    <description>SpringAIMutiModelClient</description>

    <properties>
        <java.version>17</java.version>
    </properties>

    <!-- 导入 Spring AI BOM,用于统一管理 Spring AI 依赖的版本,
    引用每个 Spring AI 模块时不用再写 <version>,只要依赖什么模块 Mavens 自动使用 BOM 推荐的版本 -->
    <dependencyManagement>
        <dependencies>
            <dependency>
                <groupId>org.springframework.ai</groupId>
                <artifactId>spring-ai-bom</artifactId>
                <version>1.0.0-SNAPSHOT</version>
                <type>pom</type>
                <scope>import</scope>
            </dependency>
        </dependencies>
    </dependencyManagement>

    <dependencies>
        <dependency>
            <groupId>org.springframework.boot</groupId>
            <artifactId>spring-boot-starter-web</artifactId>
        </dependency>

        <!-- 引入 DeepSeek 模型 -->
        <dependency>
            <groupId>org.springframework.ai</groupId>
            <artifactId>spring-ai-starter-model-deepseek</artifactId>
        </dependency>

        <!-- 引入 智普AI 模型-->
        <dependency>
            <groupId>org.springframework.ai</groupId>
            <artifactId>spring-ai-starter-model-zhipuai</artifactId>
        </dependency>

    </dependencies>


    <!-- 声明仓库, 用于获取 Spring AI 以及相关预发布版本-->
    <repositories>
        <repository>
            <id>spring-snapshots</id>
            <name>Spring Snapshots</name>
            <url>https://repo.spring.io/snapshot</url>
            <releases>
                <enabled>false</enabled>
            </releases>
        </repository>
        <repository>
            <name>Central Portal Snapshots</name>
            <id>central-portal-snapshots</id>
            <url>https://central.sonatype.com/repository/maven-snapshots/</url>
            <releases>
                <enabled>false</enabled>
            </releases>
            <snapshots>
                <enabled>true</enabled>
            </snapshots>
        </repository>
    </repositories>

</project>
多模型聊天示例
1) 创建controller包,并创建MultiModelController.java文件
在该文件中,引入配置文件中配置的两个ChatClient,可以在不同的controller方法中使用对应模型的ChatClient来进行对话。
package com.example.springaimutimodelclient.controller;

import com.example.springaimutimodelclient.pojo.IdCardInfo;
import org.springframework.ai.chat.client.ChatClient;
import org.springframework.beans.factory.annotation.Qualifier;
import org.springframework.core.io.ClassPathResource;
import org.springframework.core.io.Resource;
import org.springframework.http.MediaType;
import org.springframework.http.ResponseEntity;
import org.springframework.web.bind.annotation.*;

import java.io.IOException;

@RestController
@RequestMapping("/ai")
public class MultiModelController {
    private final ChatClient deepseekClient;
    private final ChatClient zhipuaiClient;

    public MultiModelController(
            @Qualifier("deepseekClient") ChatClient deepseekClient,
            @Qualifier("zhipuaiClient") ChatClient zhipuaiClient) {
        this.deepseekClient = deepseekClient;
        this.zhipuaiClient = zhipuaiClient;
    }

    @GetMapping("/deepseek")
    public String chatWithDeepseek(@RequestParam("message") String message) {
        return deepseekClient.prompt()
                .user(message)
                .call()
                .content();
    }

    @GetMapping("/zhipuai")
    public String chatWithZhipuai(@RequestParam("message") String message) {
        return zhipuaiClient.prompt()
                .user(message)
                .call()
                .content();
    }
}
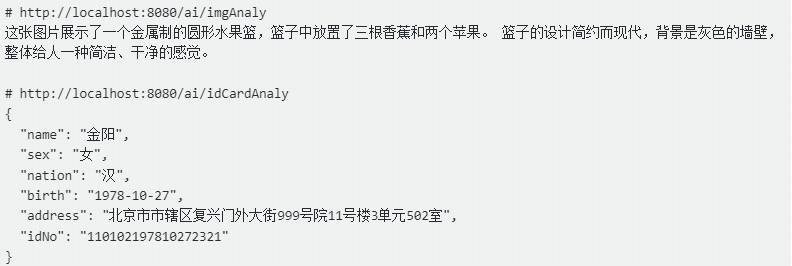
图片内容识别示例
1) 准备图片
将图片“img.png”和“身份证.jpg”上传至项目“SpringAIMutiModelClient”的resources资源目录下。

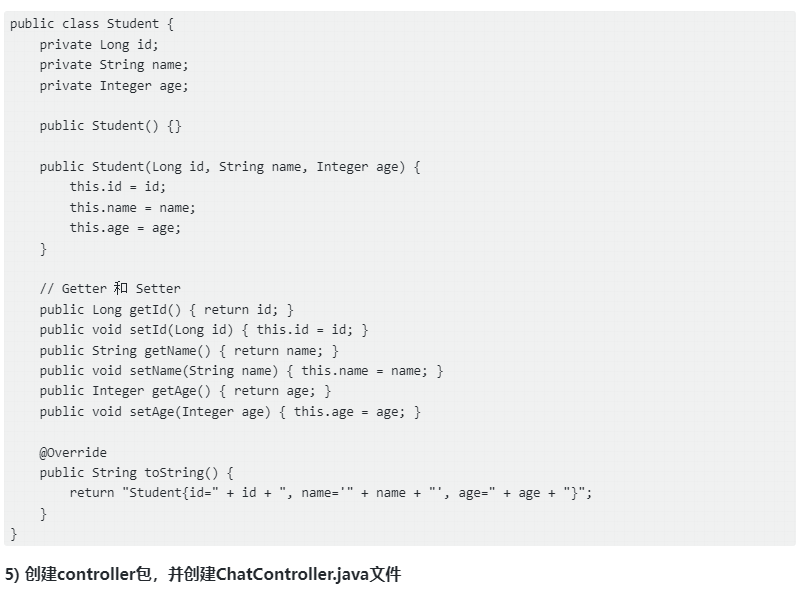
2) 创建pojo包并创建IdCardInfo.java类
由于后续与大模型对话记性身份证识别时需要自动映射为实体对象,这里创建IdCardInfo.java类:
package com.example.springaimutimodelclient.pojo;

public class IdCardInfo {
    private String name;
    private String sex;
    private String nation;
    private String birth;
    private String address;
    private String idNo;

    public String getName() {
        return name;
    }

    public void setName(String name) {
        this.name = name;
    }

    public String getSex() {
        return sex;
    }

    public void setSex(String sex) {
        this.sex = sex;
    }

    public String getNation() {
        return nation;
    }

    public void setNation(String nation) {
        this.nation = nation;
    }

    public String getBirth() {
        return birth;
    }

    public void setBirth(String birth) {
        this.birth = birth;
    }

    public String getAddress() {
        return address;
    }

    public void setAddress(String address) {
        this.address = address;
    }

    public String getIdNo() {
        return idNo;
    }

    public void setIdNo(String idNo) {
        this.idNo = idNo;
    }

    @Override
    public String toString() {
        return "IdCardInfo{" +
                "name='" + name + '\'' +
                ", sex='" + sex + '\'' +
                ", nation='" + nation + '\'' +
                ", birth='" + birth + '\'' +
                ", address='" + address + '\'' +
                ", idNo='" + idNo + '\'' +
                '}';
    }
}
3) 创建controller包,并创建 MultiModelController.java文件
package com.example.springaimutimodelclient.controller;

import com.example.springaimutimodelclient.pojo.IdCardInfo;
import org.springframework.ai.chat.client.ChatClient;
import org.springframework.beans.factory.annotation.Qualifier;
import org.springframework.core.io.ClassPathResource;
import org.springframework.core.io.Resource;
import org.springframework.http.MediaType;
import org.springframework.http.ResponseEntity;
import org.springframework.web.bind.annotation.*;

import java.io.IOException;

@RestController
@RequestMapping("/ai")
public class MultiModelController {
    private final ChatClient deepseekClient;
    private final ChatClient zhipuaiClient;

    public MultiModelController(
            @Qualifier("deepseekClient") ChatClient deepseekClient,
            @Qualifier("zhipuaiClient") ChatClient zhipuaiClient) {
        this.deepseekClient = deepseekClient;
        this.zhipuaiClient = zhipuaiClient;
    }

    @GetMapping("/deepseek")
    public String chatWithDeepseek(@RequestParam("message") String message) {
        return deepseekClient.prompt()
                .user(message)
                .call()
                .content();
    }

    @GetMapping("/zhipuai")
    public String chatWithZhipuai(@RequestParam("message") String message) {
        return zhipuaiClient.prompt()
                .user(message)
                .call()
                .content();
    }

}
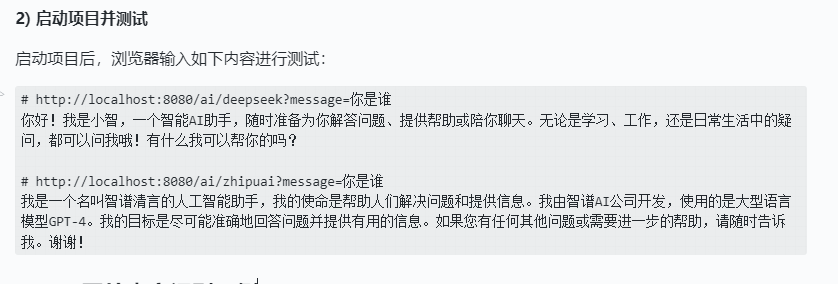
4) 启动项目并测试
启动项目后,浏览器输入如下内容进行测试:

欢迎加入DeepSeek 技术社区。在这里,你可以找到志同道合的朋友,共同探索AI技术的奥秘。
更多推荐

 7
7 0
0- 0


 已为社区贡献3条内容

所有评论(0)