【一个开发文档即可自动开发整个项目教程】Windows下配置Deepcode+通义千问
使用DeepCode和通义前问搭建自己的代码开发生成Agent
Deepcode介绍
DeepCode 是由香港大学数据智能实验室(HKUDS)黄超教授团队开发的一款开源多智能体代码生成平台。它旨在通过人工智能技术,将研究论文、自然语言描述等输入自动转化为高质量、可投入生产环境的代码。
1. 激活conda环境并安装DeepCode
首先激活您已创建的conda环境:
conda activate deepcode
然后安装DeepCode包: README.md:452-454
pip install deepcode-hku
2. 下载配置文件
下载必需的配置文件:
使用PowerShell的Invoke-WebRequest(推荐)
Invoke-WebRequest -Uri "https://raw.githubusercontent.com/HKUDS/DeepCode/main/mcp_agent.config.yaml" -OutFile "mcp_agent.config.yaml"
Invoke-WebRequest -Uri "https://raw.githubusercontent.com/HKUDS/DeepCode/main/mcp_agent.secrets.yaml" -OutFile "mcp_agent.secrets.yaml"
3. 配置千问大模型API
登录阿里云:https://help.aliyun.com/zh/model-studio/get-api-key?spm=a2c4g.11186623.0.0.78d8187awEFfhp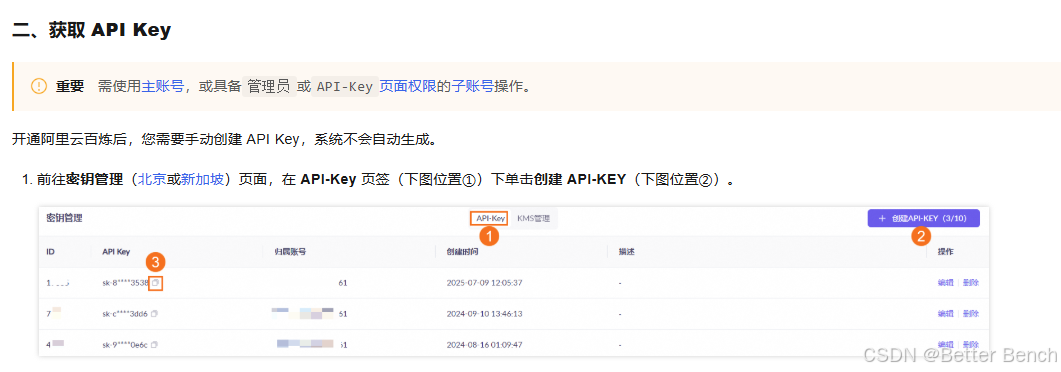
通过记事本编辑mcp_agent.secrets.yaml文件,配置API-KEY:
openai:
  api_key: "以上创建的API key"
  base_url: "https://dashscope.aliyuncs.com/compatible-mode/v1"

anthropic:
  api_key: ""
在mcp_agent.config.yaml文件中,配置大模型qwen-plus :
default_model: qwen-plus
4. Windows特定配置 - MCP服务器
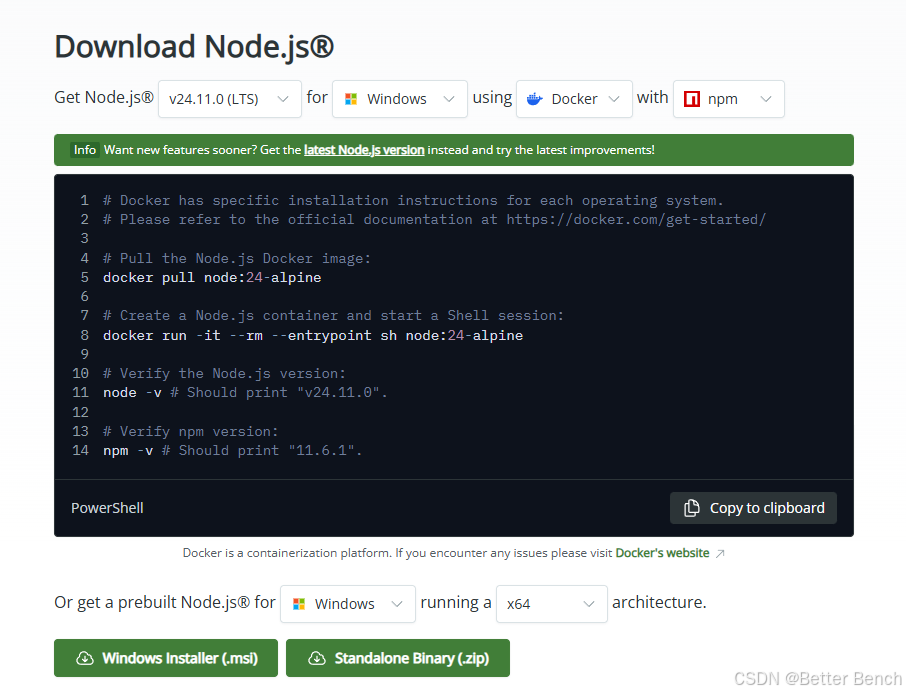
(1)下载和安装Node.js:https://nodejs.org/en/download
下载Windows安装程序(推荐LTS版本)
运行安装程序,按照向导完成安装
安装完成后,重启PowerShell或命令提示符
重新打开PowerShell,验证npm是否安装成功:
npm --version
node --version
(2)Windows用户需要手动配置MCP服务器。首先全局安装MCP服务器:
npm i -g @modelcontextprotocol/server-brave-search
npm i -g @modelcontextprotocol/server-filesystem
查找node_modules路径:
npm -g root
我的输出是:C:/Users/LiuM/AppData/Roaming/npm/node_modules
然后在mcp_agent.config.yaml中使用绝对路径更新配置:
brave服务器:
将command从npx改为"node"
将args从["-y", "@modelcontextprotocol/server-brave-search"]改为["C:/Users/LiuM/AppData/Roaming/npm/node_modules/@modelcontextprotocol/server-brave-search/dist/index.js"]
保持env.BRAVE_API_KEY不变
filesystem服务器:
将command从npx改为"node"
将args从["-y", "@modelcontextprotocol/server-filesystem", "."]改为["C:/Users/LiuM/AppData/Roaming/npm/node_modules/@modelcontextprotocol/server-filesystem/dist/index.js", "."]
注意保留最后的"."参数,它指定了文件系统的工作目录
以下是修改后完整的mcp_agent.config.yaml的内容
$schema: ./schema/mcp-agent.config.schema.json
anthropic: null
default_search_server: brave
document_segmentation:
  enabled: true
  size_threshold_chars: 3000
execution_engine: asyncio
logger:
  level: info
  path_settings:
    path_pattern: logs/mcp-agent-{unique_id}.jsonl
    timestamp_format: '%Y%m%d_%H%M%S'
    unique_id: timestamp
  progress_display: true
  transports:
  - console
  - file
mcp:
  servers:
    bocha-mcp:
      args:
      - tools/bocha_search_server.py
      command: python3
      env:
        BOCHA_API_KEY: ''
        PYTHONPATH: .
    brave:
      command: "node"
      args: ["C:/Users/LiuM/AppData/Roaming/npm/node_modules/@modelcontextprotocol/server-brave-search/dist/index.js"]
      env:
        BRAVE_API_KEY: ''
    code-implementation:
      args:
      - tools/code_implementation_server.py
      command: python
      description: Paper code reproduction tool server - provides file operations,
        code execution, search and other functions
      env:
        PYTHONPATH: .
    code-reference-indexer:
      args:
      - tools/code_reference_indexer.py
      command: python
      description: Code reference indexer server - Provides intelligent code reference
        search from indexed repositories
      env:
        PYTHONPATH: .
    command-executor:
      args:
      - tools/command_executor.py
      command: python
      env:
        PYTHONPATH: .
    document-segmentation:
      args:
      - tools/document_segmentation_server.py
      command: python
      description: Document segmentation server - Provides intelligent document analysis
        and segmented reading to optimize token usage
      env:
        PYTHONPATH: .
    fetch:
      args:
      - mcp-server-fetch
      command: uvx
    file-downloader:
      args:
      - tools/pdf_downloader.py
      command: python
      env:
        PYTHONPATH: .
    filesystem:
      command: "node"
      args: ["C:/Users/LiuM/AppData/Roaming/npm/node_modules/@modelcontextprotocol/server-filesystem/dist/index.js", "."]
    github-downloader:
      args:
      - tools/git_command.py
      command: python
      env:
        PYTHONPATH: .
openai:
  base_max_tokens: 20000
  default_model: qwen-plus
  max_tokens_policy: adaptive
  retry_max_tokens: 32768
planning_mode: traditional
5. 启动
(1)方法一:直接命令启动
deepcode
如果这个方法报错,选择方法二
(2)方法二
# 克隆仓库
git clone https://github.com/HKUDS/DeepCode.git
cd DeepCode


# 安装依赖
pip install -r requirements.txt
将以上修改后的mcp_agent.config.yaml和mcp_agent.secrets.yaml两个文件放在该项目下的根目录
从源代码运行
streamlit run ui/streamlit_app.py
会自动在浏览器打开http://localhost:8501/,显示以下界面,选择upload file上传你的详细开发文档,等待长时间的执行即可。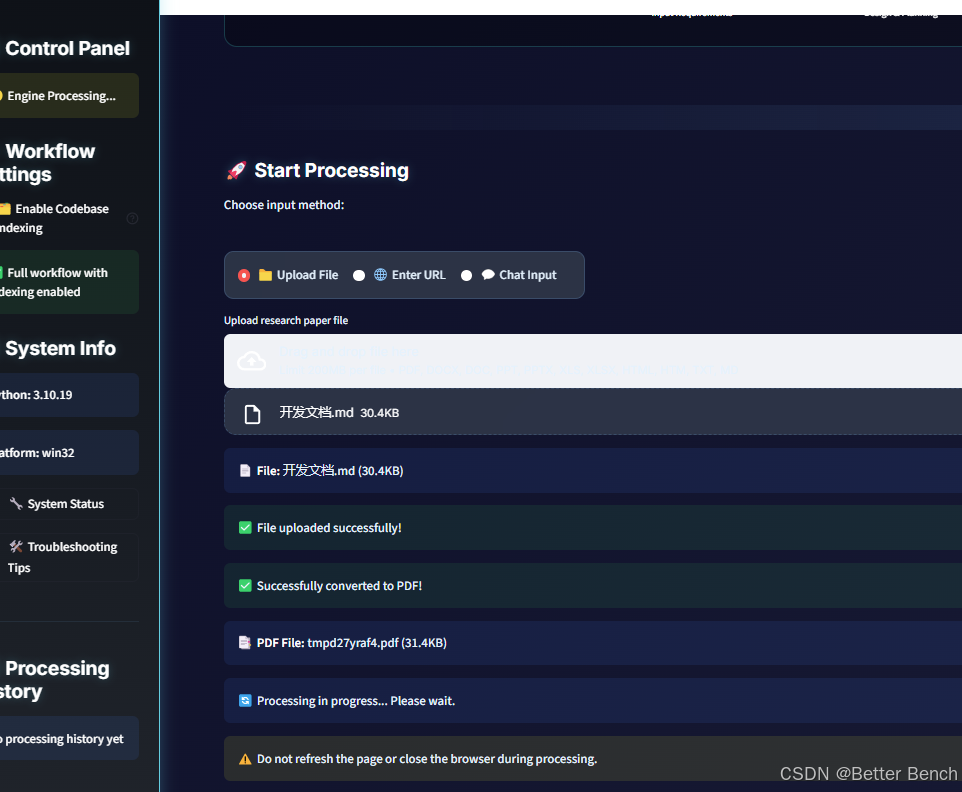
执行完成后,在终端可以提示生成代码的位置,一般在根目录的deepcode_lab文件夹下
6. 补充
为了增强Web搜索功能,可以选择分别Bocha Search和Brave Search平台,获取API,添加到mcp_agent.config.yaml。
Brave是DeepCode默认使用的搜索引擎,Bocha是一个中文AI搜索引擎,作为Brave的替代选项,这两个搜索API密钥是可选的。
brave:
  env:
    BRAVE_API_KEY: "your_brave_api_key_here"
bocha-mcp:
  env:
    BOCHA_API_KEY: "your_bocha_api_key_here"

欢迎加入DeepSeek 技术社区。在这里,你可以找到志同道合的朋友,共同探索AI技术的奥秘。
更多推荐


 12
12 0
0- 0


 已为社区贡献3条内容

所有评论(0)