【BotSharp框架示例 ——实现聊天机器人,并通过 DeepSeek V3实现 function calling】
BotSharp框架示例 ——实现聊天机器人,并通过 DeepSeek V3实现 function calling
本文通过仔细研究 BotSharp 框架的示例代码PizzaBot,实现以下内容:
1、分析Botsharp实现聊天机器人的基本组成部分;
2、模仿PizzaBot一步一步搭建自己的聊天机器人;
3、通过分析PizzaBot,实现控制agent 驱动不同的大模型;
4、实现大模型调用本地函数的示例。
一、一点点感悟
深刻感觉.Net在AI领域已经有很多优秀的框架可以使用,但是苦于资料太少,本人就研究这一个小小的例子,就花费了很长的时间。
真希望 出现以前那种一步一步学xxx 类似的文章,能引导学习的人快速上手。
真希望本例子能够作为一个投石问路,会有更多的人来分享实际的案例,清晰的使用指南。
二、创建项目
闲言少叙,开始模仿。
本文 参考
1、Botsharp的示例 PizzaBot
2、Botsharp的官方文档:https://botsharp.verdure-hiro.cn/guide/agent/hook
1、创建项目
目标是搭建一个关于天气咨询的一个聊天机器人,
所以 模仿PizzaBot 创建了三个项目
1、创建类库MyWeatherPlugin(主要部分,承载AgentHook、ConversationHook,以及本地Function的定义)
2、创建类库WeatherApiDefaultService(用于模拟PizzaBot,实现默认的服务注册和方法–此处经过测试,也可以不添加,不是必须要执行的步骤)
3、创建WebAPI项目MyWeatherAPI(通过配置、启动聊天机器人,主要关注配置文件和启动类)
2、添加引用
通过测试,需要添加以下 引用:
1、MyWeatherPlugin中需要添加 BotSharp.Core的引用
2、WeatherApiDefaultService 因为 是非必须的,可以不用添加这个项目了,如果添加了,可以 照着PizzaBot照搬下
3、MyWeatherAPI 需要添加 以下类库引用:
 BotSharp.Core
 BotSharp.Abstraction
 BotSharp.Logger
 BotSharp.OpenAPI
 BotSharp.Plugin.ChatHub
由于本例中使用到了 DeepSeek,所以要引用
BotSharp.Plugin.DeepSeekAI
在之前的探索中还使用过 llama本地模型,如果要用llama模型的话,要引用 以下的库
BotSharp.Plugin.LLamaSharp
LLamaSharp
LLamaSharp.Backend.Cpu
LLamaSharp.Backend.Cuda12
3、MyWeatherPlugin项目代码编写
模拟Pizzabot,添加 以下内容
1)添加公共using文件
2)添加MyWeatherPlugin
注意,MyWeatherPlugin文件中需要注册注册一些AgentId,示例中使用的 是 启动后通过postman 创建agent的方法(引用见 Botsharp的官方文档:https://botsharp.verdure-hiro.cn/guide/agent/hook,有启动postman workspace的链接)
using BotSharp.Abstraction.Agents;
using BotSharp.Abstraction.Conversations;
using BotSharp.Abstraction.Plugins;
using MyWeatherPlugin.Hooks;

namespace MyWeatherPlugin
{
    public class MyWeatherPlugin: IBotSharpPlugin
    {
        public string Id => "1c8270eb-de63-4ca0-8903-654d83ce5ece";
        public string Name => "MyWeather AI Assistant";
        public string Description => "An example of an Weather AI Chatbot.";
        public string IconUrl => "https://cdn-icons-png.flaticon.com/512/6978/6978255.png";
        public string[] AgentIds => new[]
        {
            "01fcc3e5-0af7-49e6-ad7a-a760bd12dc4d",
            "01fcc3e5-9af7-49e6-ad7a-a760bd12dc4a",
            "6745151e-6d46-4a02-8de4-1c4f21c7da95",
            "dfd9b46d-d00c-40af-8a75-3fbdc2b89869"
        };

        public void RegisterDI(IServiceCollection services, IConfiguration config)
        {
            // Register hooks
            services.AddScoped<IAgentHook, MyWeatherAgentHook>();
            //services.AddScoped<IConversationService, MyWeatherConversationHook>();
        }
    }
}
3)新建 Hooks的目录,参考Pizzabot,添加agenthook和 conversationhook
CommonAgentHook
MyWeatherAgentHook
MyWeatherConversationHook
agent是一个智能体,可以决定调用某一个具体的大模型,决定使用什么provider。
conversation是一个会话,也就是一个上下文,是LLM模型都需要的一个参数,用于通过上下文来推理用户的问题。
所以这里的agentHook 是botsharp中用于注册agent和agent行为的 程序,能决定 agent在创建时、加载时等各个事件发生时的一些自定义行为。
本例中没有涉及,但是在实验的时候,通过添加不同的方法,是能够验证,这些事件是能够顺利被触发的。
conversationhook 同理
代码分别是:
using BotSharp.Abstraction.Agents;

namespace MyWeatherPlugin.Hooks
{
    public class CommonAgentHook : AgentHookBase
    {
        public override string SelfId => string.Empty;

        public CommonAgentHook(IServiceProvider services, AgentSettings settings)
            : base(services, settings)
        {
        }

        public override bool OnInstructionLoaded(string template, Dictionary<string, object> dict)
        {
            dict["current_date"] = DateTime.Now.ToString("MM/dd/yyyy");
            dict["current_time"] = DateTime.Now.ToString("hh:mm tt");
            dict["current_weekday"] = DateTime.Now.DayOfWeek;
            return base.OnInstructionLoaded(template, dict);
        }
    }

}
using BotSharp.Abstraction.Agents.Enums;
using BotSharp.Abstraction.Agents;
using BotSharp.Abstraction.Functions.Models;

namespace MyWeatherPlugin.Hooks
{
    public class MyWeatherAgentHook : AgentHookBase
    {
        public override string SelfId => BuiltInAgentId.AIAssistant;

        public MyWeatherAgentHook(IServiceProvider services, AgentSettings settings)
            : base(services, settings)
        {
        }

        public override bool OnInstructionLoaded(string template, Dictionary<string, object> dict)
        {
            return base.OnInstructionLoaded(template, dict);
        }


    }

}
using BotSharp.Abstraction.Conversations.Models;
using BotSharp.Abstraction.Conversations;

namespace MyWeatherPlugin.Hooks
{
    public class MyWeatherConversationHook : ConversationHookBase
    {
        private readonly IServiceProvider _services;
        private readonly IConversationStateService _states;

        public MyWeatherConversationHook(IServiceProvider services,
            IConversationStateService states)
        {
            _services = services;
            _states = states;
        }

        public override async Task OnPostbackMessageReceived(RoleDialogModel message, PostbackMessageModel replyMsg)
        {
            if (replyMsg.FunctionName == "get_my_weather_type")
            {
                // message.StopCompletion = true;
            }
            return;
        }

        public override Task OnTaskCompleted(RoleDialogModel message)
        {
            return base.OnTaskCompleted(message);
        }

#if USE_BOTSHARP
    public override async Task OnResponseGenerated(RoleDialogModel message)
    {
        var agentService = _services.GetRequiredService<IAgentService>();
        var state = _services.GetRequiredService<IConversationStateService>();
        var agent = await agentService.LoadAgent(message.CurrentAgentId);

        if (agent.McpTools.Any(item => item.Functions.Any(x => x.Name == message.FunctionName)))
        {
            var data = JsonDocument.Parse(JsonSerializer.Serialize(message.Data));
            state.SaveStateByArgs(data);
        }

        await base.OnResponseGenerated(message);
    }
#endif
    }

}
4)添加Functions目录, 参考Pizzabot 添加几个function,
这里是本例子的一个重点,这里主要是 通过 function定义,决定一些在本地可以被调用到的自定义行为。这是非常重要的。本例中添加了三个方法:
GetMyWeatherTypeFn
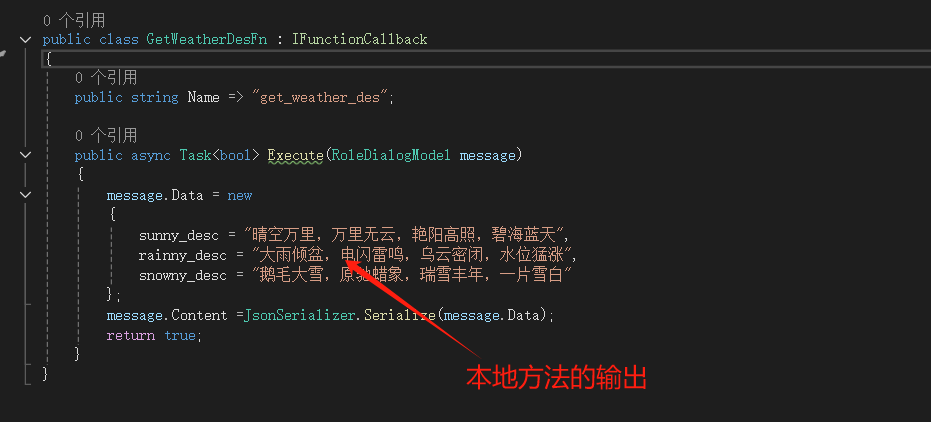
GetWeatherDesFn(这是本例中最后实现调用的方法)
GetWeatherToolFn
方法中的 Execute 方法,决定了最终方法 最终返回给大模型的 文本内容
using BotSharp.Abstraction.Conversations.Models;
using BotSharp.Abstraction.Conversations;
using BotSharp.Abstraction.Messaging.Models.RichContent.Template;
using BotSharp.Abstraction.Messaging.Models.RichContent;
using BotSharp.Abstraction.Messaging;
using System.Text.Json;

namespace MyWeatherPlugin.Functions
{
    public class GetMyWeatherTypeFn : IFunctionCallback
    {
        public string Name => "get_my_weather_type";

        private readonly IServiceProvider _services;
        public GetMyWeatherTypeFn(IServiceProvider services)
        {
            _services = services;
        }

        public async Task<bool> Execute(RoleDialogModel message)
        {
            var states = _services.GetRequiredService<IConversationStateService>();
            var weatherTypes = new List<string>
            {
                "晴天",
                "雨天",
                "雪天"
            };
            message.Content = JsonSerializer.Serialize(weatherTypes);
            message.RichContent = new RichContent<IRichMessage>
            {
                Recipient = new Recipient
                {
                    Id = states.GetConversationId()
                },
                FillPostback = true,
                Message = new ButtonTemplateMessage
                {
                    Text = "Please select a weather type",
                    Buttons = weatherTypes.Select(x => new ElementButton
                    {
                        Type = "text",
                        Title = x,
                        Payload = x
                    }).ToArray()
                }
            };


            return true;
        }
    }

}
using BotSharp.Abstraction.Conversations.Models;
using System.Text.Json;

namespace MyWeatherPlugin.Functions;

public class GetWeatherDesFn : IFunctionCallback
{
    public string Name => "get_weather_des";

    public async Task<bool> Execute(RoleDialogModel message)
    {
        message.Data = new
        {
            sunny_desc = "晴空万里,万里无云,艳阳高照,碧海蓝天",
            rainny_desc = "大雨倾盆,电闪雷鸣,乌云密闭,水位猛涨",
            snowny_desc = "鹅毛大雪,原驰蜡象,瑞雪丰年,一片雪白"
        };
        message.Content =JsonSerializer.Serialize(message.Data);
        return true;
    }
}
using BotSharp.Abstraction.Conversations;
using BotSharp.Abstraction.Conversations.Models;

namespace MyWeatherPlugin.Functions;

public class GetWeatherToolFn : IFunctionCallback
{
    public string Name => "get_weather_tool";

    private readonly IServiceProvider _service;
    public GetWeatherToolFn(IServiceProvider service)
    {
        _service = service;
    }

    public async Task<bool> Execute(RoleDialogModel message)
    {
        message.Content = "The weather date is 2025-04-25";
        var state = _service.GetRequiredService<IConversationStateService>();
        state.SetState("weather_date", "2025-04-25");

        return true;
    }
}
最终 MyWeatherPlugin 的结构如图: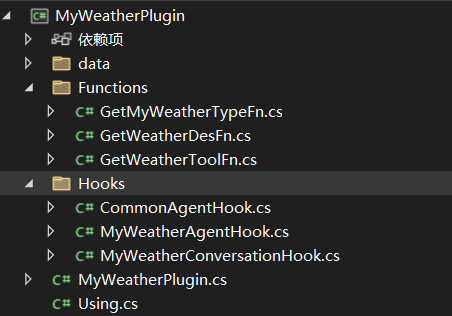
4、WeatherApiDefaultService项目代码编写
因为是非必须的,而且完全参考 Pizzabot中的 defaultservice的,所以这部分就略过了
5、WebAPI MyWeatherAPI 的项目代码编写
看下配置文件: appsettings.json
这是 经过实验,需要保留的一些节点,
保留 jwt节点 是因为botsharp框架中涉及到用户认证
LlmProviders 中保留 本例中用到LLM模型的驱动
PluginLoader 是加载的所有库
注意 填上 自己的 appkey
{
  "Logging": {
    "LogLevel": {
      "Default": "Information",
      "Microsoft.AspNetCore": "Warning"
    }
  },
  "AllowedHosts": "*",
  "AllowedOrigins": [
    "http://localhost:5015",
    "http://0.0.0.0:5015",
    "https://botsharp.scisharpstack.org",
    "https://chat.scisharpstack.org"
  ],

  "Jwt": {
    "Issuer": "botsharp",
    "Audience": "botsharp",
    "Key": "31ba6052aa6f4569901facc3a41fcb4adfd9b46dd00c40af8a753fbdc2b89869"
  },

  "LlmProviders": [

    {
      "Provider": "llama-sharp",
      "Models": [
        {
          "Name": "llama-2-7b-guanaco-qlora.Q2_K.gguf",
          "Type": "chat"
        }
      ]
    },

    {
      "Provider": "deepseek-ai",
      "Models": [
        {
          "Name": "deepseek-chat",
          "ApiKey": "xxxxx",
          "Endpoint": "https://api.deepseek.com/v1/",
          "Type": "chat",
          "PromptCost": 0.0015,
          "CompletionCost": 0.002
        }
      ]
    }
  ],

  "Router": {
  },

  "Evaluator": {
    "AgentId": "dfd9b46d-d00c-40af-8a75-3fbdc2b89869"
  },

  "Agent": {
    "DataDir": "agents",
    "TemplateFormat": "liquid",
    "HostAgentId": "01fcc3e5-0af7-49e6-ad7a-a760bd12dc4d",
    "EnableTranslator": false,
    "LlmConfig": {
      //"Provider": "llama-sharp",
      //"Model": "llama-2-7b-guanaco-qlora.Q2_K.gguf"
      "Provider": "deepseek-ai",
      "Model": "deepseek-chat"
    }
  },

  "MCP": {
    "Enabled": false,
    "McpClientOptions": {
      "ClientInfo": {
        "Name": "SimpleToolsBotsharp",
        "Version": "1.0.0"
      }
    },
    "McpServerConfigs": [
      {
        "Id": "WeatherServer",
        "Name": "WeatherServer",
        "TransportType": "sse",
        "TransportOptions": [],
        "Location": "http://localhost:58905/sse"
      }
    ]
  },

  "Conversation": {
    "DataDir": "conversations",
    "ShowVerboseLog": false,
    "EnableLlmCompletionLog": false,
    "EnableExecutionLog": true,
    "EnableContentLog": true,
    "EnableStateLog": true,
    "EnableTranslationMemory": false,
    "CleanSetting": {
      "Enable": true,
      "BatchSize": 50,
      "MessageLimit": 2,
      "BufferHours": 12,
      "ExcludeAgentIds": []
    },
    "RateLimit": {
      "MaxConversationPerDay": 100,
      "MaxInputLengthPerRequest": 256,
      "MinTimeSecondsBetweenMessages": 2
    }
  },

  "SideCar": {
    "Conversation": {
      "Provider": "botsharp"
    }
  },


  "ChatHub": {
    "EventDispatchBy": "group"
  },


  "LlamaSharp": {
    "Interactive": true,
    "ModelDir": "F:/models",
    "DefaultModel": "llama-2-7b-guanaco-qlora.Q2_K.gguf",
    "MaxContextLength": 1024,
    "NumberOfGpuLayer": 20
  },

  "AzureOpenAi": {
  },


  "RoutingSpeeder": {
  },


  "Database": {
    "Default": "FileRepository",
    "TablePrefix": "BotSharp",
    "BotSharpMongoDb": "",
    "Redis": "botsharp.redis.cache.windows.net:6380,password=,ssl=True,abortConnect=False",
    "FileRepository": "data",
    "Assemblies": [ "BotSharp.Core" ]
  },


  "Interpreter": {
    "Python": {
      "PythonDLL": "C:/Python313/python313.dll"
    }
  },

  "PluginLoader": {
    "Assemblies": [
      "BotSharp.Core",
      "BotSharp.Core.SideCar",
      "BotSharp.Core.Crontab",
      "BotSharp.Logger",
      "BotSharp.Plugin.OpenAI",
      "BotSharp.Plugin.AzureOpenAI",
      "BotSharp.Plugin.DeepSeekAI",
      "BotSharp.Plugin.MetaMessenger",
      "BotSharp.Plugin.ChatHub",
      "MyWeatherPlugin",
      "BotSharp.Plugin.LLamaSharp"
    ],
    "ExcludedFunctions": [
      "McpToolAdapter"
    ]
  }
}
progam.cs 是启动程序,代码如下
using BotSharp.Abstraction.Conversations;
using BotSharp.Abstraction.Messaging.JsonConverters;
using BotSharp.Abstraction.Users;
using BotSharp.Core;
using BotSharp.Core.Agents;
using BotSharp.Core.MCP;
using BotSharp.Logger;
using BotSharp.OpenAPI;
using BotSharp.Plugin.ChatHub;
using MyWeatherPlugin.Hooks;

var builder = WebApplication.CreateBuilder(args);

// Add services to the container.

builder.Services.AddBotSharpCore(builder.Configuration, options =>
{
    options.JsonSerializerOptions.Converters.Add(new RichContentJsonConverter());
    options.JsonSerializerOptions.Converters.Add(new TemplateMessageJsonConverter());
}).AddBotSharpOpenAPI(builder.Configuration,
builder.Configuration.GetSection("AllowedOrigins").Get<string[]>() ?? new[]
    {
        "http://0.0.0.0:5015",
        "https://botsharp.scisharpstack.org",
        "https://chat.scisharpstack.org"
    }, builder.Environment, true)
 .AddBotSharpLogger(builder.Configuration);

builder.Services.AddControllers();

builder.AddServiceDefaults();
builder.Services.AddSignalR();
var app = builder.Build();

// Configure the HTTP request pipeline.
app.MapHub<SignalRHub>("/chatHub");
app.UseMiddleware<WebSocketsMiddleware>();

app.UseBotSharp()
    .UseBotSharpOpenAPI(app.Environment);

//app.MapControllers();

app.Run();
6、data文件夹中声明agent 、conversation、functions
这是这个例子中 最重要的部分,
1、程序运行
2、通过 官方文档:https://botsharp.verdure-hiro.cn/guide/quick-start/get-started
中的 postman 链接 如下: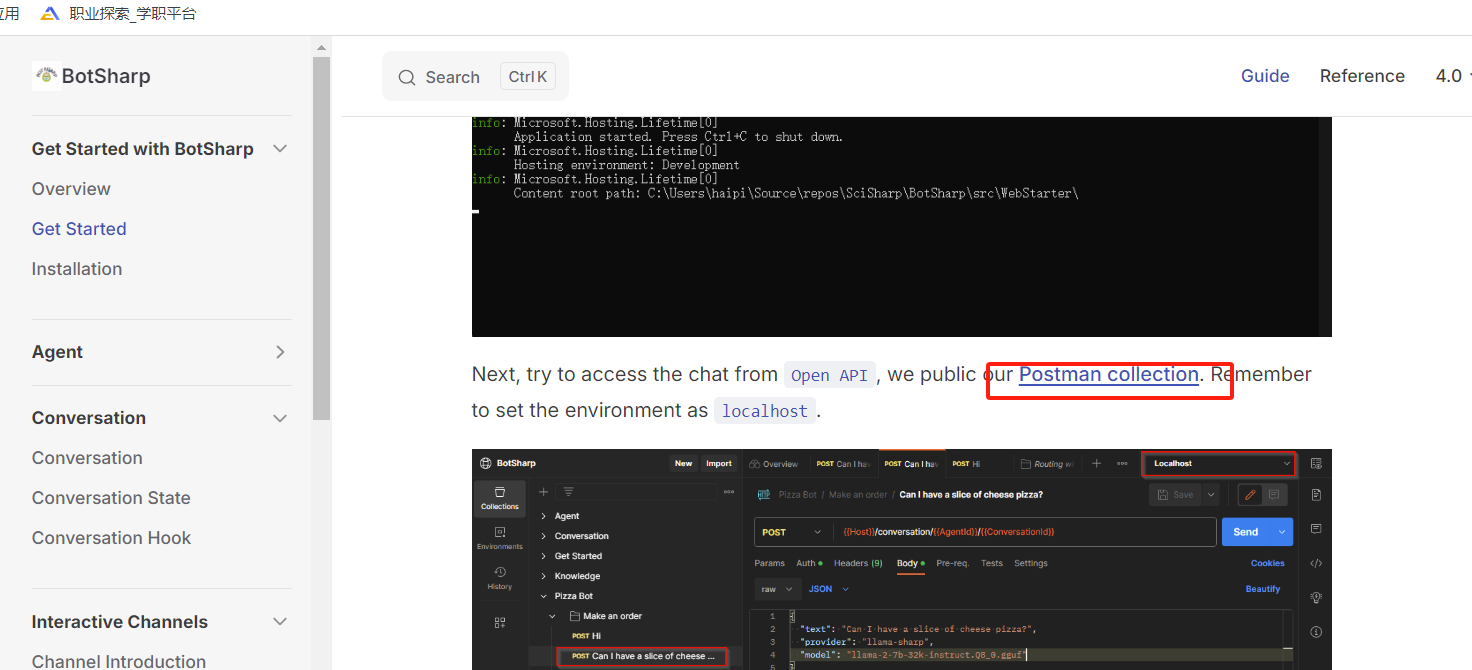
调整成自己的 Host等参数
3)依次 执行
New User Account
Get Access Token
Create Agent
的操作 ,如图: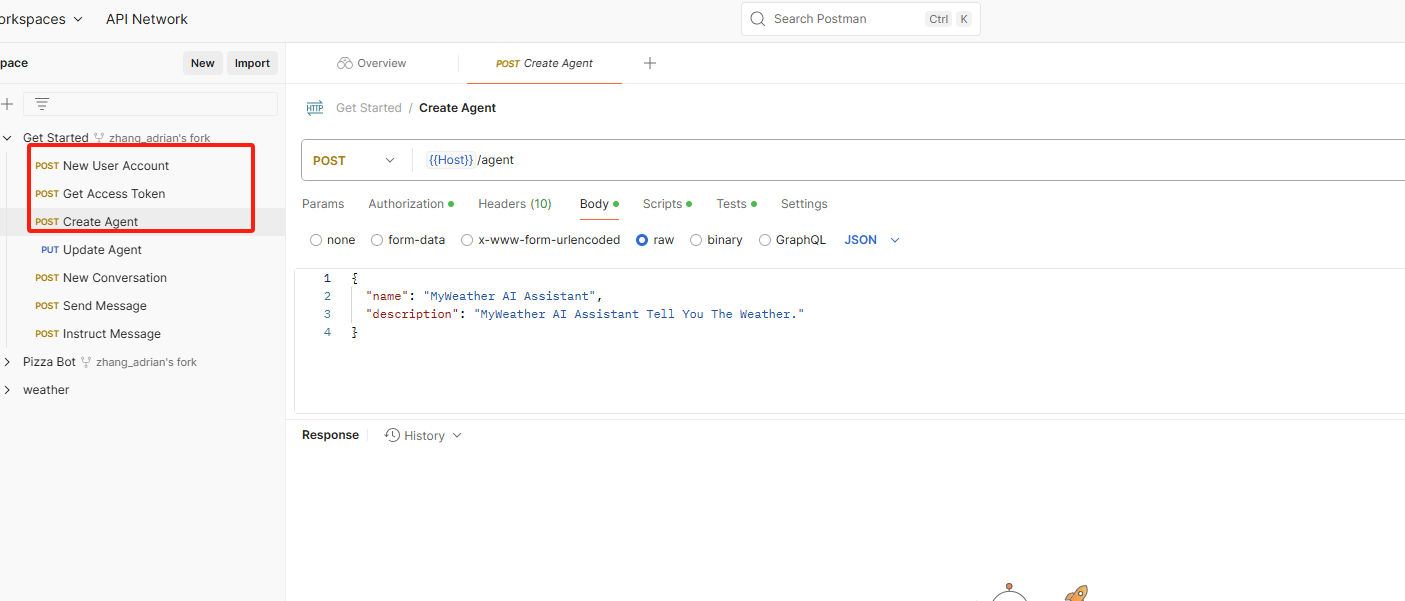
4)这时候要查找下 创建的 agent目录在哪里,应该在 webAPI的bin目录下
\bin\Debug\net9.0\data\agents
我把这个目录 拷贝到 webAPI的根目录 以及 Myweatherplugin项目的根目录下了
注意每次修改的时候 我都同步拷贝了。(实验是有效的,可能不需要,但是这么做是不出错的)
5)假设创建的agentId是本例的 01fcc3e5-0af7-49e6-ad7a-a760bd12dc4d
注意要修改 appsettings.json 中的 agent节点,修改 MyWeatherPlugin 项目中的 MyWeatherPlugin 类中 加载的 agentid数组
然后拷贝 webAPI目录下的 \MyWeatherAPI(解决方案目录)\MyWeatherAPI(webAPI项目目录)\bin\Debug\net9.0\data\agents\01fcc3e5-0af7-49e6-ad7a-a760bd12dc4d
到
\MyWeatherAPI(解决方案目录)\MyWeatherAPI (webAPI项目目录)\data\agents 目录下
同时拷贝到 \MyWeatherAPI\MyWeatherPlugin\data\agents 目录下
以上步骤 可能不是必须的,但是这么做 不出错。(注意后面改了之后 也同步拷贝下)
6)选择修改 MyWeatherPlugin\data\agents\01fcc3e5-0af7-49e6-ad7a-a760bd12dc4d下的配置信息
结构如图: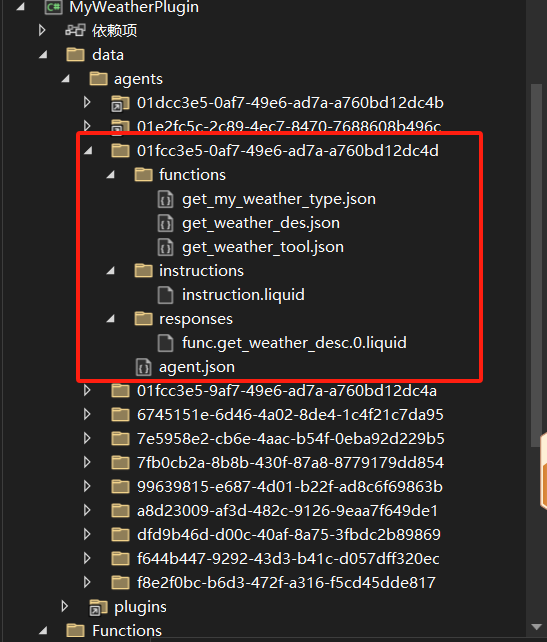
改动信息 如下:
functions/get_my_weather_type.json
{
  "name": "get_my_weather_type",
  "description": "获取所有的天气类型,您可以选择后返回响应的描述",
  "parameters": {
    "type": "object",
    "properties": {},
    "required": []
  }
}
functions/get_weather_des.json
{
  "name": "get_weather_des",
  "description": "用户选择了天气后,获取关于天气的描述",
  "parameters": {
    "type": "object",
    "properties": {
      "weather_type": {
        "type": "string",
        "description": "The type of the weather."
      }
    },
    "required": [ "weather_type" ]
  }
}
functions/get_weather_tool.json
{
  "name": "get_weather_tool",
  "description": "提供一个适合天气出行的外带工具.",
  "parameters": {
    "type": "object",
    "properties": {
      "weather_type": {
        "type": "string",
        "description": "天气类型."
      },
      "weather_desc": {
        "type": "string",
        "description": "天气描述."
      }
    },
    "required": [ "weather_type", "weather_desc" ]
  }
}
instructions/instructions.liquid
你是一个关于天气资讯的小助手,你可以根据用户的天气问题,回复天气的描述和不同的天气要带什么工具出门。

根据一下步骤进行操作:
1: 首先回答下用户今天是 {{current_date}},时间是 {{current_time}}.
2: 如果用户一些需求,你需要询问用户是否需要相关帮助。
3: 如果的问题中包含了关键词 {{weather_type}},你就执行函数 get_my_weather_type 。
response/func.get_weather_des.0.liquid
{% assign weather_type = weather_type | downcase %}
{% if weather_type contains "晴天" -%}
    关于 {{weather_type}} 的描述是 is ${{ sunny_desc }}.您觉得满意吗?
{%- elsif weather_type contains "雨天" -%}
    关于 {{weather_type}} 的描述是 is ${{ rainny_desc }}.您觉得满意吗??
{%- elsif weather_type contains "雪天" -%}
    关于 {{weather_type}} 的描述是 is ${{ snowny_desc }}.您觉得满意吗??
{%- else -%}
    我们没有 {{weather_type}} 您天气的描述
{%- endif %}
{% if quantity == nil -%}
    How many slices would you like to order?
{%- endif %}
agent.json ---- 这个最重要,定义了 需要大模型回调的函数声明
{
  "id": "01fcc3e5-0af7-49e6-ad7a-a760bd12dc4d",
  "name": "Weather About",
  "description": "weather.Talk",
  "createdDateTime": "2024-05-07T10:00:00Z",
  "updatedDateTime": "2024-05-07T10:00:00Z",
  "disabled": false,
  "isPublic": true,
  "llmConfig": {
    "provider": "deepseek-ai",
    "model": "deepseek-chat"
  },
  "profiles": [ "weather" ],
  "functions": [
    {
      "name": "get_my_weather_type",
      "description": "获取所有的天气类型,您可以选择后返回响应的描述",
      "parameters": {
        "type": "object",
        "properties": {},
        "required": []
      }
    },
      {
        "name": "get_weather_des",
        "description": "用户选择了天气后,获取关于天气的描述",
        "parameters": {
          "type": "object",
          "properties": {
            "weather_type": {
              "type": "string",
              "description": "The type of the weather."
            }
          },
          "required": [ "weather_type" ]
        }
      },
    {
      "name": "get_weather_tool",
      "description": "提供一个适合天气出行的外带工具.",
      "parameters": {
        "type": "object",
        "properties": {
          "weather_type": {
            "type": "string",
            "description": "天气类型."
          },
          "weather_desc": {
            "type": "string",
            "description": "天气描述."
          }
        },
        "required": [ "weather_type", "weather_desc" ]
      }
    }
  ],
  "labels": [ "about" ]
}
其他基本不再重要了。
三、运行程序 进行测试
刚刚 postman已经执行了 createagent 操作了。
继续执行 接下来的 New Conversation 和 sendMessage 测试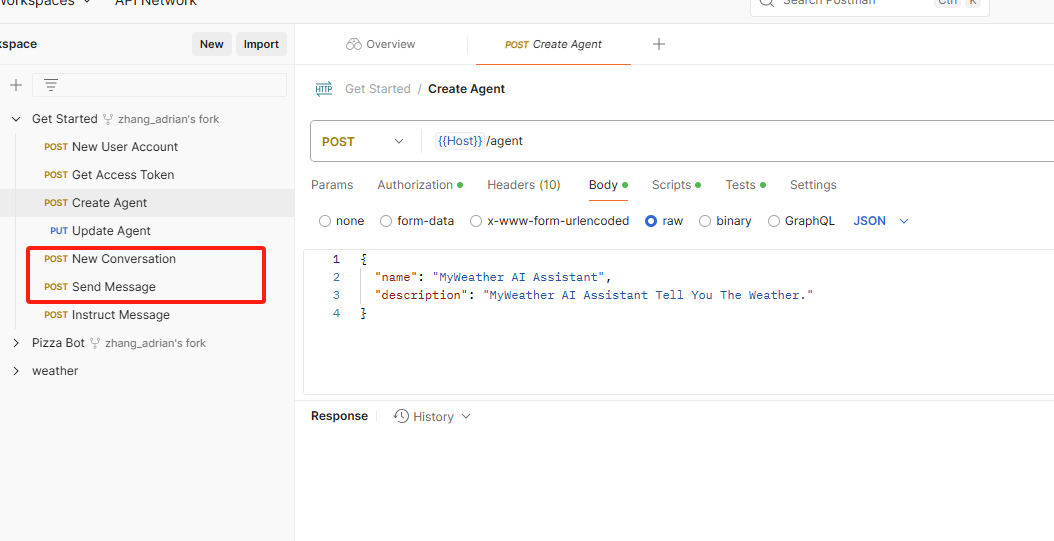
执行结果如图: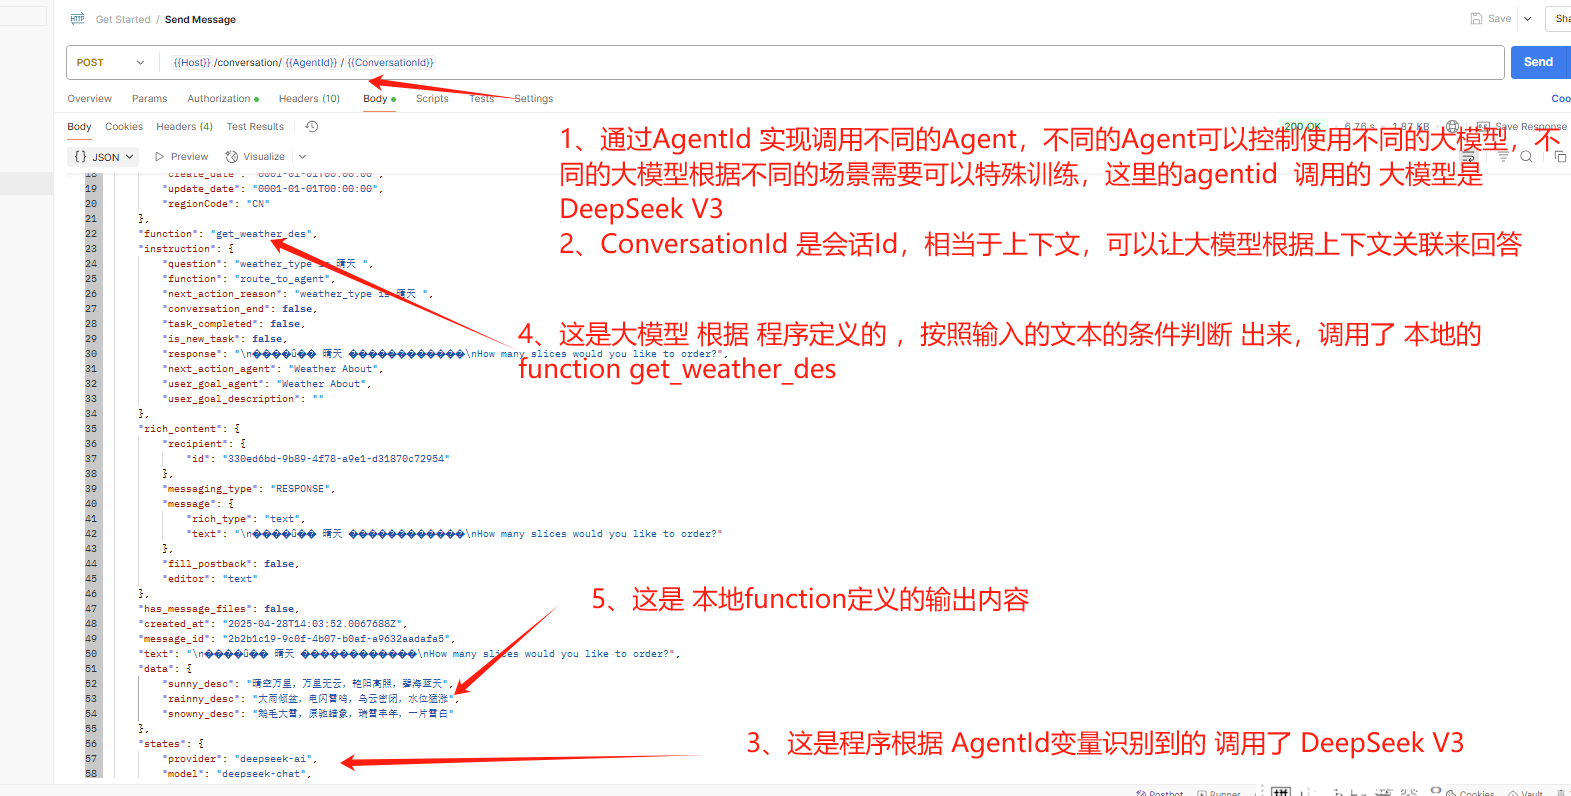

四、总结
1、实现了 通过 agent 控制调用不同的 大模型。
2、通过 conversation 控制 不同的 会话上下文,相当于session,
3、通过输入内容,控制了 让 大模型来调用本地的函数,输出准确的结果。

欢迎加入DeepSeek 技术社区。在这里,你可以找到志同道合的朋友,共同探索AI技术的奥秘。
更多推荐


 13
13 0
0- 0


 已为社区贡献1条内容

所有评论(0)