使用Dify将AI机器人嵌入到你的前端页面中及chrome的扩展应用
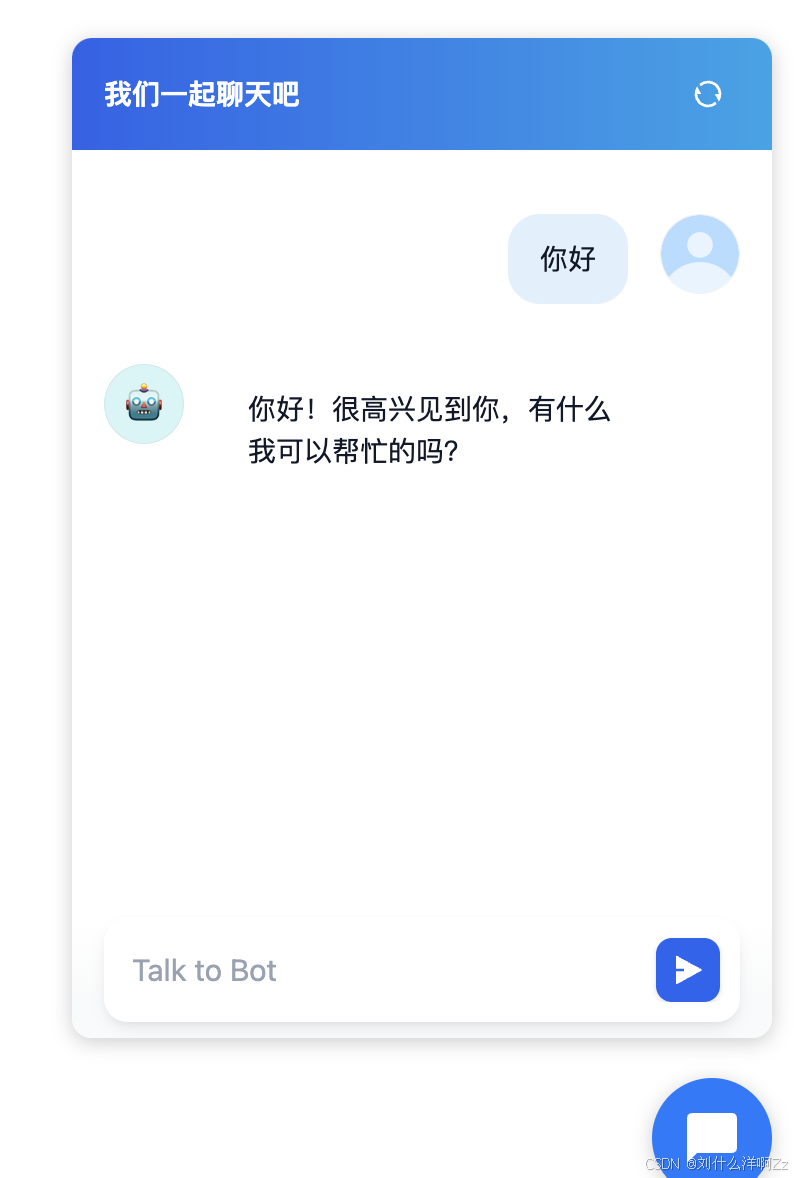
Dify使开发AI应用变得简单,毕竟Dify是封装了调用大模型的技术栈,肯定是有局限性,但是现有的功能也可以实现不少有用的场景啦!这个界面是使用dify配置的一个“聊天助手”的应用,助手使用的是deepseek-r1的大模型,并将这个机器人嵌入了html中。写一个html,嵌入iframe代码,这里加了点样式(ps:代码我是用cursor生成的!这时候你就有一个网页版本的聊天机器人了,新打开一个网
目录
1 博主有话说
那博主话不多说,先展示一下成果!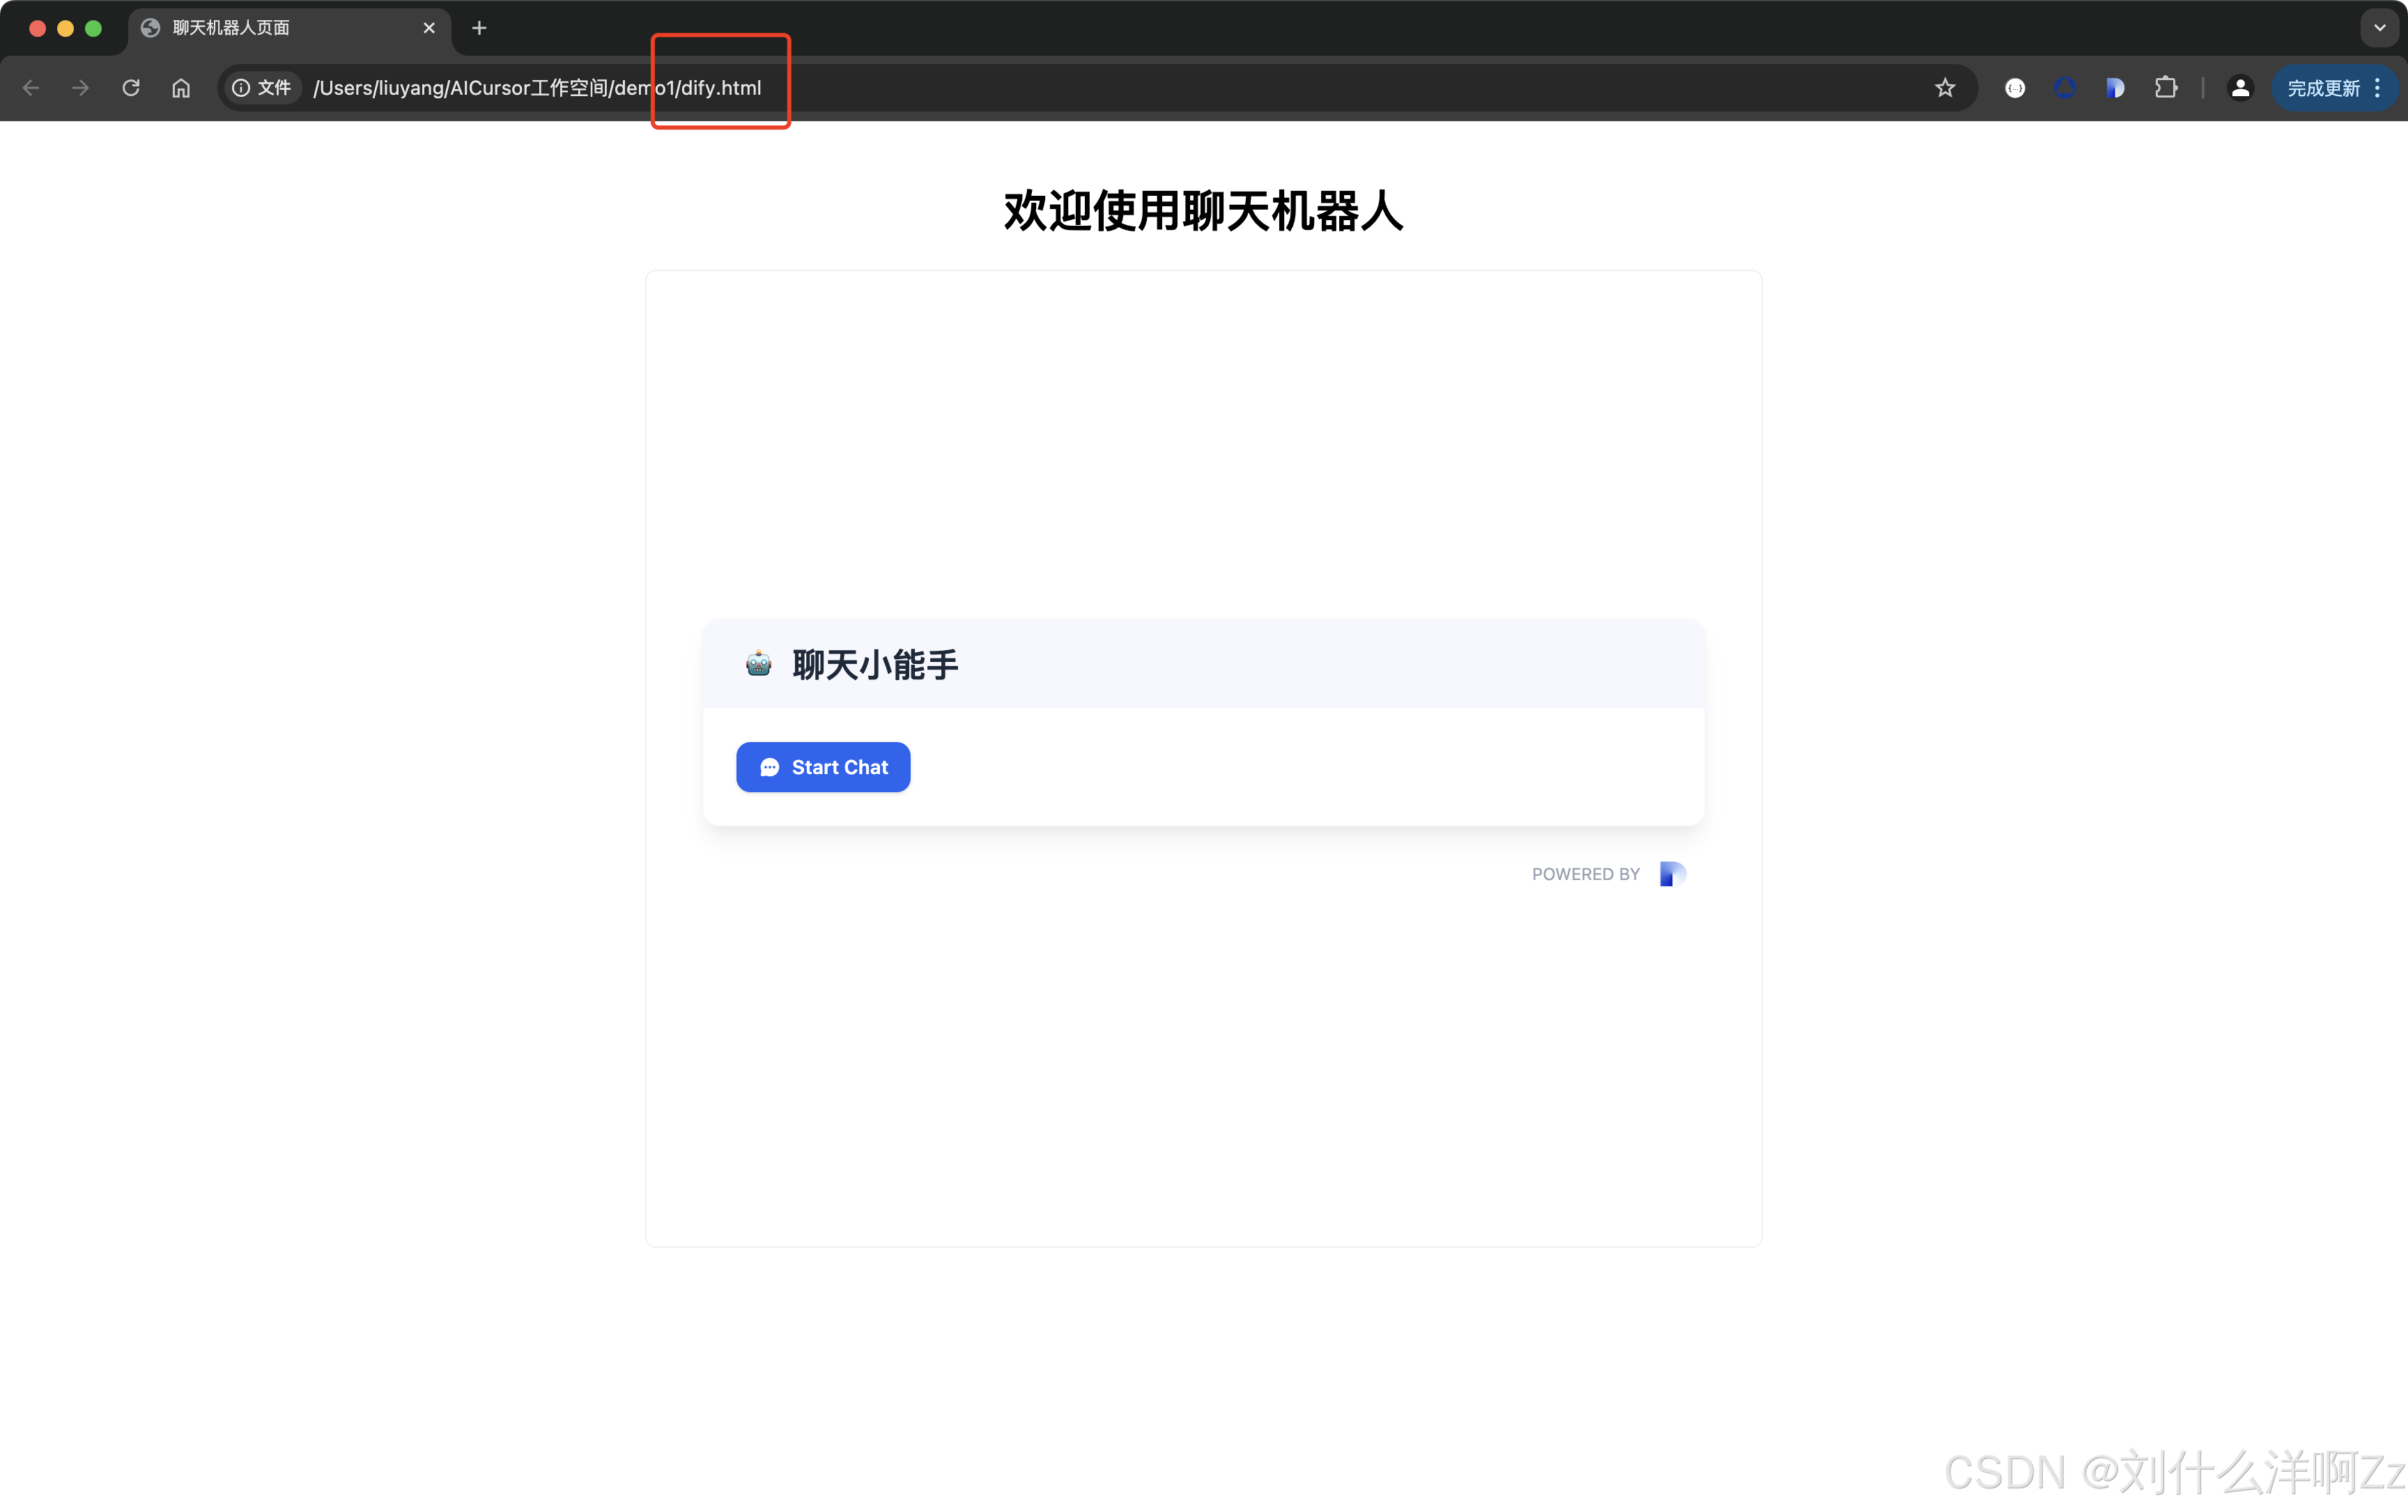

这个界面是使用dify配置的一个“聊天助手”的应用,助手使用的是deepseek-r1的大模型,并将这个机器人嵌入了html中。
那么是如何实现的呢??请看下文!
2 前提环境
这里只展示一下我的环境,你只要有下面的工具就行
- 电脑:芯片->Apple M1 Max 内存->32G
- 本地安装的deepseek-r1 7b(ps:也可以选择远程的大模型服务器)
- 本地安装的dify
如果你还没有安装,可以参考我的另一篇文章:Mac下Deepseek及Dify的本地搭建
3 Dify创建个聊天助手应用
进入到dify的主页面
创建个聊天助手的应用

点击创建
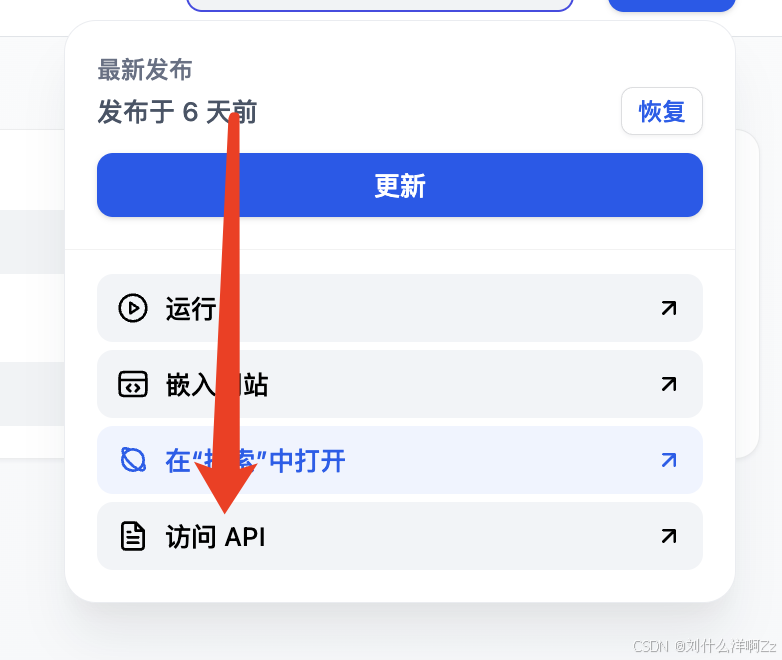
此时我们就获取了一个聊天助手了,点击右上角的 发布+更新 保存到数据库中
4 将AI聊天机器人嵌入到html中
4.1 以iframe方式嵌入页面
点击右上角的 发布+嵌入网站
会自动为我们生成代码,用于嵌入到自己的网页中
前两个是iframe和js方式嵌入到用户的业务代码里,最后一个是嵌入到chrome的扩展应用中,作为插件使用
写一个html,嵌入iframe代码,这里加了点样式(ps:代码我是用cursor生成的!!方便且高效!!!😆)
<!DOCTYPE html>
<html lang="zh">
<head>
    <meta charset="UTF-8">
    <meta name="viewport" content="width=device-width, initial-scale=1.0">
    <title>聊天机器人页面</title>
    <style>
        /* 设置页面基本样式 */
        body {
            margin: 0;
            padding: 20px;
            font-family: Arial, sans-serif;
            text-align: center;  /* 添加这行使页面内容居中 */
        }

        /* 设置标题样式 */
        h1 {
            margin-bottom: 20px;  /* 添加一些底部间距 */
        }

        /* 设置聊天机器人容器样式 */
        .chatbot-container {
            width: 800px;
            height: 700px;
            margin: 0 auto;
            border: 1px solid #eee;
            border-radius: 8px;
            overflow: hidden;
        }
    </style>
</head>
<body>
    <h1>欢迎使用聊天机器人</h1>

    <!-- 聊天机器人容器 -->
    <div class="chatbot-container">
        <iframe
            src="http://localhost/chatbot/GM63ZTSrVPSufNzi"
            style="width: 100%; height: 100%; min-height: 700px"
            frameborder="0"
            allow="microphone">
        </iframe>
    </div>
</body>
</html>
接下来就是展示了,使用谷歌打开你的html

是不是还是挺便捷的!
4.2 以JS方式嵌入气泡
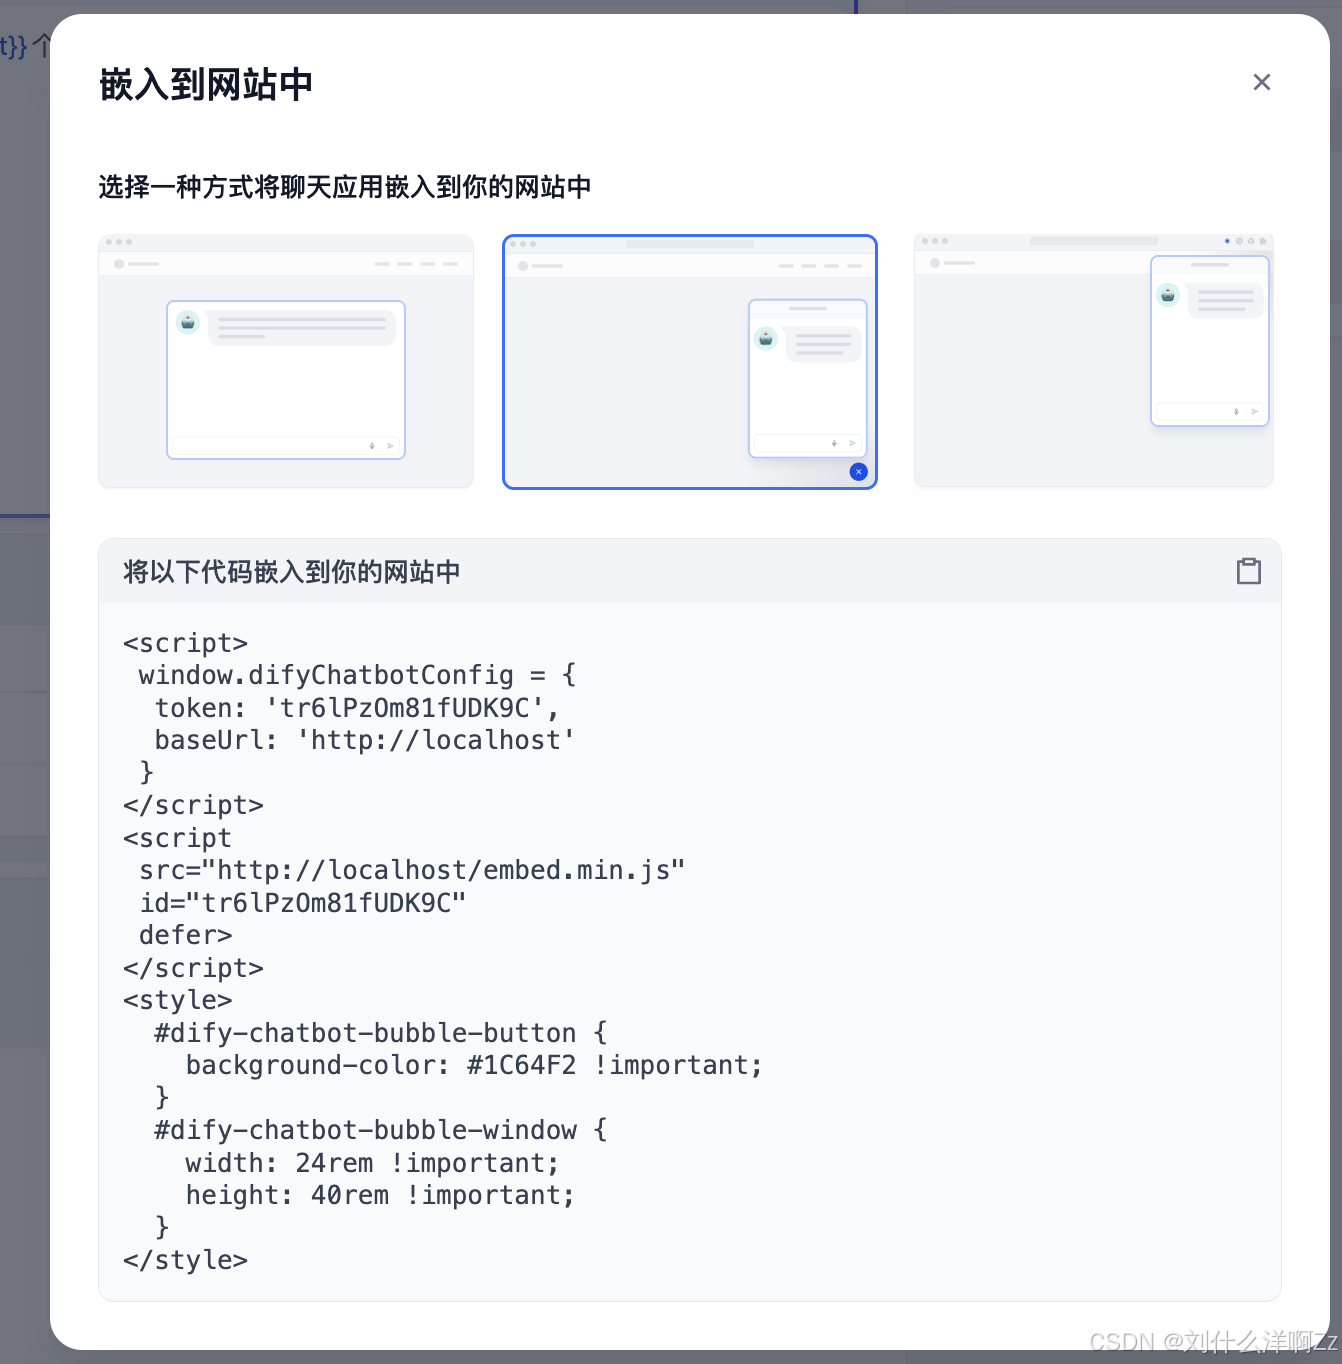

当我们选择第二种方式嵌入前端代码寻思自己可以做一点样式,但是报错404,这个报错官网解释就是会话不存在!!不过也没有查到解决方案!!但是归根到底就是展示机器人,我们只要知道机器人的地址就好了,根据第三个方式可以拿到机器人的地址!!我们根据这个地址写个气泡!!!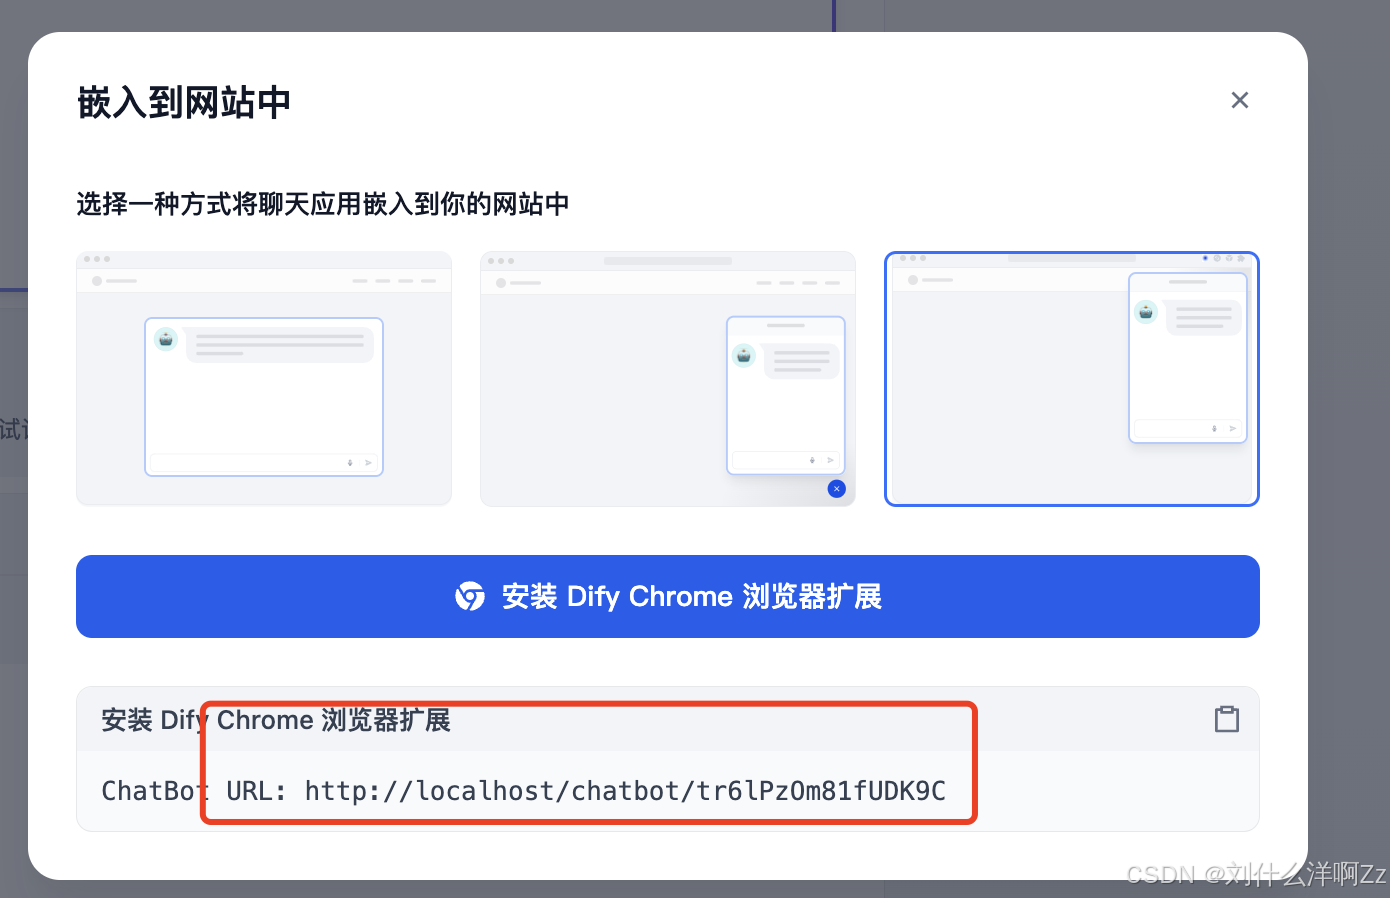
chatbot/后面跟的就是应用的唯一id,每个应用都不一样!!!!
我们只要拿到这个地址就好啦!!!
就比如页面的:
http://localhost/chatbot/tr6lPzOm81fUDK9C
我们来写一个简单的html页面嵌入气泡
<!DOCTYPE html>
<html lang="zh">
<head>
    <meta charset="UTF-8">
    <meta name="viewport" content="width=device-width, initial-scale=1.0">
    <title>聊天机器人气泡</title>
    <style>
        .chat-bubble {
            position: fixed;
            bottom: 20px;
            right: 20px;
            width: 60px;
            height: 60px;
            background-color: #007bff;
            border-radius: 50%;
            display: flex;
            justify-content: center;
            align-items: center;
            cursor: pointer;
            box-shadow: 0 2px 10px rgba(0,0,0,0.2);
            z-index: 1000;
        }

        .chat-bubble img {
            width: 30px;
            height: 30px;
        }

        .chat-container {
            position: fixed;
            bottom: 100px;
            right: 20px;
            width: 350px;
            height: 500px;
            background: white;
            border-radius: 10px;
            box-shadow: 0 2px 10px rgba(0,0,0,0.2);
            display: none;
            z-index: 999;
        }

        .chat-iframe {
            width: 100%;
            height: 100%;
            border: none;
            border-radius: 10px;
        }
    </style>
</head>
<body>
    <div class="chat-bubble" onclick="toggleChat()">
        <img src="data:image/svg+xml,%3Csvg xmlns='http://www.w3.org/2000/svg' viewBox='0 0 24 24' fill='white'%3E%3Cpath d='M20 2H4c-1.1 0-2 .9-2 2v18l4-4h14c1.1 0 2-.9 2-2V4c0-1.1-.9-2-2-2z'/%3E%3C/svg%3E" alt="聊天">
    </div>

    <div class="chat-container" id="chatContainer">
        <iframe src="http://localhost/chatbot/tr6lPzOm81fUDK9C" class="chat-iframe"></iframe>
    </div>

    <script>
        function toggleChat() {
            const container = document.getElementById('chatContainer');
            if (container.style.display === 'none' || container.style.display === '') {
                container.style.display = 'block';
            } else {
                container.style.display = 'none';
            }
        }
    </script>
</body>
</html>
展示!
如果需要调整和机器人的交互方式,可以使用api的方式
5 将AI聊天机器人设置为chrome的扩展应用
点击右上角的 发布+嵌入网站
点击安装 安装Dify Chrome浏览器扩展 跳转到安装Dify扩展程序的界面,安装!
我这里安装完了
打开扩展程序,将url粘贴进来,点击save

这时候你就有一个网页版本的聊天机器人了,新打开一个网页,一定是要有数据的网页,空白页不展示
我这里访问了deepseek了
这里就有机器人了!!!点它!!!和它聊天!!!


6 博主增语
Dify使开发AI应用变得简单,毕竟Dify是封装了调用大模型的技术栈,肯定是有局限性,但是现有的功能也可以实现不少有用的场景啦!!!可以参考Dify的探索模块,里面有大佬们配置的模板!!

欢迎加入DeepSeek 技术社区。在这里,你可以找到志同道合的朋友,共同探索AI技术的奥秘。
更多推荐


 46
46 0
0- 0


 已为社区贡献1条内容

所有评论(0)