【LangGraph入门 1】第一个LangGraph-HelloWorld
·
本文介绍了LangGraph框架的基本概念和使用方法。核心组件包括节点(Node)和图(Graph),节点代表具体功能操作,图定义工作流程和节点连接关系。文章详细讲解了执行步骤:
1)定义State消息格式;
2)定义节点函数;
3)构建图结构;
4)可视化查看;
5)运行并输出结果
最后提供了1个完整Demo示例。文中配有代码示例和流程图,帮助读者理解LangGraph的实际应用。
文章目录
一、核心组件
1.1 Node(节点)
- 节点是图中的基本单元,代表一个具体的功能或操作
- 每个节点负责完成一项特定任务(如查询数据、生成文本、做决策等)
- 节点接收输入,处理后产生输出
- 可以是简单的函数、API调用、LLM调用或其他复杂操作
1.2 Graph图
- 图是及其连接关系的结合,代表整个工作流程
- 定义了信息如何从一个节点流向另一个节点
- 可以是线性的,或者包含分支、循环的复杂结构
- 控制整个应用的执行流程和逻辑
二、常见的基本控制
2.1 基本控制
- 串行控制
- 分支控制
- 条件分支与循环
- 图的可视化
2.2 精细控制
- 图的运行时配置
- map-reduce
三、执行步骤
3.1 定义State
确定节点间通讯的消息格式
- TypedDict 属于python标准库typing模块的一部分,仅提供静态类型检查,运行时不执行验证
- Pydantic 第三方库,需要单独安装,提供运行时数据验证和序列化功能
from langchain_core.messages import AnyMessage
from typing_extensions import TypedDict

# 定义节点间通讯的消息格式
class State(TypedDict):
    message: list(AnyMessage)
    extra_field: int
3.2 定义节点
一般而言,节点就是一个函数,接收State值得传入
def node(state:State):
    message = state['message']
    new_message = AIMessage("你好,我是节点1")
    return {
        'message': message + [new_message],
        "extra_field": 1
    }
3.3 构建图
包含节点,使用state通信
graph = StateGraph(State)
graph.add_node("node", node)

graph.add_edge(START, "node")
graph.add_edge("node", END)
graph_build = graph.compile()
print("hello world")
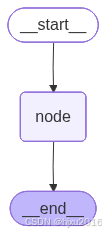
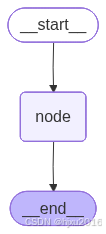
3.4 查看节点与图结构
graph_image = graph_build.get_graph().draw_mermaid_png()
im = Image(graph_image)
with open('saved_image1.png', 'wb') as f:
    f.write(im.data)
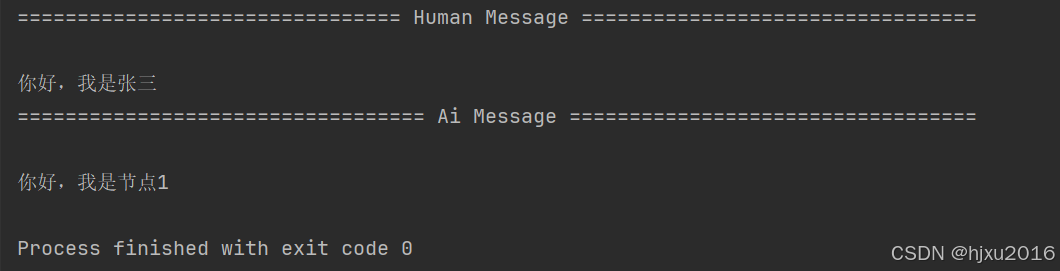
3.5 查看输出
reponse = graph_build.invoke({
"message":[HumanMessage("你好,我是张三")]
})
#
print(reponse)
# 5. 使用pretty_print来格式化显示
for message in reponse["message"]:
message.pretty_print()
四、Demo-HelloWorld
from langchain_core.messages import AnyMessage, AIMessage
from typing_extensions import TypedDict
from langgraph.graph import StateGraph, START, END
from IPython.display import display, Image
from langchain_core.messages import HumanMessage

# 1. 定义state,确定节点间通讯的消息格式
class State(TypedDict):
    message: list[AnyMessage]
    extra_field: int

# 2. 定义节点,一般而言,节点就是一个函数,接收State值的传入

def node(state:State):
    message = state['message']
    new_message = AIMessage("你好,我是节点1")
    return {
        'message': message + [new_message],
        "extra_field": 1
    }

# 3. 构建图,包含一个节点,使用state通信

graph = StateGraph(State)
graph.add_node("node", node)

graph.add_edge(START, "node")
graph.add_edge("node", END)
graph_build = graph.compile()
print("hello world")

# 4. 查看节点与图结构

graph_image = graph_build.get_graph().draw_mermaid_png()
im = Image(graph_image)
with open('saved_image1.png', 'wb') as f:
    f.write(im.data)

reponse = graph_build.invoke({
    "message":[HumanMessage("你好,我是张三")]
})
print(reponse)

# 5. 使用pretty_print来格式化显示

for message in reponse["message"]:
    message.pretty_print()

欢迎加入DeepSeek 技术社区。在这里,你可以找到志同道合的朋友,共同探索AI技术的奥秘。
更多推荐
 5
5 0
0- 0


 已为社区贡献2条内容

所有评论(0)