从零搭建本地大模型Agent:Ollama + FastAPI 实战指南
引言
随着AI技术的爆发,云端大模型API的调用成本不断攀升,同时数据隐私问题也日益受到关注。越来越多的开发者开始将目光投向本地化部署方案。今天,我将手把手教你如何利用 Ollama + FastAPI,在本地搭建一个具备Agent能力的AI助手,让它能够自主调用工具、执行任务,彻底告别云端依赖。
Ollama 是一款极简的本地大模型管理工具,它封装了复杂的模型下载、GPU加速和推理过程,让开发者只需一条命令就能在本地运行Llama、Qwen、DeepSeek等主流模型。FastAPI 则是构建高性能API的利器,可以帮助我们将模型能力快速封装成REST服务。二者结合,就能打造一个完全本地化、可扩展、具备Agent能力的AI应用系统。
为什么需要Agent?
普通的大模型只能被动回答用户问题,而Agent(智能体)能够自主判断用户意图、调用外部工具、执行多步骤任务。例如:“帮我在北京订一间今晚的酒店” → Agent自动搜索酒店、比较价格、完成预订。
2026年4月最新更新:Ollama v0.21.0已正式发布,新增Hermes Agent联动、Copilot CLI集成和多项性能修复,本地Agent体验大幅提升。v0.18.3版本更是实现了VS Code原生集成,一行命令即可在IDE中调用本地模型。
目录
一、环境搭建与Ollama部署
1.1 安装Ollama
访问 Ollama官网 下载对应操作系统的安装包,双击安装即可。
# Windows: 双击 OllamaSetup.exe 安装
# macOS: brew install ollama
# Linux: curl https://ollama.com/install.sh | sh
验证安装:
ollama --version
1.2 路径迁移(可选,推荐)
Ollama默认安装在C盘(Windows),模型也会存储在C盘。如果C盘空间紧张,建议迁移到其他盘符。
- 打开任务管理器,结束Ollama进程
- 将
C:\Users\用户名\.ollama整个文件夹剪切到目标路径,如D:\AIWorld\.ollama - 新增系统环境变量
OLLAMA_MODELS,变量值设为D:\AIWorld\.ollama\models - 重新启动Ollama
💡 小提示:迁移后首次启动会重新加载已有模型,无需重新下载。
二、模型下载与基础对话
2.1 拉取模型
Ollama官方模型库支持Qwen、DeepSeek、Llama、Mistral等主流模型。本文以轻量高效的 Qwen2.5:7B 为例。
# 拉取模型(约4GB,取决于网速)
ollama pull qwen2.5:7b

# 查看已下载的模型列表
ollama list

# 直接运行对话
ollama run qwen2.5:7b
2.2 测试对话
运行 ollama run qwen2.5:7b 后,可以直接在终端中与模型对话,输入 exit 退出。
📸 截图示例:
(此处插入终端对话截图)
模型正常运行后的对话界面,输入问题模型会生成回复
三、FastAPI封装REST接口
3.1 安装依赖
pip install fastapi uvicorn requests pydantic
3.2 基础API封装代码
创建 main.py,编写最简API接口:
import requests
from fastapi import FastAPI
from pydantic import BaseModel

app = FastAPI(title="本地大模型API")

class ChatRequest(BaseModel):
    prompt: str
    model: str = "qwen2.5:7b"
    stream: bool = False

@app.post("/chat")
def chat(request: ChatRequest):
    """对话接口"""
    url = "http://localhost:11434/api/generate"
    data = {
        "model": request.model,
        "prompt": request.prompt,
        "stream": request.stream
    }
    response = requests.post(url, json=data)
    if response.status_code == 200:
        return {"response": response.json()["response"]}
    else:
        return {"error": f"请求失败: {response.text}"}
3.3 启动服务
uvicorn main:app --host 0.0.0.0 --port 8000 --reload
访问 http://localhost:8000/docs 即可看到Swagger交互式文档,在线测试API。
📸 截图示例:
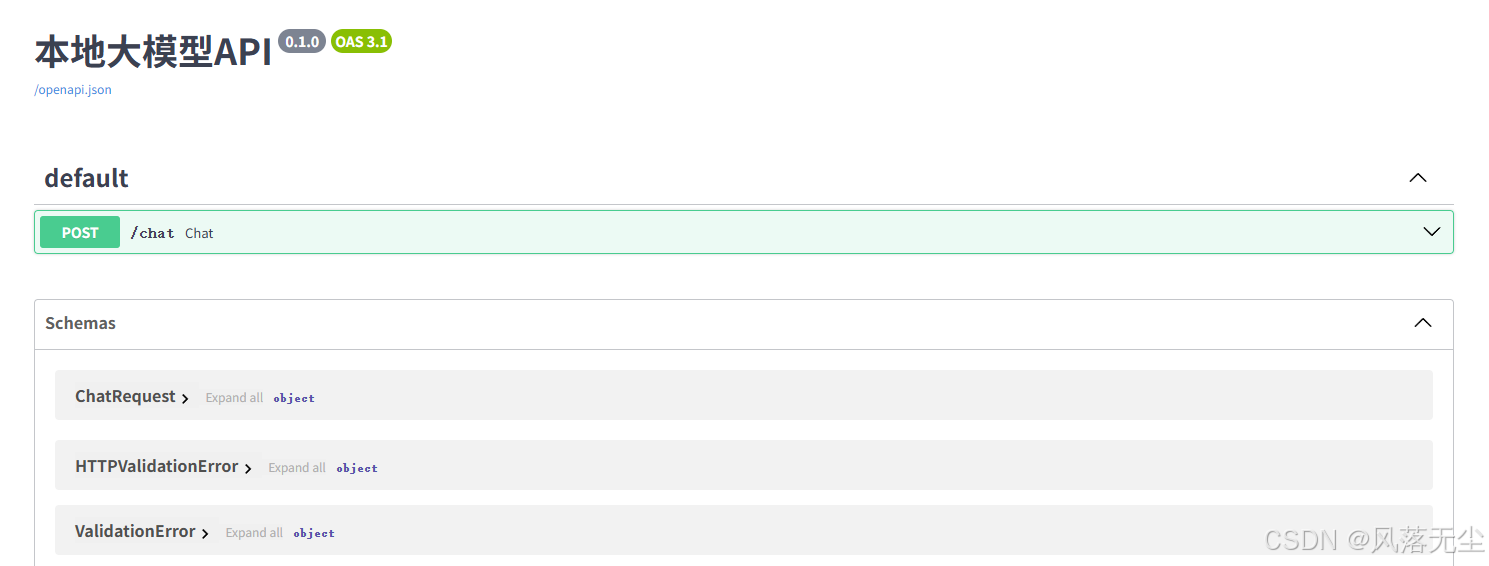
FastAPI自动生成的API文档界面,可以在这里直接测试接口
四、Agent工具调用实战
这是文章的核心部分。我们将让大模型具备自主调用外部工具的能力——当用户需要查询实时信息时,Agent会主动调用天气API并返回结果。
4.1 工具调用的核心原理
Ollama从v0.18.3版本开始优化了工具调用的解析能力,并支持流式工具调用。其流程是:
- 用户发送请求,同时告诉模型可用的工具列表
- 模型判断是否需要调用工具,如需调用则返回
tool_calls - 开发者执行工具函数,将结果返回给模型
- 模型根据工具结果生成最终回复
4.2 完整Agent代码
创建 agent.py:
import requests
import json
from fastapi import FastAPI
from pydantic import BaseModel
from typing import List, Dict, Any

app = FastAPI(title="本地AI Agent")

# ========== 定义可用工具 ==========
def get_current_weather(location: str, unit: str = "celsius") -> str:
    """获取指定位置的天气(模拟)"""
    # 实际应用中可调用真实天气API
    return f"{location}的天气:晴朗,温度25{unit}"

def calculate(expression: str) -> str:
    """计算数学表达式"""
    try:
        return str(eval(expression))
    except:
        return "计算错误"

# 工具注册表
TOOLS = {
    "get_current_weather": get_current_weather,
    "calculate": calculate,
}

# 工具Schema(告诉模型如何调用)
TOOLS_SCHEMA = [
    {
        "type": "function",
        "function": {
            "name": "get_current_weather",
            "description": "获取指定位置的天气",
            "parameters": {
                "type": "object",
                "properties": {
                    "location": {"type": "string", "description": "城市名"},
                    "unit": {"type": "string", "enum": ["celsius", "fahrenheit"]}
                },
                "required": ["location"]
            }
        }
    },
    {
        "type": "function",
        "function": {
            "name": "calculate",
            "description": "计算数学表达式",
            "parameters": {
                "type": "object",
                "properties": {
                    "expression": {"type": "string", "description": "数学表达式"}
                },
                "required": ["expression"]
            }
        }
    }
]

class AgentRequest(BaseModel):
    prompt: str
    model: str = "qwen2.5:7b"

def call_ollama_with_tools(prompt: str, model: str):
    """调用Ollama并处理工具调用"""
    url = "http://localhost:11434/api/chat"

    messages = [{"role": "user", "content": prompt}]

    # 第一次请求:模型决定是否调用工具
    payload = {
        "model": model,
        "messages": messages,
        "tools": TOOLS_SCHEMA,
        "stream": False
    }

    response = requests.post(url, json=payload)
    if response.status_code != 200:
        return f"API错误: {response.text}"

    result = response.json()
    message = result.get("message", {})

    # 检查是否有工具调用
    tool_calls = message.get("tool_calls", [])
    if tool_calls:
        # 执行工具调用
        for tool_call in tool_calls:
            func_name = tool_call["function"]["name"]
            arguments = json.loads(tool_call["function"]["arguments"])

            if func_name in TOOLS:
                tool_result = TOOLS[func_name](**arguments)
                # 将工具结果添加到对话中
                messages.append(message)
                messages.append({
                    "role": "tool",
                    "content": tool_result,
                    "tool_call_id": tool_call.get("id", "unknown")
                })

        # 第二次请求:模型根据工具结果生成最终回答
        final_payload = {
            "model": model,
            "messages": messages,
            "stream": False
        }
        final_response = requests.post(url, json=final_payload)
        return final_response.json()["message"]["content"]
    else:
        # 无工具调用,直接返回
        return message.get("content", "")

@app.post("/agent")
async def agent_chat(request: AgentRequest):
    """Agent对话接口"""
    response = call_ollama_with_tools(request.prompt, request.model)
    return {"response": response}

if __name__ == "__main__":
    import uvicorn
    uvicorn.run(app, host="0.0.0.0", port=8000)
4.3 测试Agent
python agent.py
测试1:工具调用(天气查询)
curl -X POST http://localhost:8000/agent \
  -H "Content-Type: application/json" \
  -d '{"prompt": "深圳今天天气怎么样?"}'
测试2:工具调用(数学计算)
curl -X POST http://localhost:8000/agent \
  -H "Content-Type: application/json" \
  -d '{"prompt": "帮我计算 123 * 456 等于多少"}'
测试3:普通问答
curl -X POST http://localhost:8000/agent \
  -H "Content-Type: application/json" \
  -d '{"prompt": "介绍一下人工智能"}'
📸 截图示例:
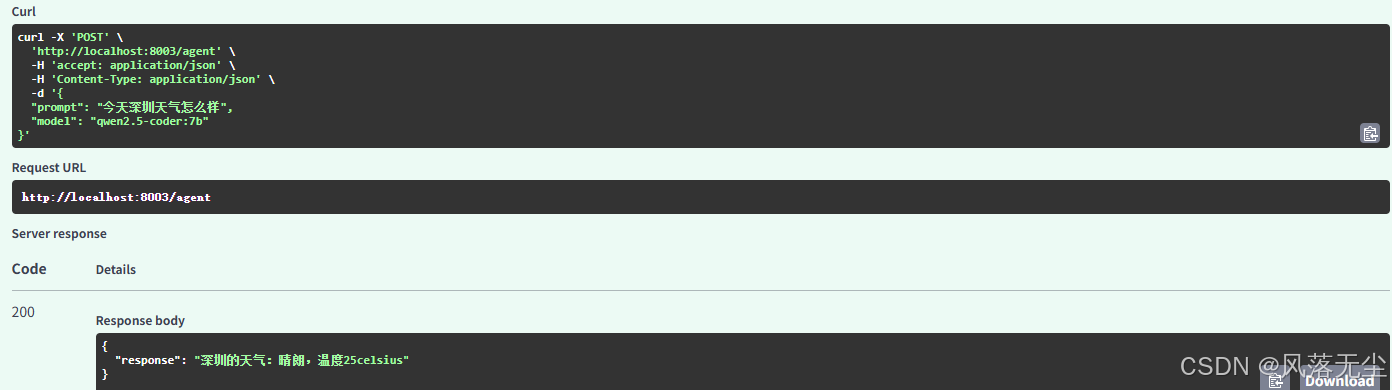
这里推荐使用Postman 或 Apifox 等图形化工具
工具调用成功后模型返回的包含计算结果的回复
4.4 LangChain + Ollama Agent(更强大)
如果你需要更复杂的Agent能力,可以使用LangChain框架。首先安装依赖:
pip install langchain langchain-community
from langchain_community.llms import Ollama
from langchain.agents import initialize_agent, Tool
from langchain.agents import AgentType

# 初始化本地模型
llm = Ollama(model="qwen2.5:7b")

# 定义工具
tools = [
    Tool(name="天气查询", func=get_current_weather, description="查询城市天气"),
    Tool(name="计算器", func=calculate, description="数学计算")
]

# 初始化Agent
agent = initialize_agent(
    tools, llm, agent=AgentType.ZERO_SHOT_REACT_DESCRIPTION, verbose=True
)

# 执行
result = agent.run("深圳今天天气怎么样?")
print(result)
五、进阶优化与避坑指南
5.1 GPU加速配置
默认情况下Ollama会使用CPU运行。如果需要GPU加速,确保NVIDIA驱动已安装,然后使用以下命令启动:
# Windows: 确保NVIDIA CUDA环境已配置
ollama run qwen2.5:7b --num-gpu 1
5.2 修改默认端口
Ollama默认使用11434端口,如需修改:
# Windows (PowerShell)
$env:OLLAMA_HOST="0.0.0.0:11435"
ollama serve

# Linux/macOS
export OLLAMA_HOST="0.0.0.0:11435"
ollama serve
5.3 模型下载加速
如果模型下载缓慢,可以使用代理:
# Windows (PowerShell)
$env:HTTP_PROXY="http://127.0.0.1:7890"
ollama pull qwen2.5:7b

# Linux/macOS
export HTTP_PROXY=http://127.0.0.1:7890
ollama pull qwen2.5:7b
5.4 常见错误及解决方案
| 错误 | 原因 | 解决方案 |
|---|---|---|
connection refused |
Ollama服务未启动 | 确保 ollama serve 在后台运行 |
no model found |
模型未下载 | 执行 ollama pull [model_name] |
out of memory |
显存/内存不足 | 使用更小的模型,如 qwen2.5:1.5b |
tool call not working |
模型不支持工具调用 | Qwen、Llama 3.1+、DeepSeek等均支持 |
5.5 性能优化建议
- 使用4-bit量化模型:
qwen2.5:7b-q4占用约4GB显存,质量损失极小 - 合理设置上下文长度:
--num-ctx 2048 - 监控资源使用:
ollama ps查看运行中的模型
六、总结
本文从零开始,带领大家完成了以下工作:
- ✅ 部署Ollama本地大模型运行环境
- ✅ 下载并测试Qwen2.5-7B模型
- ✅ 使用FastAPI封装REST接口
- ✅ 实现Agent工具调用,让大模型能够自主执行任务
技术架构总览:
用户请求 → FastAPI → Ollama API → 本地模型推理 → 工具调用判断 → 执行工具 → 返回结果
后续扩展方向
- 集成更多工具:如搜索引擎、数据库查询、文件操作等
- 构建RAG知识库:结合Chroma向量数据库,让模型回答私有文档问题
- 开发Web前端:使用React/Next.js构建聊天界面
- VS Code原生集成:Ollama v0.18.3已支持一行命令集成到IDE
参考资料
💡 互动提问:你在本地部署过程中遇到了什么问题?欢迎在评论区留言交流!
本文代码已上传至GitHub,需要的朋友可以私信获取。如果觉得有用,记得点赞收藏哦!⭐

欢迎加入DeepSeek 技术社区。在这里,你可以找到志同道合的朋友,共同探索AI技术的奥秘。
更多推荐

 18
18 0
0- 0


 已为社区贡献7条内容

所有评论(0)