【仅用10张图!基于LLaMA-Factory微调Qwen2.5-VL,实现遥感影像建筑检测】
一、LLamaFactory部署(wsl/linux)
1.配置环境
git clone --depth 1 https://github.com/hiyouga/LLaMA-Factory.git
cd LLaMA-Factory
conda create -n llama_factory python=3.12 -y
conda activate llama_factory
pip install -e ".[torch,metrics]"
这个命令会自动安装一系列关键库:
transformers,datasets,peft,acceleratetrl(用于强化学习)sentencepiece,safetensors,bitsandbytes(支持量化训练)
安装完成后,验证是否成功:
llamafactory-cli version
返回版本号说明成功

⭐⭐⭐ 文件说明 ⭐⭐⭐
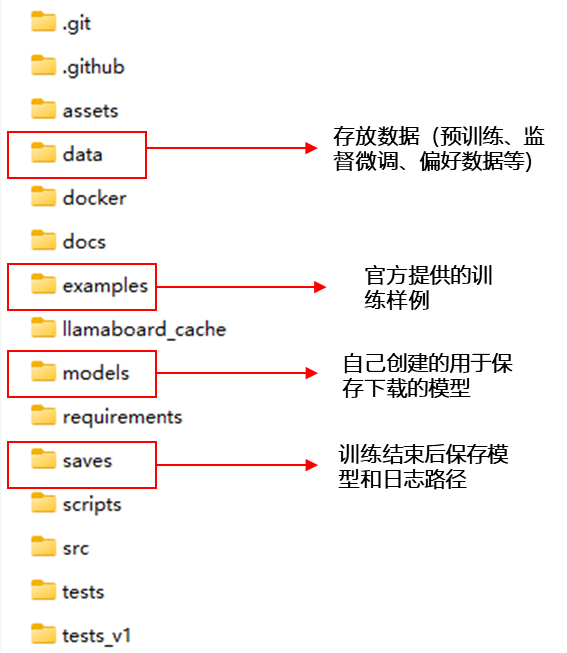
2.设置模型路径
因为微调大模型时会自动下载基础模型到默认路径 \home\username\.cache\huggingface\hub
,这样模型并不好找,需要手动指定模型下载位置(直接修改 WSL 的 .bashrc 文件,这样每次打开终端都会自动生效):
(1)首先新建好目标文件夹
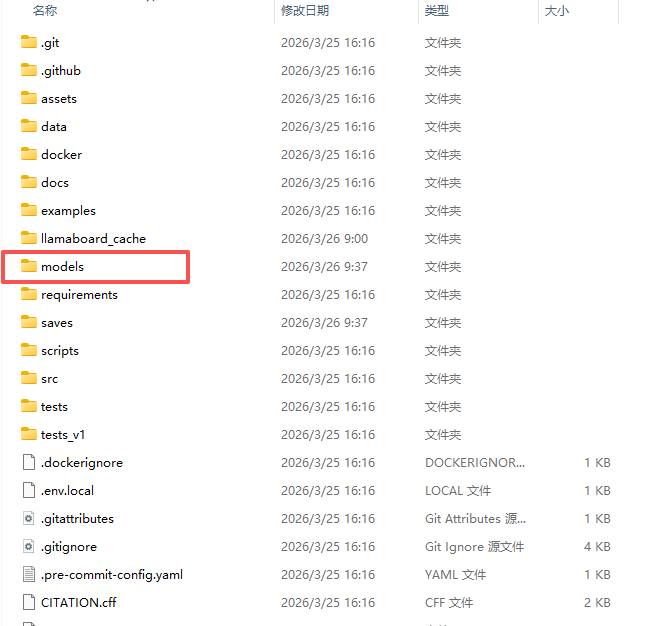
(2)打开 wsl 配置文件
nano ~/.bashrc
(3)在文件末尾添加以下内容
# 1. 统一模型存储路径到 E 盘(防止撑爆 WSL 虚拟磁盘)
export MODELSCOPE_CACHE='/home/xx/LlamaFactory/models'
export HF_HOME='/home/xx/LlamaFactory/models'
# 2. 启用 Hugging Face 国内镜像加速(保留全生态 + 国内全速下载)
export HF_ENDPOINT=https://hf-mirror.com
(4)保存并刷新配置文件
保存并退出配置文件后
source ~/.bashrc
(5)检查配置文件是否生效
echo $HF_HOME
3.启动 WebUI:开启可视化训练
启动服务只需一条命令:
llamafactory-cli webui
首次运行时会自动下载 Gradio 并启动本地服务器,默认地址是:
打开浏览器访问该链接,你会看到一个功能完整的控制台:
- 左侧导航栏清晰划分出【模型加载】、【训练配置】、【数据集管理】等模块;
- 支持中英文切换,对中文用户非常友好;
- 实时展示 loss 曲线、GPU 利用率、训练日志等关键信息。
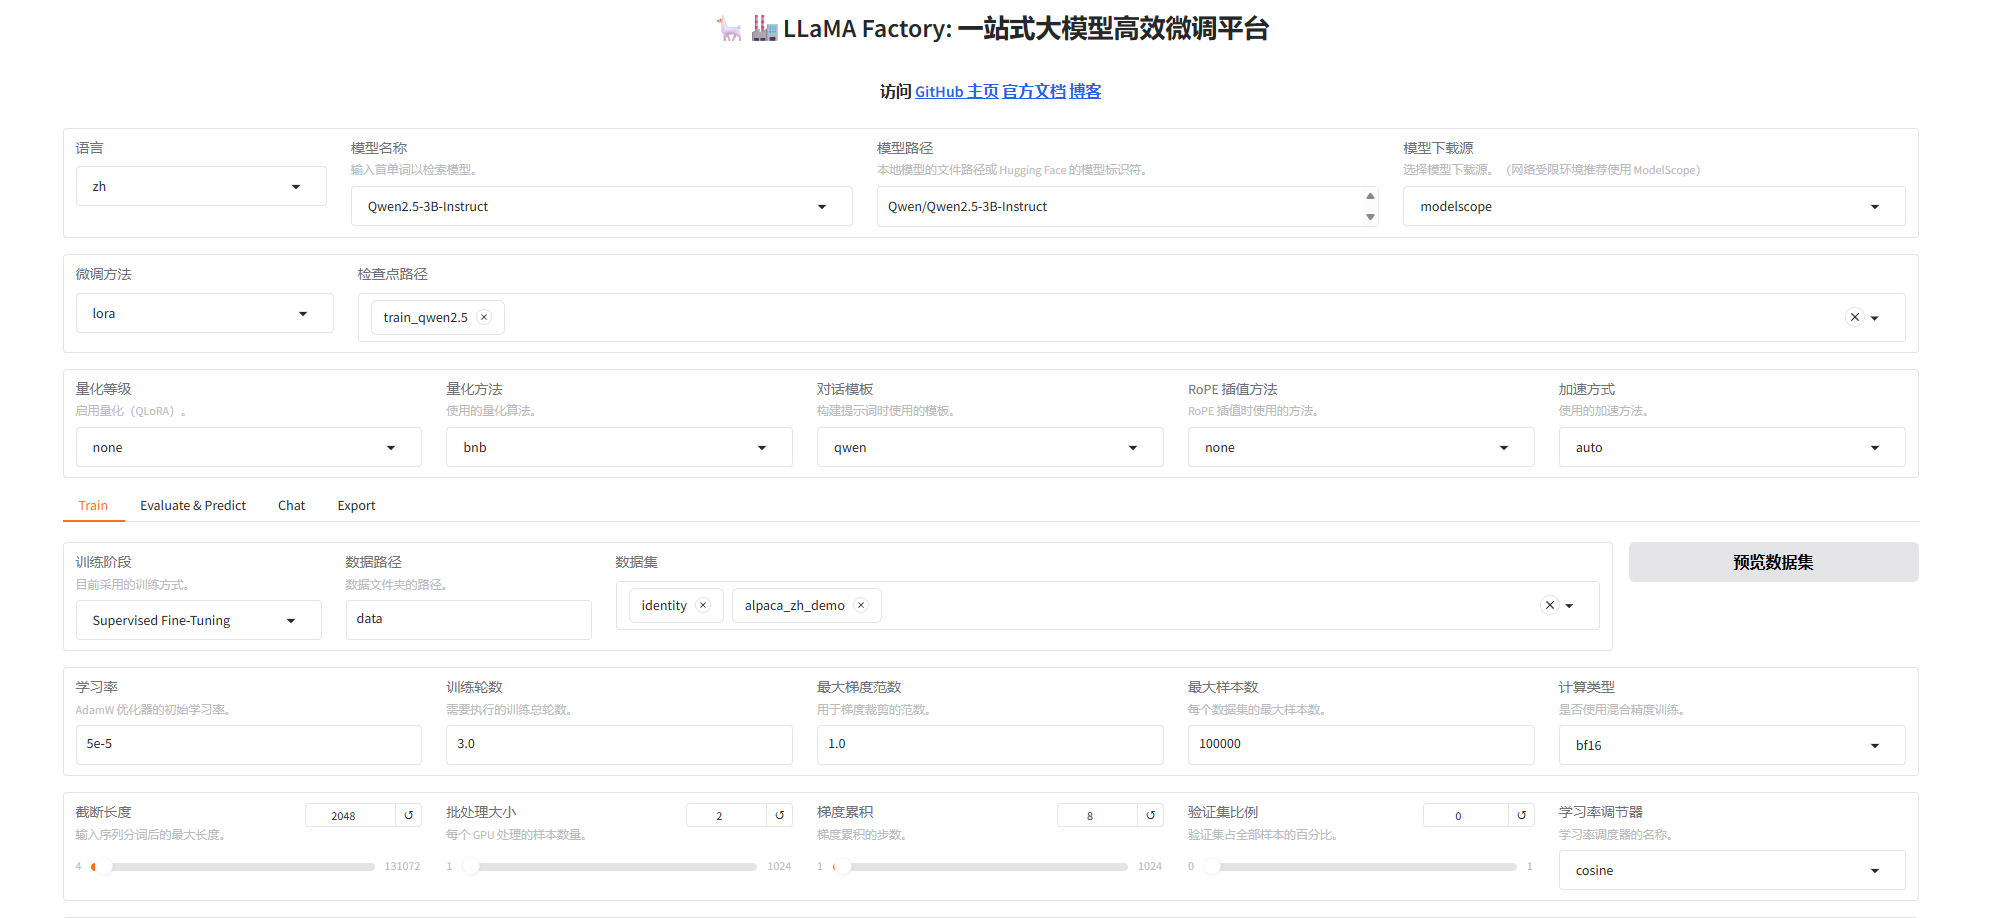
4.QWen2.5VL 目标检测微调
(1)数据集标注
采用十张 512*512 影像,并利用 labelme 绘制矩形框标注,得到标注文件
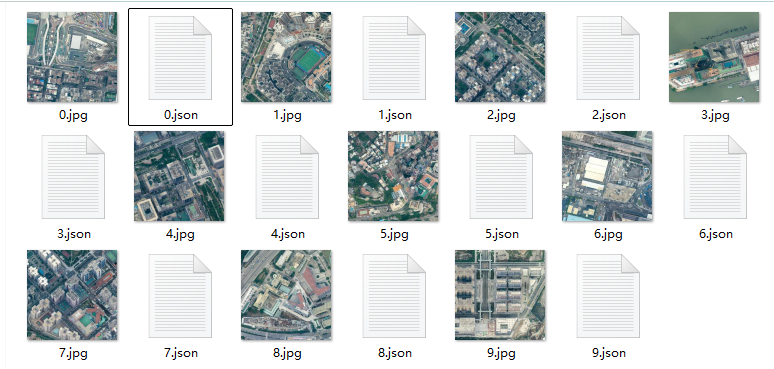
json 内容格式如下:
{
  "version": "5.5.0",
  "flags": {},
  "shapes": [
    {
      "label": "building",
      "points": [
        [
          3.560975609756099,
          67.78861788617886
        ],
        [
          49.4959349593496,
          133.64227642276424
        ]
      ],
      "group_id": null,
      "description": "",
      "shape_type": "rectangle",
      "flags": {},
      "mask": null
    },
    {
      "label": "building",
      "points": [
        [
          0.7154471544715761,
          145.02439024390245
        ],
        [
          43.398373983739816,
          225.51219512195124
        ]
      ],
      "group_id": null,
      "description": "",
      "shape_type": "rectangle",
      "flags": {},
      "mask": null
    },
❗❗ 其中的坐标点代表(左上角点和右下角点坐标)[[xmin, ymin], [xmax, ymax]],且为绝对坐标 ❗❗
默认原点从左上角开始,纵轴朝下,横轴朝右,
例如:
“points”: [
[3.560975609756099, 67.78861788617886],
[49.4959349593496, 133.64227642276424]
]
含义是这个矩形框在当前这张图像中的像素位置:
x_min ≈ 3.56 像素
y_min ≈ 67.79 像素
x_max ≈ 49.50 像素
y_max ≈ 133.64 像素
我的数据结构:
- ├─ LLAMA-FACTORY /
- ├─ data /
- ├─ building_gt_bbox /
- ├─ gt / (这里存的是原始的影像和 labelme 的 json 标注)
- ├─ qwen_det_building /(用于存储缩放后的影像和转化的 jsonl 文件)
- ├─ building_gt_bbox /
- ├─ notebook /
- ├─ 格式转化代码.ipynb
- ├─ data /
(2)训练数据格式转换
已有的目标检测框保存的格式为 labelme 的 json 格式。现在需要将该种标签,转换成与 mllm_demo 一致的数据格式。
一般的数据处理,仅在生成训练时需要的 jsonl 时,使用官方提供的 smart_resize 获取图片 resize 后应该有的尺寸,使用该尺寸处理检测框坐标即可,无需 resize 图片。图片的 resize 操作,会在模型 pipeline 中自动进行。
但这里为了尽可能减少出错的可能性,同时处理了图片和标签,将训练的图片和标签一开始就对齐,保存到新的路径下。
模型输入尺寸必须能被 28 整除
1.【图像与边界框的协同处理】
原始图片: 512*512 像素
经过 smart_resize 处理后:504*504 像素
2.模型输入要求
- Qwen2.5-VL 使用 Vision Transformer 架构
- 需要将图片分割成 28×28 的 patch
- 输入尺寸必须是 28 的倍数
_# 约束1: 能被factor整除。调整后的尺寸必须是28的倍数_
_# 这是因为Vision Transformer使用28×28的patch_
_# new_height % 28 == 0、new_width % 28 == 0_
**round**(512/28)×28 = 18×28 = 504(宽度)
**round**(512/28)×28 = 18×28 = 504(高度)
3.计算效率考虑
- 固定尺寸便于批处理
- 避免内存溢出(通过 max_pixels 限制)
- 避免太小影响效果(通过 min_pixels 保证)
# 约束2: 像素总数在指定范围内
min_pixels = 56×56 = 3,136 像素
max_pixels = 14×14×4×1280 = 1,003,520 像素
# 14×14是patch网格,4是某种设计参数,1280是模型维度
检查像素数:504 * 504= 254016 像素,在 3136 和 1003520之间
最终尺寸:504*504 像素
4.保持空间关系
- 相对位置不变:如果原始框在图片中心,缩放后仍在中心
- 相对大小不变:框与图片的比例关系保持不变
- 纵横比不变:不会发生形变
- 注意:由于需要同时满足"能被 28 整除"和"保持宽高比"这两个要求,在实际操作中存在内在矛盾。当原始图片尺寸不是 28 的倍数时,完美保持宽高比在数学上是不可能的。因此,smart_resize 函数采取了一种近似保持的策略:
- 分别调整:将高度和宽度分别四舍五入到最接近的 28 的倍数
- 轻微形变:接受由此产生的轻微纵横比变化(通常在 1-3% 范围内)
- 权衡选择:相较于填充法(增加无效像素)或裁剪法(丢失图像信息),这种轻微形变是更好的权衡
- 这种处理在保持图像主要内容不变的同时,确保了模型输入要求
5.关键注意事项
- a 坐标系统:始终是绝对像素坐标,不是相对坐标(百分比)
- b 舍入处理:使用
round()四舍五入,可能引入 1 像素误差 - c 边界保护:防止坐标超出图像边界
- d 保持有效性:确保转换后仍然是有效的矩形(x2≥x1, y2≥y1)
尽可能的保持问题可控性,我将图片 resize 到固定的、模型可接受的尺寸,同时将标签同等映射处理。具体实现如下:格式转化代码.ipynb
import json, glob, os, math, cv2
from pathlib import Path
from typing import List, Tuple, Dict, Optional
class Qwen2_5VLProcessor:
"""
这个类的作用:
把 LabelMe 标注的建筑物检测数据,转换成 Qwen2.5-VL / LLaMA-Factory 可以训练的 JSONL 格式。
你的原始数据结构类似:
building_gt_bbox/gt/
├── 0.jpg
├── 0.json
├── 1.jpg
├── 1.json
每个 json 是 LabelMe 标注文件,里面的 rectangle 框表示建筑物。
最终输出:
1. resize 后的图片
2. train_part.jsonl
train_part.jsonl 每一行是一张图片的训练样本,例如:
{
"id": "0",
"images": ["qwen_det_building/resized_imgs/0.jpg"],
"messages": [
{
"role": "user",
"content": "<image>请检测..."
},
{
"role": "assistant",
"content": "[{\"bbox_2d\":[...],\"label\":\"building\"}]"
}
]
}
"""
def __init__(
self,
factor: int = 28,
min_pixels: int = 56 * 56,
max_pixels: int = 14 * 14 * 4 * 1280,
long_edge_range: Tuple[int, int] = (504, 504),
target_label: str = "building",
):
"""
初始化参数。
factor:
Qwen2.5-VL 图像尺寸通常要求高和宽是 28 的倍数。
所以这里 factor 默认是 28。
min_pixels:
resize 后图片允许的最小像素数。
太小的图会被放大。
max_pixels:
resize 后图片允许的最大像素数。
太大的图会被缩小。
long_edge_range:
控制图片长边缩放到哪个范围。
你的原图是 512x512,这里设置成 (504, 504),
表示强制把长边缩放到 504。
因为 504 = 28 * 18,正好是 28 的倍数。
target_label:
只保留这个类别的框。
你的 LabelMe json 里建筑物 label 是 "building",
所以这里默认 target_label="building"。
"""
# Qwen2.5-VL 尺寸对齐因子,一般是 28
self.factor = factor
# 图片最小像素数限制
self.min_pixels = min_pixels
# 图片最大像素数限制
self.max_pixels = max_pixels
# 长边目标范围,例如 (504, 504)
self.long_edge_range = long_edge_range
# 只保留 LabelMe 中 label 等于 target_label 的目标
self.target_label = target_label
# 训练时给模型看的问题,也就是 user 的 content
# 后续模型会学习:看到这句话 + 图像,就输出 assistant 中的 bbox JSON
self.user_prompt = (
"<image>请检测输入遥感影像中的所有建筑物,并仅以 JSON 数组格式返回结果。"
"每个建筑物使用 bbox_2d 表示,格式为 [xmin, ymin, xmax, ymax]。"
"如果没有建筑物,返回空数组 []。只输出合法 JSON,不要输出解释文字。"
)
# ============================================================
# private 部分:类内部使用的辅助函数
# ============================================================
def _smart_resize(self, h: int, w: int) -> Tuple[int, int]:
"""
根据 Qwen2.5-VL 的尺寸要求,对图片尺寸进行调整。
输入:
h: 原图高度
w: 原图宽度
输出:
new_h: resize 后高度
new_w: resize 后宽度
处理逻辑:
1. 先把图片长边缩放到 long_edge_range 指定范围
2. 再把高宽调整为 factor=28 的倍数
3. 如果图片面积太大,则继续缩小
4. 如果图片面积太小,则继续放大
对你的 512x512 图片来说:
long_edge_range=(504,504)
最终大概率会得到 504x504
"""
# 取出目标长边范围
# 比如 long_edge_range=(504,504),lo=504,hi=504
lo, hi = self.long_edge_range
# 原图长边,例如 512x512 的 long=512
long = max(h, w)
# 如果原图长边小于目标范围下限,就放大
if long < lo:
scale = lo / long
# 如果原图长边大于目标范围上限,就缩小
elif long > hi:
scale = hi / long
# 如果原图长边已经在目标范围内,就不缩放
else:
scale = 1.0
# 按比例缩放高宽
# 注意这里先变成 int,得到初步缩放后的尺寸
h, w = int(h * scale), int(w * scale)
# 防止图片太小,小于 factor=28 无法处理
if h < self.factor or w < self.factor:
raise ValueError(
f"height:{h} or width:{w} must be larger than factor:{self.factor}"
)
# 防止长宽比极端异常,比如 10000x20 这种图
if max(h, w) / min(h, w) > 200:
raise ValueError("absolute aspect ratio must be smaller than 200")
# 把高度调整成最接近的 28 的倍数
# 例如 504 / 28 = 18,所以还是 504
h_bar = round(h / self.factor) * self.factor
# 把宽度调整成最接近的 28 的倍数
w_bar = round(w / self.factor) * self.factor
# 如果调整后的图片总像素数超过 max_pixels,就继续缩小
if h_bar * w_bar > self.max_pixels:
# beta 是缩小比例
beta = math.sqrt((h * w) / self.max_pixels)
# 缩小后仍然保证是 28 的倍数
h_bar = math.floor(h / beta / self.factor) * self.factor
w_bar = math.floor(w / beta / self.factor) * self.factor
# 如果调整后的图片总像素数小于 min_pixels,就继续放大
elif h_bar * w_bar < self.min_pixels:
# beta 是放大比例
beta = math.sqrt(self.min_pixels / (h * w))
# 放大后仍然保证是 28 的倍数
h_bar = math.ceil(h * beta / self.factor) * self.factor
w_bar = math.ceil(w * beta / self.factor) * self.factor
# 返回最终 resize 后的高和宽
return h_bar, w_bar
@staticmethod
def _shape2xyxy(points: List[List[float]]) -> List[int]:
"""
把 LabelMe rectangle 的两个点转换成 bbox_2d 格式。
LabelMe 中 rectangle 的 points 通常长这样:
[
[x1, y1],
[x2, y2]
]
但是这两个点不一定严格是左上角和右下角,
所以这里用 min / max 统一转成:
[xmin, ymin, xmax, ymax]
这正是 Qwen2.5-VL 常用的 bbox_2d 格式。
"""
# zip(*points) 可以把 [[x1,y1],[x2,y2]] 拆成 xs=(x1,x2), ys=(y1,y2)
xs, ys = zip(*points)
# xmin 是两个 x 中较小的
xmin = round(min(xs))
# ymin 是两个 y 中较小的
ymin = round(min(ys))
# xmax 是两个 x 中较大的
xmax = round(max(xs))
# ymax 是两个 y 中较大的
ymax = round(max(ys))
return [xmin, ymin, xmax, ymax]
def _map_bbox(
self,
bbox: List[int],
oh: int,
ow: int,
nh: int,
nw: int,
) -> List[int]:
"""
当图片 resize 后,把原图上的 bbox 坐标同步缩放到新图上。
输入:
bbox: 原图上的框 [x1, y1, x2, y2]
oh: original height,原图高度
ow: original width,原图宽度
nh: new height,新图高度
nw: new width,新图宽度
输出:
resize 后图片上的 bbox [x1, y1, x2, y2]
举例:
原图 512x512
新图 504x504
原 bbox = [100,100,200,200]
scale_x = 504 / 512
scale_y = 504 / 512
新 bbox ≈ [98,98,197,197]
"""
# 拆开 bbox 坐标
x1, y1, x2, y2 = bbox
# 计算 x 方向缩放比例
scale_x = nw / ow
# 计算 y 方向缩放比例
scale_y = nh / oh
# 缩放 x1,并限制在 [0, nw-1] 范围内
x1 = max(0, min(round(x1 * scale_x), nw - 1))
# 缩放 y1,并限制在 [0, nh-1] 范围内
y1 = max(0, min(round(y1 * scale_y), nh - 1))
# 缩放 x2,并限制在 [0, nw-1] 范围内
x2 = max(0, min(round(x2 * scale_x), nw - 1))
# 缩放 y2,并限制在 [0, nh-1] 范围内
y2 = max(0, min(round(y2 * scale_y), nh - 1))
return [x1, y1, x2, y2]
def _find_image(self, json_path: Path) -> Optional[Path]:
"""
根据 json 文件自动寻找同名图片。
你的数据是:
0.json 对应 0.jpg
1.json 对应 1.jpg
这个函数会在 json 所在目录下依次尝试:
0.jpg
0.jpeg
0.png
0.tif
0.tiff
找到就返回图片路径,找不到就返回 None。
"""
# 支持的图片后缀
img_exts = [".jpg", ".jpeg", ".png", ".tif", ".tiff"]
# 逐个尝试同名不同后缀的图片
for ext in img_exts:
# json_path.with_suffix(".jpg") 会把 0.json 变成 0.jpg
img_path = json_path.with_suffix(ext)
# 如果图片存在,就返回
if img_path.exists():
return img_path
# 所有后缀都没找到,返回 None
return None
# ============================================================
# public 部分:真正被外部调用的处理函数
# ============================================================
def process_one(
self,
json_path: str,
save_img_dir: Optional[str] = None,
image_rel_prefix: Optional[str] = None,
) -> Optional[Dict]:
"""
处理一张图片对应的一个 LabelMe json。
输入:
json_path:
LabelMe json 文件路径,例如 building_gt_bbox/gt/0.json
save_img_dir:
resize 后图片保存目录,例如 building_gt_bbox/qwen_det_building/resized_imgs
image_rel_prefix:
写入 JSONL 的图片路径前缀。
例如 image_rel_prefix="qwen_det_building/resized_imgs"
那么 JSONL 中会写:
"images": ["qwen_det_building/resized_imgs/0.jpg"]
输出:
一个训练样本 dict。
如果没有找到图片,或者没有 building 框,返回 None。
"""
# 转成 Path 对象,方便后面处理路径
json_path = Path(json_path)
# 根据 0.json 自动找 0.jpg / 0.png 等
img_path = self._find_image(json_path)
# 如果找不到图片,则跳过
if img_path is None:
print(f"[WARN] skip {json_path}: image not found")
return None
# 读取 LabelMe json 标注
ann = json.loads(json_path.read_text(encoding="utf-8"))
# 用 OpenCV 读取图片
img = cv2.imread(str(img_path))
# 如果图片读取失败,直接报错
if img is None:
raise ValueError(f"cannot read image: {img_path}")
# 从真实图片中获取高和宽
# OpenCV 读出来的 shape 是 [高度, 宽度, 通道数]
real_h, real_w = img.shape[:2]
# 优先使用 json 中记录的 imageHeight 和 imageWidth
# 如果 json 里没有,就使用真实图片尺寸
orig_h = ann.get("imageHeight", real_h)
orig_w = ann.get("imageWidth", real_w)
# 计算 smart_resize 后的新尺寸
# 例如 512x512 -> 504x504
new_h, new_w = self._smart_resize(orig_h, orig_w)
# 用于保存当前图片中的所有建筑物目标
# 最终会变成:
# [
# {"bbox_2d":[...],"label":"building"},
# {"bbox_2d":[...],"label":"building"}
# ]
objects = []
# 遍历 LabelMe 中所有标注 shape
for shape in ann.get("shapes", []):
# 只处理 rectangle 标注
# 如果是 polygon / circle / line,则跳过
if shape.get("shape_type") != "rectangle":
continue
# 只保留 label 等于 target_label 的目标
# 你的 target_label 是 building
if shape.get("label") != self.target_label:
continue
# 获取 rectangle 的两个点
points = shape.get("points", [])
# rectangle 至少应该有两个点
if len(points) < 2:
continue
# 把 LabelMe 的两个点转成 [xmin, ymin, xmax, ymax]
bbox = self._shape2xyxy(points)
# 因为图片要从原尺寸 resize 到 new_h,new_w,
# 所以 bbox 也要同步缩放到新图坐标
bbox = self._map_bbox(
bbox=bbox,
oh=orig_h,
ow=orig_w,
nh=new_h,
nw=new_w,
)
# 加入当前图片的 objects 列表
objects.append({
"bbox_2d": bbox,
"label": "building"
})
# 这里严格仿照甲下损坏项目逻辑:
# 如果当前图片没有任何目标框,就不写入训练集。
#
# 如果你以后想加入“无建筑物负样本”,
# 可以把下面两行注释掉,
# 这样 objects=[] 也会写入 JSONL。
if not objects:
return None
# 对原图进行 resize
# 注意 cv2.resize 的尺寸参数顺序是 (宽, 高)
img_res = cv2.resize(
img,
(new_w, new_h),
interpolation=cv2.INTER_LINEAR
)
# 如果指定了保存目录,就把 resize 后图片保存进去
if save_img_dir:
# 转成 Path 对象
save_img_dir = Path(save_img_dir)
# 如果目录不存在,就自动创建
save_img_dir.mkdir(parents=True, exist_ok=True)
# resize 后图片保存路径
# 比如 save_img_dir/0.jpg
save_path = save_img_dir / img_path.name
# 保存 resize 后图片
cv2.imwrite(str(save_path), img_res)
else:
# 如果没有指定保存目录,就使用原图路径
# 但是注意:bbox 已经是 resize 后坐标,
# 所以正式训练时不建议 save_img_dir=None
save_path = img_path
# 构造写入 JSONL 的图片路径
if image_rel_prefix:
# 如果设置了相对路径前缀,就写成:
# qwen_det_building/resized_imgs/0.jpg
image_path_for_jsonl = f"{image_rel_prefix}/{save_path.name}".replace("\\", "/")
else:
# 否则就写真实保存路径
image_path_for_jsonl = str(save_path).replace("\\", "/")
# 构造 LLaMA-Factory / Qwen2.5-VL 训练样本
sample = {
# 样本 id,使用图片文件名,不带后缀
# 例如 0.jpg -> id = "0"
"id": img_path.stem,
# 图片路径列表
# Qwen2.5-VL 多模态格式中 images 一般是列表
"images": [image_path_for_jsonl],
# 对话数据
# user 是输入提示词
# assistant 是模型应该学习输出的 bbox JSON 字符串
"messages": [
{
"role": "user",
"content": self.user_prompt
},
{
"role": "assistant",
# 注意:
# assistant 的 content 必须是字符串,
# 所以这里用 json.dumps 把 objects 转成 JSON 字符串。
#
# separators=(",", ":") 的作用是压缩空格,
# 让输出更紧凑:
# [{"bbox_2d":[1,2,3,4],"label":"building"}]
"content": json.dumps(
objects,
ensure_ascii=False,
separators=(",", ":")
)
},
],
}
return sample
def process_batch(
self,
json_dir: str,
out_jsonl: str,
save_img_dir: Optional[str] = None,
image_rel_prefix: Optional[str] = None,
):
"""
批量处理一个目录下的所有 LabelMe json。
输入:
json_dir:
原始数据目录,例如:
building_gt_bbox/gt
out_jsonl:
输出 JSONL 文件路径,例如:
building_gt_bbox/qwen_det_building/train_part.jsonl
save_img_dir:
resize 后图片保存目录,例如:
building_gt_bbox/qwen_det_building/resized_imgs
image_rel_prefix:
写入 JSONL 的图片相对路径前缀,例如:
qwen_det_building/resized_imgs
输出:
一个 jsonl 文件。
每一行是一张图的训练样本。
"""
# 找到 json_dir 目录下所有 .json 文件
# 例如 building_gt_bbox/gt/*.json
json_files = sorted(glob.glob(os.path.join(json_dir, "*.json")))
# 如果一个 json 都没找到,说明路径写错或目录为空
if not json_files:
raise ValueError(f"no json found in {json_dir}")
# 确保输出 jsonl 的父目录存在
Path(out_jsonl).parent.mkdir(parents=True, exist_ok=True)
# 如果指定了 resize 后图片目录,也提前创建
if save_img_dir:
Path(save_img_dir).mkdir(parents=True, exist_ok=True)
# 记录成功写入了多少条样本
written = 0
# 打开输出 jsonl 文件
with open(out_jsonl, "w", encoding="utf-8") as fw:
# 遍历每个 LabelMe json
for jf in json_files:
# 处理单个 json
sample = self.process_one(
json_path=jf,
save_img_dir=save_img_dir,
image_rel_prefix=image_rel_prefix,
)
# 如果成功得到样本,就写入 jsonl
if sample:
# 每一行是一个完整 JSON
fw.write(json.dumps(sample, ensure_ascii=False) + "\n")
# 计数加 1
written += 1
# 打印转换结果
print(f"✅ 完成!共转换 {written}/{len(json_files)} 条样本 -> {out_jsonl}")
# ============================================================
# 使用示例
# ============================================================
if __name__ == "__main__":
# 创建处理器
proc = Qwen2_5VLProcessor(
# 只保留 LabelMe 中 label == "building" 的框
target_label="building",
# 你的原图是 512x512。
# 设置为 504 是为了让输出图像尺寸是 28 的倍数:
# 504 = 28 * 18
long_edge_range=(504, 504),
)
# 批量转换
proc.process_batch(
# 原始数据目录:
# 里面同时有 0.jpg、0.json、1.jpg、1.json
json_dir="../data/building_gt_bbox/gt",
# 输出 JSONL 文件
out_jsonl="../data/building_gt_bbox/qwen_det_building/train_part.jsonl",
# resize 后图片保存目录
save_img_dir="../data/building_gt_bbox/qwen_det_building/resized_imgs",
# 写入 JSONL 中 images 字段的图片路径前缀
#
# 生成后,每条样本里会是:
# "images": ["qwen_det_building/resized_imgs/0.jpg"]
#
# 如果你后续把 qwen_det_building 整个文件夹放到:
# LLaMA-Factory/data/
# 那这个路径就是相对于 data/ 的路径。
image_rel_prefix="building_gt_bbox/qwen_det_building/resized_imgs",
)
直接运行:✅ 完成!共转换 10/10 条样本 -> …/data/building_gt_bbox/qwen_det_building/train_part.jsonl
查看结果:
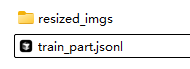
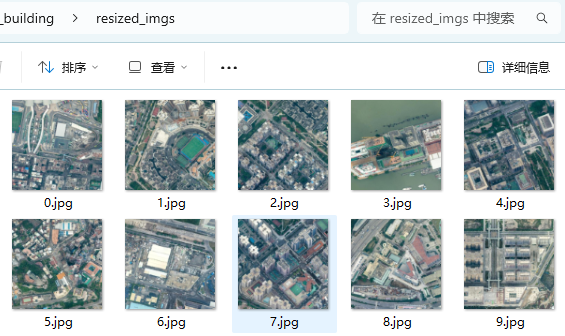

✅ 转换成功
接下来查看转化的是否正确,需要可视化检查
import json
import cv2
from pathlib import Path
import matplotlib.pyplot as plt

jsonl_path = Path("../data/building_gt_bbox/qwen_det_building/train_part.jsonl")
img_prefix = Path("../data")   # jsonl 中图片路径前面加这个
max_show = 10                  # 显示前 10 张;想全部显示就设为 0

with open(jsonl_path, "r", encoding="utf-8") as f:
    lines = f.read().strip().splitlines()

if max_show > 0:
    lines = lines[:max_show]

for i, line in enumerate(lines, 1):
    sample = json.loads(line)

    img_path = img_prefix / sample["images"][0]
    objects = json.loads(sample["messages"][1]["content"])

    img = cv2.imread(str(img_path))
    if img is None:
        print(f"读取失败:{img_path}")
        continue

    for obj in objects:
        x1, y1, x2, y2 = map(int, obj["bbox_2d"])
        label = obj.get("label", "building")

        cv2.rectangle(img, (x1, y1), (x2, y2), (0, 0, 255), 2)
        cv2.putText(
            img,
            label,
            (x1, max(0, y1 - 5)),
            cv2.FONT_HERSHEY_SIMPLEX,
            0.5,
            (0, 0, 255),
            1
        )

    img_rgb = cv2.cvtColor(img, cv2.COLOR_BGR2RGB)

    plt.figure(figsize=(6, 6))
    plt.imshow(img_rgb)
    plt.title(f"{i}: {img_path.name} | buildings: {len(objects)}")
    plt.axis("off")
    plt.show()
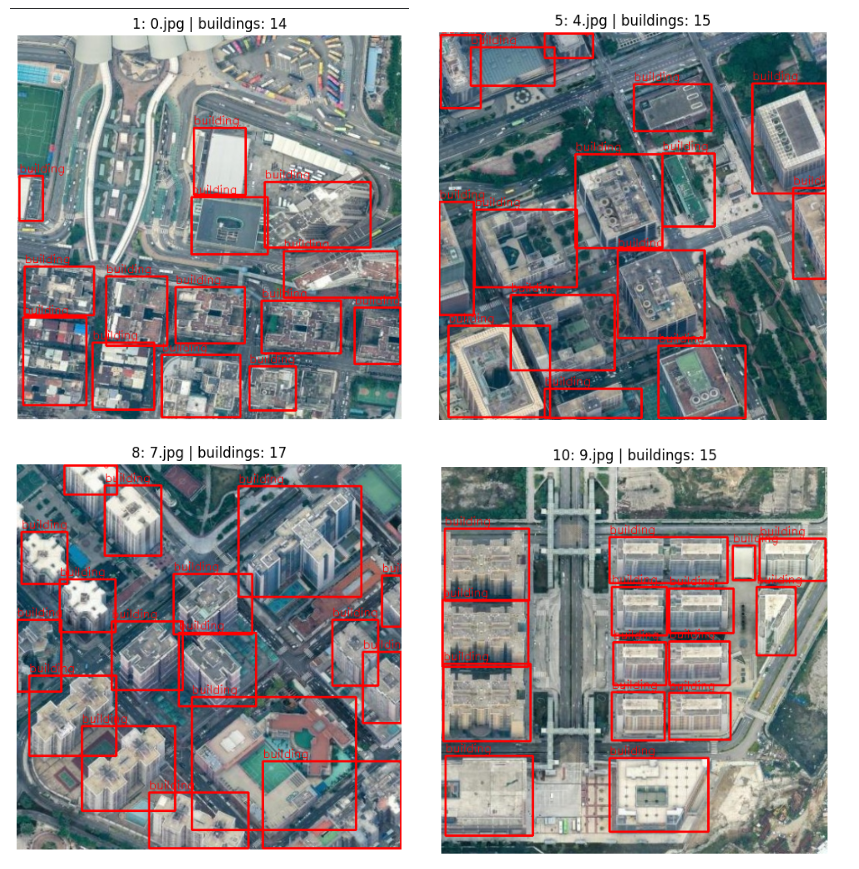
发现是正确的,可以进行下一步
(3)模型训练测试
1)注册数据集
首先需要将上述转化得到的 jsonl 文件移动到 dataset_info.josn 同级目录
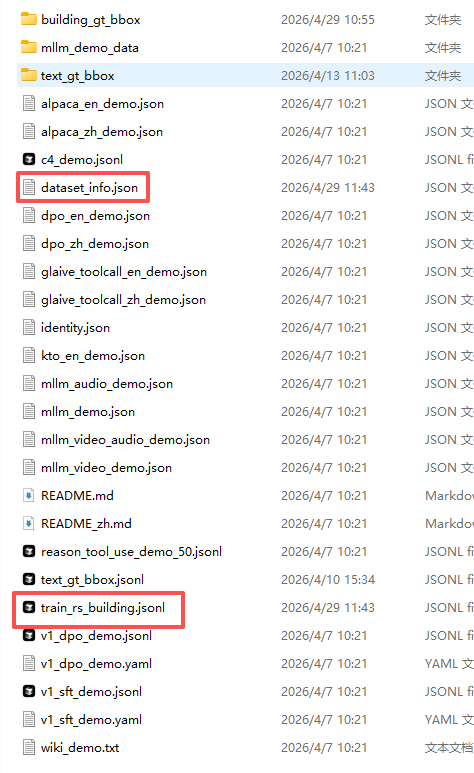
并注册到 dataset_info.josn 中
"rs_building": {
    "file_name": "train_rs_building.jsonl",
    "formatting": "sharegpt",
    "columns": {
      "messages": "messages",
      "images": "images"
    },
    "tags": {
      "role_tag": "role",
      "content_tag": "content",
      "user_tag": "user",
      "assistant_tag": "assistant"
    }
  },
2)训练
首先利用llamafactory-cli webui 进行web页面
然后在训练参数中选择QWen2.5VL_3B_instruct模型(或下载到本地,保存到之前的model文件夹中)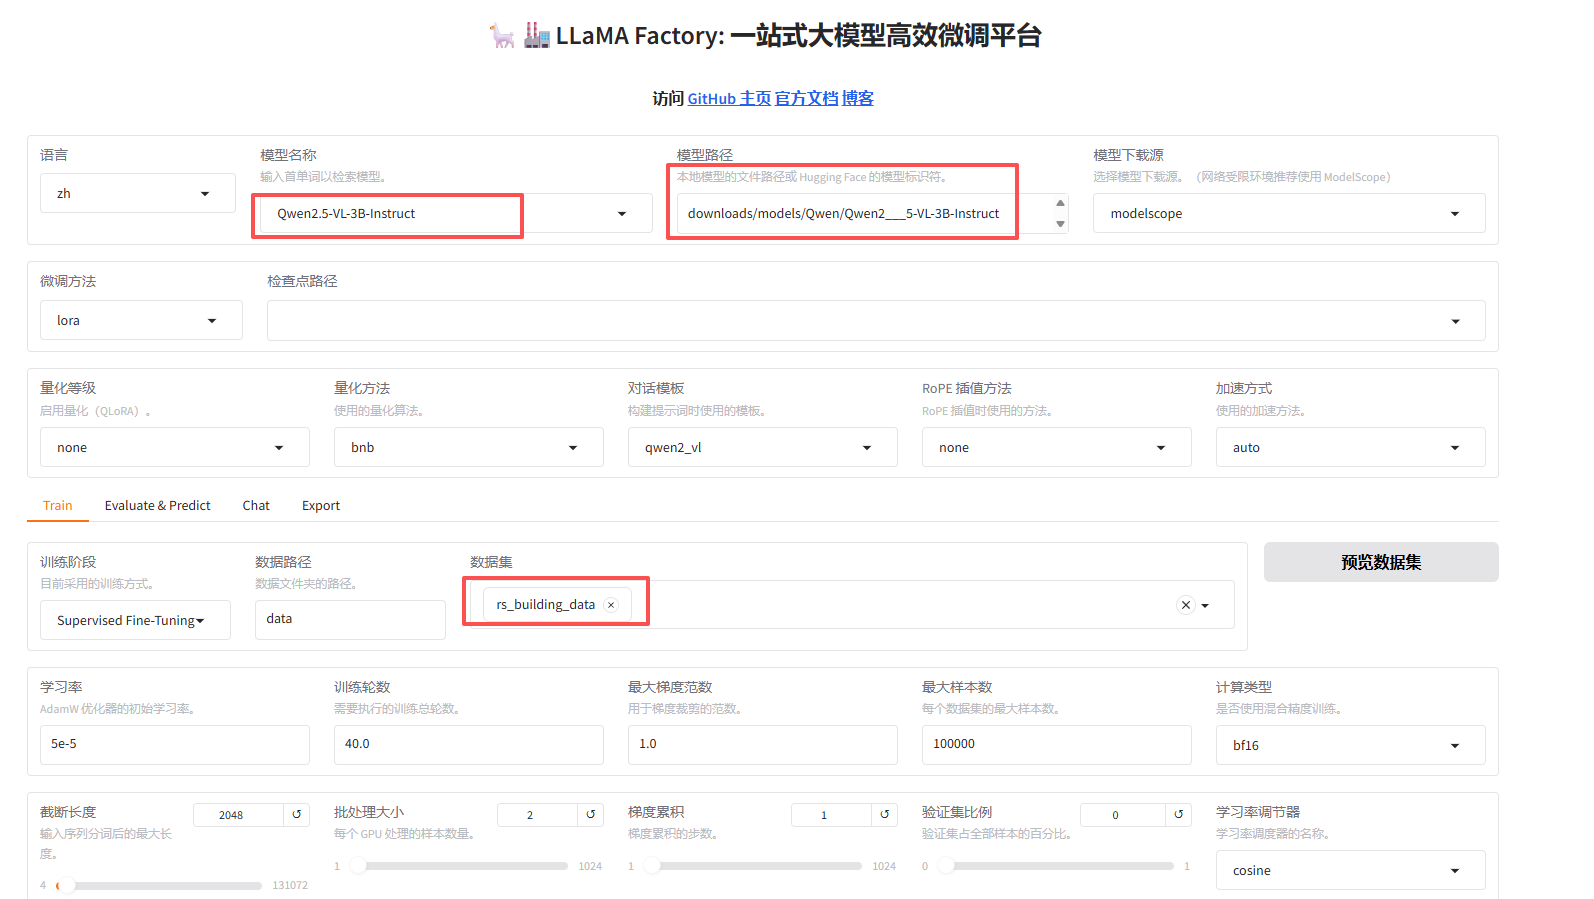
其他参数:
- 模型:qwen2.5vl
- 数据集:rs_building
- epoch:由于数据量太少,这里设置 40
- 梯度累计:1
训练日志

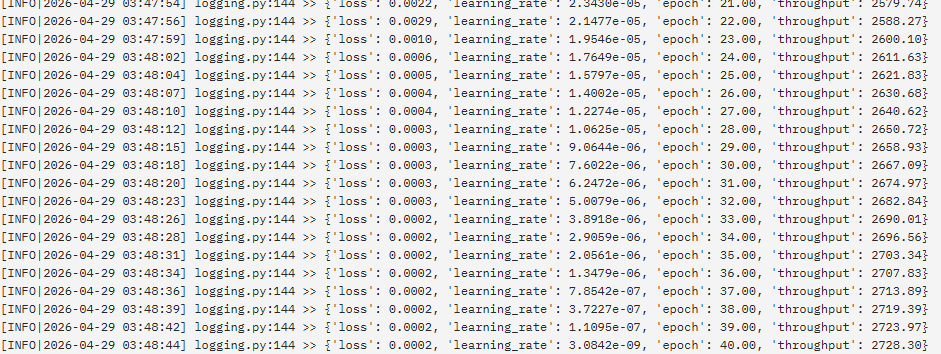
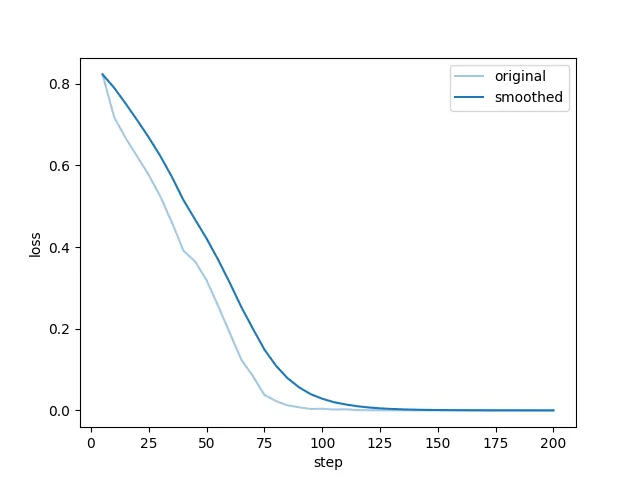
3)测试
需要用 resize 之后的数据去测试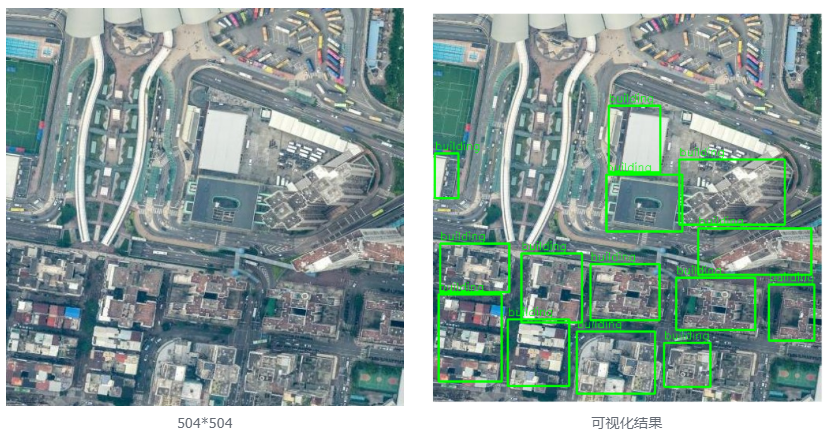
question:
请检测输入遥感影像中的所有建筑物,并仅以 JSON 数组格式返回结果
answer:
[{“bbox_2d”:[231,121,299,209],“label”:“building”},{“bbox_2d”:[228,212,328,287],“label”:“building”},{“bbox_2d”:[324,192,463,278],“label”:“building”},{“bbox_2d”:[349,283,498,344],“label”:“building”},{“bbox_2d”:[9,303,100,367],“label”:“building”},{“bbox_2d”:[7,370,90,485],“label”:“building”},{“bbox_2d”:[116,316,196,407],“label”:“building”},{“bbox_2d”:[207,330,298,404],“label”:“building”},{“bbox_2d”:[98,403,179,491],“label”:“building”},{“bbox_2d”:[189,419,292,501],“label”:“building”},{“bbox_2d”:[320,348,424,417],“label”:“building”},{“bbox_2d”:[304,434,365,492],“label”:“building”},{“bbox_2d”:[2,184,33,243],“label”:“building”},{“bbox_2d”:[442,357,502,431],“label”:“building”}]
4)与原始模型对比验证
进入 chat 模式,分别加载原始模型和微调后 lora 模型,分开测试,并将测试结果可视化对比:
由于训练数据只有十张,且为自己标注,标签精度不高,所以微调的模型效果也一般,但是也有了质的提升。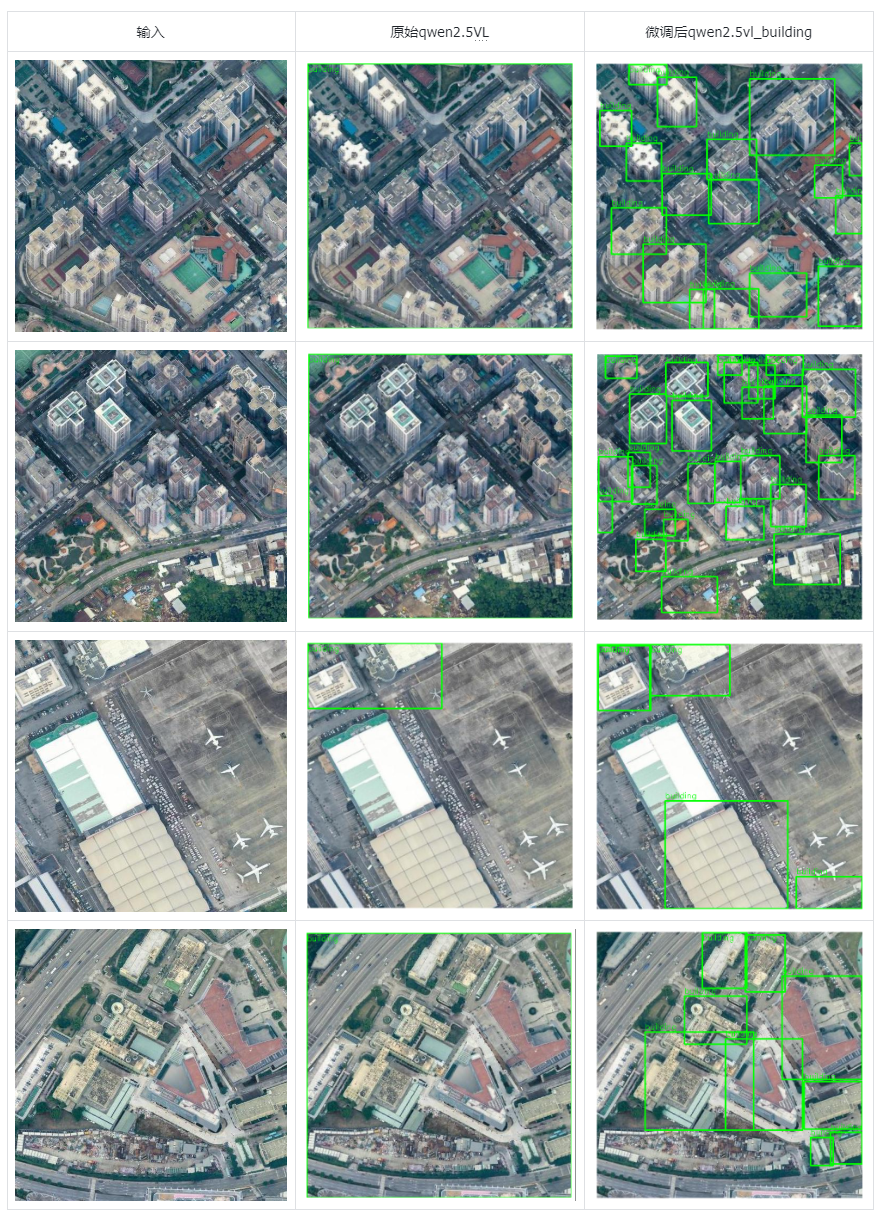

欢迎加入DeepSeek 技术社区。在这里,你可以找到志同道合的朋友,共同探索AI技术的奥秘。
更多推荐
 12
12 0
0- 0


 已为社区贡献1条内容

所有评论(0)