使用VLLM+Deepseek+Milvus构建本地向量库
Milvus是一个开源、专门构建的分布式向量数据库,用于为生成式人工智能(GenAI)工作负载存储、索引和搜索向量。它能够执行混合搜索、 元数据过滤、重排序并高效处理数万亿向量,这使得 Milvus 成为人工智能和机器学习工作负载的首选。Milvus可在本地、集群上运行
pip install --upgrade pymilvus openai requests tqdm下载官方示例文档,这里可以替换为自己的word文档.
wget https://github.com/milvus-io/milvus-docs/releases/download/v2.4.6-preview/milvus_docs_2.4.x_en.zip
unzip -q milvus_docs_2.4.x_en.zip -d milvus_docs
我们从milvus_docs/en/faq 文件夹中加载所有标记文件。对于每个文档,我们只需简单地使用 "#"来分隔文件中的内容,这样就能大致分隔出 markdown 文件中每个主要部分的内容。
from glob import glob

text_lines = []

for file_path in glob("milvus_docs/en/faq/*.md", recursive=True):
    with open(file_path, "r") as file:
        file_text = file.read()

    text_lines += file_text.split("# ")
准备 LLM 和 Embeddings 模型 Ollama 支持基于 LLM 任务和嵌入生成的多种模型,这使得开发检索增强生成(RAG)应用变得非常容易。在此设置中
我们将使用Llama 3.2 (3B)作为文本生成任务的 LLM。 对于嵌入生成,我们将使用mxbai-embed-large,这是一个针对语义相似性优化的 334M 参数模型。 在开始之前,请确保这两个模型都已拉到本地:
生成一个测试嵌入并打印其维度和前几个元素。
from pymilvus import MilvusClient

milvus_client = MilvusClient(uri="./milvus_demo.db")

collection_name = "my_rag_collection"
插入数据 遍历文本行,创建 Embeddings,然后将数据插入 Milvus。
这里有一个新字段text ,它是 Collections Schema 中的一个非定义字段。它将自动添加到保留的 JSON 动态字段中,在高层次上可将其视为普通字段。
from tqdm import tqdm

data = []

for i, line in enumerate(tqdm(text_lines, desc="Creating embeddings")):
    data.append({"id": i, "vector": emb_text(line), "text": line})

milvus_client.insert(collection_name=collection_name, data=data)
为查询检索数据 让我们指定一个关于 Milvus 的常见问题。
question = "How is data stored in milvus?"
search_res = milvus_client.search(
    collection_name=collection_name,
    data=[
        emb_text(question)
    ],  # Use the `emb_text` function to convert the question to an embedding vector
    limit=3,  # Return top 3 results
    search_params={"metric_type": "IP", "params": {}},  # Inner product distance
    output_fields=["text"],  # Return the text field
)

import json

retrieved_lines_with_distances = [
    (res["entity"]["text"], res["distance"]) for res in search_res[0]
]
print(json.dumps(retrieved_lines_with_distances, indent=4))

context = "\n".join(
    [] for line_with_distance in retrieved_lines_with_distances]
)
SYSTEM_PROMPT = """
Human: You are an AI assistant. You are able to find answers to the questions from the contextual passage snippets provided.
"""
USER_PROMPT = f"""
Use the following pieces of information enclosed in <context> tags to provide an answer to the question enclosed in <question> tags.
<context>
{context}
</context>
<question>
{question}
</question>
"""
接下来我们开始配置vllm服务,注意国内不能直接连接,需要从modelscope上面下载好,模型之后本地加载,我这里使用了deepseek-r1-qwen-7b,你可以换成其他的模型。 然后下面的代码,你把模型的路径换成你自己的模型文件路径 注意,windows不支持vllm
export VLLM_USE_MODELSCOPE=True
vllm serve ~/deepseek-ai/DeepSeek-R1-Distill-Qwen-7B --enable-reasoning --reasoning-parser deepseek_r1 --dtype float16 --max-model-len 16380
下面是调用openai启动会话的程序,
from openai import OpenAI
# Set OpenAI's API key and API base to use vLLM's API server.
# 设置 OpenAI 的 API 密钥和 API 基础 URL 以使用 vLLM 的 API 服务器。
openai_api_key = "EMPTY"
openai_api_base = "http://localhost:8000/v1"


client = OpenAI(
    api_key=openai_api_key,
    base_url=openai_api_base,
)


chat_response = client.chat.completions.create(
    model="~/deepseek-ai/DeepSeek-R1-Distill-Qwen-7B",
    messages=[
        {"role": "system", "content": SYSTEM_PROMPT},
        {"role": "user", "content": USER_PROMPT},
    ]
)
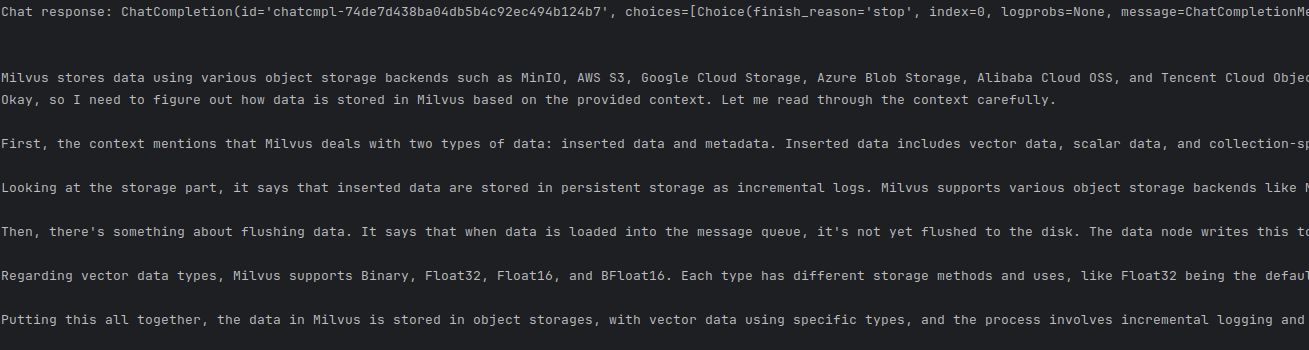
print("Chat response:", chat_response)
你会看到下面这个结果。

欢迎加入DeepSeek 技术社区。在这里,你可以找到志同道合的朋友,共同探索AI技术的奥秘。
更多推荐
 7
7 0
0- 0


 已为社区贡献3条内容

所有评论(0)