MCP模型上下文协议
MCP(Model Context Protocol)是一种开放协议,用于标准化应用程序与大型语言模型(LLM)之间的上下文交互。它类似于USB-C接口,为AI模型提供统一的数据源和工具连接方式。MCP通过客户端-服务器架构实现,包含主机、客户端、服务器和数据源等组件,使用WebSocket上的JSON-RPC 2.0进行通信。本文详细介绍了如何构建加密货币价格查询服务的MCP服务器,包括环境设置
什么是 MCP?
MCP (Model Context Protocol) 是一种开放协议,用于标准化应用程序如何向大型语言模型 提供上下文。你可以把 MCP 想象成 AI 应用的 USB-C 接口——就像 USB-C 为设备提供标准化的连接方式一样,MCP 为 AI 模型提供了标准化的方式来连接不同的数据源和工具。
为什么 MCP 对 AI 代理很重要?
传统的 AI 模型与外部资源连接方式通常需要为每个数据源或工具进行自定义集成,这会导致:
- 集成复杂性:每个新数据源都需要独特的实现
- 可扩展性问题:添加新工具变得越来越困难
- 维护开销:一个集成的更新可能会破坏其他集成
MCP 通过提供标准化协议解决了这些挑战,实现了:
- 统一访问:多个数据源和工具的单一接口
- 即插即用扩展:轻松添加新功能
- 状态通信:AI 和资源之间的实时双向通信
- 动态发现:AI 可以即时找到并使用新工具
MCP 架构概述
MCP 遵循客户端-服务器架构,包含以下几个主要组件:
- 主机:需要访问外部资源的 AI 应用程序(如 Claude Desktop、Cursor 或自定义代理)
- 客户端:维护与服务器连接的连接器
- 服务器:通过 MCP 协议公开功能(数据、工具、提示)的轻量级程序
- 数据源:MCP 服务器可以访问的本地(文件、数据库)和远程服务(API)
MCP 内的通信使用 WebSocket 连接上的 JSON-RPC 2.0,确保组件之间的实时双向通信。
构建你的 MCP 服务器
在本教程中,我们将构建一个加密货币价格查询服务,使用 CoinGecko API。我们的服务器将提供工具,允许 AI 检查加密货币的当前价格或市场数据。
设置环境
-
安装 uv 包管理器:
curl -LsSf https://astral.sh/uv/install.sh | sh-
设置项目:
# 创建并导航到项目目录
mkdir mcp-crypto-server
cd mcp-crypto-server
uv init

# 创建并激活虚拟环境
uv venv
source .venv/bin/activate  # Windows: .venv\Scripts\activate

# 安装依赖
uv add "mcp[cli]" httpx-
运行 MCP 服务器
设置环境后,我们可以开始构建工具。然后通过以下命令启动服务器:
# 从脚本文件夹复制服务器文件
cp ../scripts/mcp_server.py .

# 启动 MCP 服务器
uv run mcp_server.py-
与 Claude Desktop 集成
- 找到 uv 命令的绝对路径:
which uv创建或编辑 Claude Desktop 配置文件:
macOS:
~/Library/Application Support/Claude/claude_desktop_config.jsonWindows:
%APPDATA%\Claude\claude_desktop_config.jsonLinux:
~/.config/Claude/claude_desktop_config.json
- 添加 MCP 服务器配置:
{
    "mcpServers": {
        "crypto-price-tracker": {
            "command": "/ABSOLUTE/PATH/TO/uv",
            "args": [
                "--directory",
                "/ABSOLUTE/PATH/TO/GenAI_Agents/all_agents_tutorials/mcp-crypto-server",
                "run",
                "mcp_server.py"
            ]
        }
    }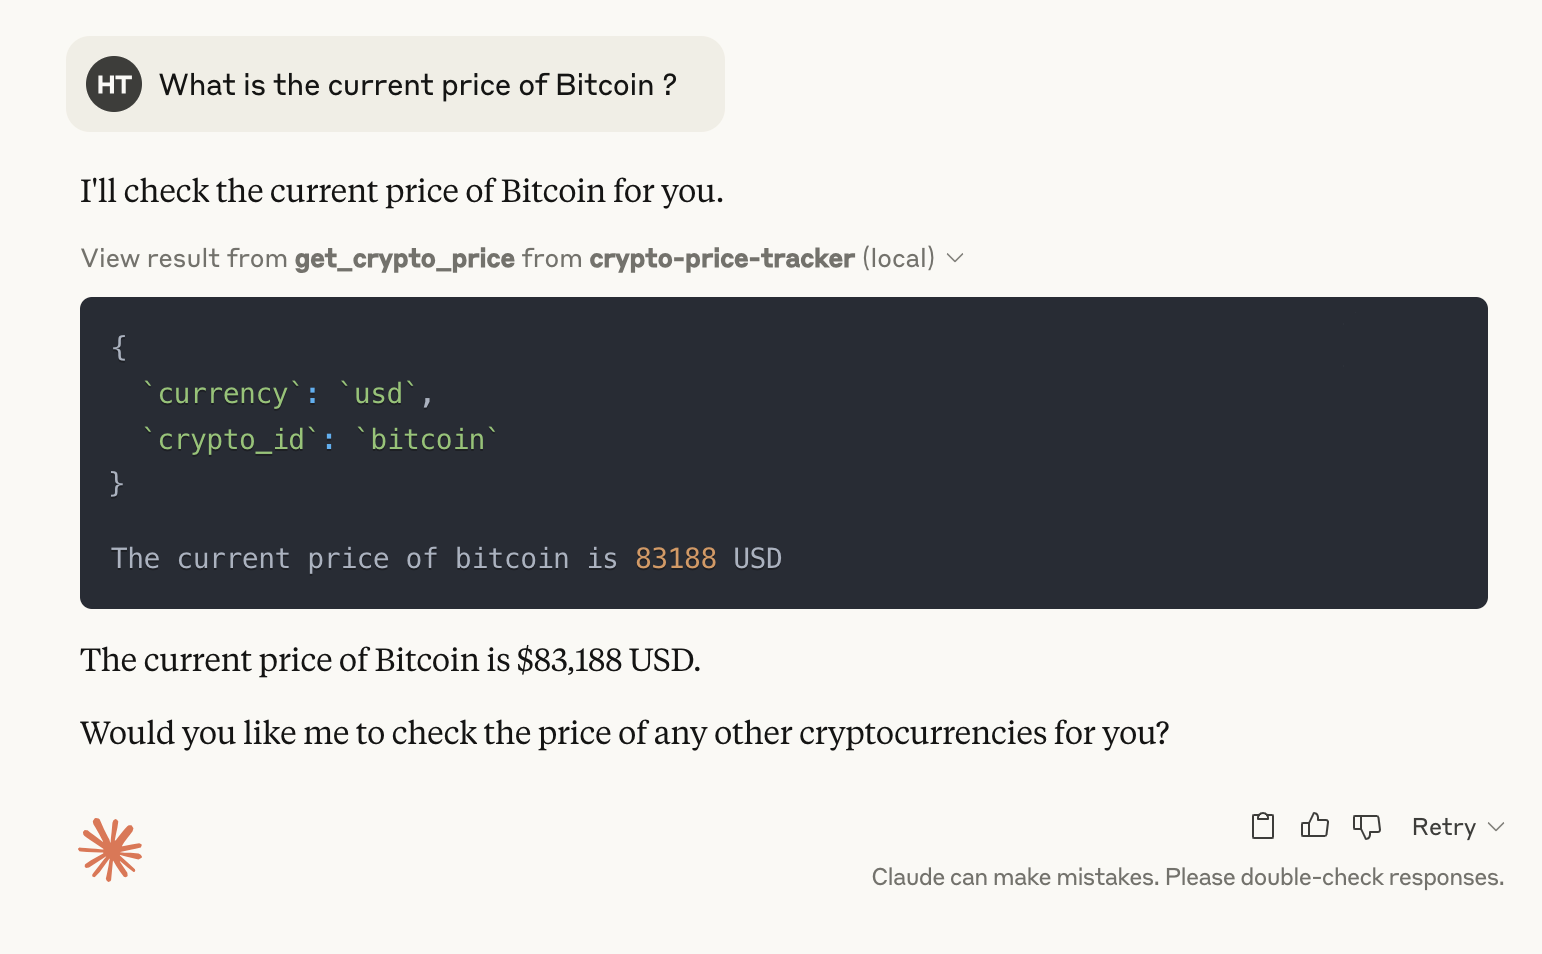
}- 重启 Claude Desktop,然后尝试询问比特币价格,你会看到类似这样的响应:

构建自定义 MCP 主机和客户端
现在我们将构建自己的 MCP 主机和客户端,创建一个能够:
- 充当 MCP 主机
- 发现 MCP 服务器上可用的工具
- 根据用户查询了解何时使用哪种工具
- 使用适当的参数执行工具
- 处理工具结果以提供有用的响应
理解架构
这个架构遵循现代 AI 系统中的常见模式:
- 发现阶段:我们的自定义主机发现可用的工具
- 规划阶段:代理根据用户查询决定使用哪种工具
- 执行阶段:我们的客户端连接到服务器并执行选定的工具
- 解释阶段:代理用自然语言解释结果
设置环境和导入库
我们需要两个主要库:
- MCP:处理与 MCP 服务器的客户端-服务器通信,允许我们构建主机和客户端组件
- Anthropic:与 Claude 交互,为我们的代理提供推理能力
# 安装必要的库
! pip install mcp anthropic

# 导入必要的库
import os
import json
from typing import List, Dict, Any

# MCP 库用于连接服务器
from mcp import ClientSession, StdioServerParameters
from mcp.client.stdio import stdio_client

# Anthropic API 用于 Claude
from anthropic import Anthropic

# 设置 Anthropic API 密钥
os.environ["ANTHROPIC_API_KEY"] = "your_anthropic_api_key_here"

# 初始化 Anthropic 客户端
client = Anthropic()

# 你的 MCP 服务器路径
mcp_server_path = "absolute/path/to/your/running/mcp/server"
工具发现:构建我们的 MCP 主机
首先,我们需要创建一个主机,能够发现 MCP 服务器上可用的工具。我们的主机将充当用户、AI 和可用工具之间的中介 - 类似于 Claude Desktop 的功能,但由我们完全控制。
async def discover_tools():
    """
    连接到 MCP 服务器并发现可用工具。
    返回有关可用工具的信息。
    """
    # ANSI 颜色代码,使日志更清晰可见
    BLUE = "\033[94m"
    GREEN = "\033[92m"
    RESET = "\033[0m"
    SEP = "=" * 40

    # 创建通过标准输入/输出连接到 MCP 服务器的服务器参数
    server_params = StdioServerParameters(
        command="python",  # 运行服务器的命令
        args=[mcp_server_path],  # 你的 MCP 服务器脚本的路径
    )

    print(f"{BLUE}{SEP}\n🔍 发现阶段: 连接到 MCP 服务器...{RESET}")

    # 通过标准输入/输出连接到服务器
    async with stdio_client(server_params) as (read, write):
        # 创建客户端会话
        async with ClientSession(read, write) as session:
            # 初始化连接
            print(f"{BLUE}📡 初始化 MCP 连接...{RESET}")
            await session.initialize()

            # 列出可用工具
            print(f"{BLUE}🔎 发现可用工具...{RESET}")
            tools = await session.list_tools()

            # 格式化工具信息以便于查看
            tool_info = []
            for tool_type, tool_list in tools:
                if tool_type == "tools":
                    for tool in tool_list:
                        tool_info.append({
                            "name": tool.name,
                            "description": tool.description,
                            "schema": tool.inputSchema
                        })

            print(f"{GREEN}✅ 成功发现 {len(tool_info)} 个工具{RESET}")
            print(f"{SEP}")
            return tool_info
工具执行:实现我们的 MCP 客户端
现在我们的主机可以发现可用工具,我们需要实现能够执行这些工具的客户端组件。
async def execute_tool(tool_name: str, arguments: Dict[str, Any]):
    """
    执行 MCP 服务器提供的特定工具。

    参数:
        tool_name: 要执行的工具名称
        arguments: 传递给工具的参数字典

    返回:
        执行工具的结果
    """
    # ANSI 颜色代码,使日志更清晰可见
    BLUE = "\033[94m"
    GREEN = "\033[92m"
    YELLOW = "\033[93m"
    RESET = "\033[0m"
    SEP = "-" * 40

    server_params = StdioServerParameters(
        command="python",
        args=[mcp_server_path],
    )

    print(f"{YELLOW}{SEP}")
    print(f"⚙️ 执行阶段: 运行工具 '{tool_name}'")
    print(f"📋 参数: {json.dumps(arguments, indent=2)}")
    print(f"{SEP}{RESET}")

    async with stdio_client(server_params) as (read, write):
        async with ClientSession(read, write) as session:
            await session.initialize()

            # 使用提供的参数调用特定工具
            print(f"{BLUE}📡 向 MCP 服务器发送请求...{RESET}")
            result = await session.call_tool(tool_name, arguments)

            print(f"{GREEN}✅ 工具执行完成{RESET}")

            # 格式化结果预览,使输出更整洁
            result_preview = str(result)
            if len(result_preview) > 150:
                result_preview = result_preview[:147] + "..."

            print(f"{BLUE}📊 结果: {result_preview}{RESET}")
            print(f"{SEP}")

            return result
将 AI 与我们的 MCP 实现集成
现在我们需要将这些组件与能够智能决定工具使用的 AI 系统集成。这是我们自定义 MCP 主机的"大脑",它需要:
- 根据用户输入了解何时需要工具
- 为任务选择适当的工具
- 正确格式化参数
- 处理和解释结果
async def query_claude(prompt: str, tool_info: List[Dict], previous_messages=None):
    """
    向 Claude 发送查询并处理响应。

    参数:
        prompt: 用户的查询
        tool_info: 有关可用工具的信息
        previous_messages: 用于维护上下文的先前消息

    返回:
        Claude 的响应,可能在执行工具后
    """
    # ANSI 颜色代码,使日志更清晰可见
    BLUE = "\033[94m"
    GREEN = "\033[92m"
    YELLOW = "\033[93m"
    PURPLE = "\033[95m"
    RESET = "\033[0m"
    SEP = "=" * 40

    if previous_messages is None:
        previous_messages = []

    print(f"{PURPLE}{SEP}")
    print("🧠 推理阶段: 用 Claude 处理查询")
    print(f"🔤 查询: \"{prompt}\"")
    print(f"{SEP}{RESET}")

    # 为 Claude 格式化工具信息
    tool_descriptions = "\n\n".join([
        f"Tool: {tool['name']}\nDescription: {tool['description']}\nSchema: {json.dumps(tool['schema'], indent=2)}"
        for tool in tool_info
    ])

    # 构建系统提示
    system_prompt = f"""You are an AI assistant with access to specialized tools through MCP (Model Context Protocol).

Available tools:
{tool_descriptions}

When you need to use a tool, respond with a JSON object in the following format:
{{
    "tool": "tool_name",
    "arguments": {{
        "arg1": "value1",
        "arg2": "value2"
    }}
}}

Do not include any other text when using a tool, just the JSON object.
For regular responses, simply respond normally.
"""

    # 从先前的消息中过滤掉系统消息
    filtered_messages = [msg for msg in previous_messages if msg["role"] != "system"]

    # 构建对话消息(不含系统消息)
    messages = filtered_messages.copy()

    # 添加当前用户查询
    messages.append({"role": "user", "content": prompt})

    print(f"{BLUE}📡 向 Claude API 发送请求...{RESET}")

    # 向 Claude 发送请求,将系统作为顶级参数
    response = client.messages.create(
        model="claude-3-5-sonnet-20240620",
        max_tokens=4000,
        system=system_prompt,  # 系统提示作为单独的参数
        messages=messages      # 仅用户和助手消息
    )

    # 获取 Claude 的响应
    claude_response = response.content[0].text
    print(f"{GREEN}✅ 收到来自 Claude 的响应{RESET}")

    # 尝试从响应中提取和解析 JSON
    try:
        # 在响应中查找 JSON 模式
        import re
        json_match = re.search(r'(\{[\s\S]*\})', claude_response)

        if json_match:
            json_str = json_match.group(1)
            print(f"{YELLOW}🔍 在响应中检测到工具使用{RESET}")
            print(f"{BLUE}📦 提取的 JSON: {json_str}{RESET}")

            tool_request = json.loads(json_str)

            if "tool" in tool_request and "arguments" in tool_request:
                tool_name = tool_request["tool"]
                arguments = tool_request["arguments"]

                print(f"{YELLOW}🔧 Claude 想要使用工具: {tool_name}{RESET}")

                # 使用我们的 MCP 客户端执行工具
                tool_result = await execute_tool(tool_name, arguments)

                # 如果需要,将工具结果转换为字符串
                if not isinstance(tool_result, str):
                    tool_result = str(tool_result)

                # 用工具请求和结果更新消息
                messages.append({"role": "assistant", "content": claude_response})
                messages.append({"role": "user", "content": f"Tool result: {tool_result}"})

                print(f"{PURPLE}🔄 获取 Claude 对工具结果的解释...{RESET}")

                # 获取 Claude 对工具结果的解释
                final_response = client.messages.create(
                    model="claude-3-5-sonnet-20240620",
                    max_tokens=4000,
                    system=system_prompt,
                    messages=messages
                )

                print(f"{GREEN}✅ 最终响应已准备就绪{RESET}")
                print(f"{SEP}")

                return final_response.content[0].text, messages

    except (json.JSONDecodeError, KeyError, AttributeError) as e:
        print(f"{YELLOW}⚠️ 在响应中未检测到工具使用: {str(e)}{RESET}")

    print(f"{GREEN}✅ 响应已准备就绪{RESET}")
    print(f"{SEP}")

    return claude_response, messages
构建交互式 MCP 主机界面
为了完整的 MCP 主机实现,我们需要一个能够在多轮对话中维护上下文的用户界面。这允许我们的主机记住以前的交互并在后续交流中建立在这些交互的基础上,就像 Claude Desktop 等专业 MCP 主机一样。
async def chat_session():
    """
    运行与 AI 代理的交互式聊天会话。
    """
    # ANSI 颜色代码,使日志更清晰可见
    BLUE = "\033[94m"
    GREEN = "\033[92m"
    YELLOW = "\033[93m"
    CYAN = "\033[96m"
    BOLD = "\033[1m"
    RESET = "\033[0m"
    SEP = "=" * 50

    print(f"{CYAN}{BOLD}{SEP}")
    print("🤖 初始化 MCP 代理")
    print(f"{SEP}{RESET}")

    # 确保从之前的单元格定义了 'tools',或者再次发现它们
    try:
        # 检查是否定义了 tools 且不为空
        if 'tools' not in globals() or not tools:
            print(f"{BLUE}🔍 未找到工具,正在发现可用工具...{RESET}")
            tools_local = await discover_tools()
        else:
            tools_local = tools

        print(f"{GREEN}✅ 代理已准备就绪,具有 {len(tools_local)} 个工具:{RESET}")

        # 打印可用工具以供参考
        for i, tool in enumerate(tools_local, 1):
            print(f"{YELLOW}  {i}. {tool['name']}{RESET}")
            print(f"     {tool['description'].strip()}")

        # 开始聊天会话
        print(f"\n{CYAN}{BOLD}{SEP}")
        print(f"💬 交互式聊天会话")
        print(f"{SEP}")
        print(f"Type 'exit' or 'quit' to end the session{RESET}")

        messages = []

        while True:
            # 获取用户输入
            user_input = input(f"\n{BOLD}You:{RESET} ")

            # 检查用户是否想要退出
            if user_input.lower() in ['exit', 'quit']:
                print(f"\n{GREEN}结束聊天会话。再见!{RESET}")
                break

            # 用 Claude 处理查询
            print(f"\n{BLUE}处理中...{RESET}")
            response, messages = await query_claude(user_input, tools_local, messages)

            # 显示 Claude 的响应
            print(f"\n{BOLD}Assistant:{RESET} {response}")

    except Exception as e:
        print(f"\n{YELLOW}⚠️ 发生错误: {str(e)}{RESET}")
结论
模型上下文协议(MCP)代表了一种将 AI 模型与外部资源集成的变革性方法,解决了 AI 应用开发中的关键挑战:
协议优势
- 标准化集成:消除复杂的自定义 API 连接
- 动态工具发现:使 AI 能够无缝找到并使用工具
- 灵活通信:支持实时双向交互
技术亮点
我们的实现展示了:
- 使用专业工具构建 MCP 服务器
- 创建可以动态发现和执行工具的主机
- 将 AI 模型与外部资源集成
通过这个教程,你将了解 MCP 如何通过为 AI 代理提供对更广泛数字生态系统的访问来增强它们的能力,使它们更加强大、上下文感知和有用。
技术引用

欢迎加入DeepSeek 技术社区。在这里,你可以找到志同道合的朋友,共同探索AI技术的奥秘。
更多推荐


 10
10 0
0- 0


 已为社区贡献1条内容

所有评论(0)