SpringBoot的使用
从ThymeleafAutoConfiguration的源代码中我们可以得知ThymeleafProperties中配置了Thymeleaf的规则。比较(Comparators): >, <, >=, <= (gt, lt, ge, le)文字标记(Literal tokens): one, sometext, main,…数字文本(Number literals): 0, 34, 3.0, 12
Web开发
使用SpringBoot:
1.创建SpringBoot应用,选中我们需要的模块
2.SpringBoot已经默认配置好了场景,只需要在配置文件中指定少量配置就可以运行
3.自己编写业务代码;
自动配置原理?
这个场景SpringBoot帮我们配置了什么?能不能修改?能修改哪些配置?能不能扩展?

SpringBoot对静态资源的映射规则
@ConfigurationProperties(prefix = "spring.resources", ignoreUnknownFields = false)
public class ResourceProperties implements ResourceLoaderAware {
//可以设置和静态资源有关的参数,缓存时间等
WebMvcAuotConfiguration:
@Override
public void addResourceHandlers(ResourceHandlerRegistry registry) {
if (!this.resourceProperties.isAddMappings()) {
logger.debug("Default resource handling disabled");
return;
}
Integer cachePeriod = this.resourceProperties.getCachePeriod();
if (!registry.hasMappingForPattern("/webjars/**")) {
customizeResourceHandlerRegistration(registry.addResourceHandler("/webjars/**").addResourceLocations("classpath:/META‐INF/resources/webjars/").setCachePeriod(cachePeriod));
}
String staticPathPattern = this.mvcProperties.getStaticPathPattern();
//静态资源文件夹映射
if (!registry.hasMappingForPattern(staticPathPattern)) {
customizeResourceHandlerRegistration(registry.
addResourceHandler(staticPathPattern).addResourceLocations(this.resourceProperties.getStaticLocations()).setCachePeriod(cachePeriod));
}
} /
/配置欢迎页映射
@Bean
public WelcomePageHandlerMapping welcomePageHandlerMapping(
ResourceProperties resourceProperties) {
return new WelcomePageHandlerMapping(resourceProperties.getWelcomePage(),
this.mvcProperties.getStaticPathPattern());
}
//配置喜欢的图标
@Configuration
@ConditionalOnProperty(value = "spring.mvc.favicon.enabled", matchIfMissing = true)
public static class FaviconConfiguration {
private final ResourceProperties resourceProperties;
public FaviconConfiguration(ResourceProperties resourceProperties) {
this.resourceProperties = resourceProperties;
}
@Bean
public SimpleUrlHandlerMapping faviconHandlerMapping() {
SimpleUrlHandlerMapping mapping = new SimpleUrlHandlerMapping();
mapping.setOrder(Ordered.HIGHEST_PRECEDENCE + 1);
//所有 **/favicon.ico
mapping.setUrlMap(Collections.singletonMap("**/favicon.ico",
faviconRequestHandler());
return mapping;
}
@Bean
public ResourceHttpRequestHandler faviconRequestHandler() {
ResourceHttpRequestHandler requestHandler = new ResourceHttpRequestHandler();
requestHandler.setLocations(this.resourceProperties.getFaviconLocations());
return requestHandler;
}
}
所有 /webjars/** ,都去 classpath:/META-INF/resources/webjars/ 找资源;
webjars:以jar包的方式引入静态资源;WebJars - Web Libraries in Jars

localhost:8080/webjars/jquery/3.3.1/jquery.js
<!‐‐引入jquery‐webjar‐‐>在访问的时候只需要写webjars下面资源的名称即可
<dependency>
    <groupId>org.webjars</groupId>
    <artifactId>jquery</artifactId>
    <version>3.3.1</version>
</dependency>
"/**" 访问当前项目的任何资源,都去(静态资源的文件夹)找映射
"classpath:/META‐INF/resources/",
"classpath:/resources/",
"classpath:/static/",
"classpath:/public/"
"/":当前项目的根路径
localhost:8080/abc === 去静态资源文件夹里面找abc
欢迎页; 静态资源文件夹下的所有index.html页面;被"/**"映射;
localhost:8080/ 找index页面
模板引擎
JSP、Velocity、Freemarker、Thymeleaf
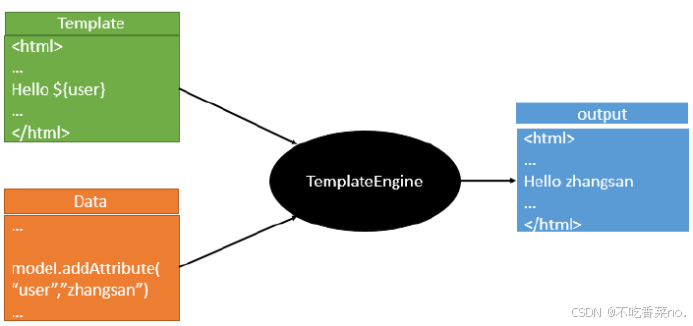 SpringBoot推荐的Thymeleaf;
引入thymeleaf
在pom.xml中引入
<dependency>
    <groupId>org.springframework.boot</groupId>
    <artifactId>spring-boot-starter-thymeleaf</artifactId>
</dependency>
从spring父文件中能看到Springboot2.0.1所使用的thymeleaf版本是3.0.9
springBoot启动的时候会自动配置
org.springframework.boot.autoconfigure.thymeleaf.ThymeleafAutoConfiguration
从ThymeleafAutoConfiguration的源代码中我们可以得知ThymeleafProperties中配置了Thymeleaf的规则
public class ThymeleafProperties {
    private static final Charset DEFAULT_ENCODING;
    public static final String DEFAULT_PREFIX = "classpath:/templates/";
    public static final String DEFAULT_SUFFIX = ".html";
    private boolean checkTemplate = true;
    private boolean checkTemplateLocation = true;
    private String prefix = "classpath:/templates/";
    private String suffix = ".html";
    private String mode = "HTML";
    private Charset encoding;
    private boolean cache;
我们使用html作为模板,而且默认的前缀是放在classpath:/templates/下,后缀是.html
当然这些属性我们都可以通过application.properties来修改。我们采用默认即可。
示例:
- 在templates下创建一个success.html
- 在html中引入thymeleaf的命名空间
<html lang="en" xmlns:th="http://www.thymeleaf.org">
3.创建一个Controller提供一个访问的方法
@RequestMapping("/success")
public String hello(Model model){
    model.addAttribute("hello","<h1>zhangsan</h1>");
    return "success";
}4.在thymeleaf模板中取值
<!DOCTYPE HTML PUBLIC "-//W3C//DTD HTML 4.01 Transitional//EN"
        "http://www.w3.org/TR/html4/loose.dtd">
<html lang="en" xmlns:th="http://www.thymeleaf.org">
<head>
    <title>Title</title>
</head>
<body>
<div  th:text="${hello}"> </div>
</body>
</html>Thymeleaf语法
变量表达式
变量表达式即OGNL表达式或Spring EL表达式(在Spring术语中也叫model attributes)。如下所示: ${session.user.name}
它们将以HTML标签的一个属性来表示:
|
<span th:text="${book.author.name}"> |
选择(星号)表达式
选择表达式很像变量表达式,不过它们用一个预先选择的对象来代替上下文变量容器(map)来执行,如下: *{customer.name}
被指定的object由th:object属性定义:
|
<div th:object="${book}"> ... <span th:text="*{title}">...</span> ... </div> |
文字国际化表达式
文字国际化表达式允许我们从一个外部文件获取区域文字信息(.properties),用Key索引Value,还可以提供一组参数(可选).
|
#{main.title} |
URL表达式
URL表达式指的是把一个有用的上下文或回话信息添加到URL,这个过程经常被叫做URL重写。不需要指定项目名字
@{/order/list}
URL还可以设置参数:
@{/order/details(id=${orderId})}
让我们看这些表达式:
|
<form th:action="@{/createOrder}"> <a href="main.html" rel="external nofollow" th:href="@{/main}" rel="external n |
表达式支持的语法
字面(Literals)
- 文本文字(Text literals): 'one text', 'Another one!',…
- 数字文本(Number literals): 0, 34, 3.0, 12.3,…
- 布尔文本(Boolean literals): true, false
- 空(Null literal): null
- 文字标记(Literal tokens): one, sometext, main,…
文本操作(Text operations)
- 字符串连接(String concatenation): +
- 文本替换(Literal substitutions): |The name is ${name}|
算术运算(Arithmetic operations)
- 二元运算符(Binary operators): +, -, *, /, %
- 减号(单目运算符)Minus sign (unary operator): -
布尔操作(Boolean operations)
- 二元运算符(Binary operators):and, or
- 布尔否定(一元运算符)Boolean negation (unary operator):!, not
比较和等价(Comparisons and equality)
- 比较(Comparators): >, <, >=, <= (gt, lt, ge, le)
- 等值运算符(Equality operators):==, != (eq, ne)
条件运算符(Conditional operators)
If-then: (if) ? (then)
If-then-else: (if) ? (then) : (else)
Default: (value) ?: (defaultvalue)
常用的thymeleaf标签
|
关键字 |
功能介绍 |
案例 |
|
th:id |
替换id |
<input th:id="'xxx' + ${collect.id}"/> |
|
th:text |
文本替换 |
<p th:text="${collect.description}">description</p> |
|
th:utext |
支持html的文本替换 |
<p th:utext="${htmlcontent}">conten</p> |
|
th:object |
替换对象 |
<div th:object="${session.user}"> |
|
th:value |
属性赋值 |
<input th:value="${user.name}" /> |
|
th:onclick |
点击事件 |
th:οnclick="'getCollect()'" |
|
th:each |
属性赋值 |
tr th:each="user,userStat:${users}"> |
|
th:if |
判断条件 |
<a th:if="${userId == collect.userId}" > |
|
th:unless |
和th:if判断相反 |
<a th:href="@{/login}" rel="external nofollow" rel="external nofollow" rel="external nofollow" th:unless=${session.user != null}>Login</a> |
|
th:href |
链接地址 |
<a th:href="@{/login}" rel="external nofollow" rel="external nofollow" rel="external nofollow" th:unless=${session.user != null}>Login</a> /> |
|
th:switch |
多路选择 配合th:case 使用 |
<div th:switch="${user.role}"> |
|
th:case |
th:switch的一个分支 |
<p th:case="'admin'">User is an administrator</p> |
|
th:fragment |
布局标签,定义一个代码片段,方便其它地方引用 |
<div th:fragment="alert"> |
|
th:include |
布局标签,替换内容到引入的文件 |
<head th:include="layout :: htmlhead" th:with="title='xx'"></head> /> |
|
th:replace |
布局标签,替换整个标签到引入的文件 |
<div th:replace="fragments/header :: title"></div> |
|
th:selected |
selected选择框 选中 |
th:selected="(${xxx.id} == ${configObj.dd})" |
|
th:src |
图片类地址引入 |
<img class="img-responsive" alt="App Logo" th:src="@{/img/logo.png}" /> |
|
th:action |
表单提交的地址 |
<form action="subscribe.html" th:action="@{/subscribe}"> |

欢迎加入DeepSeek 技术社区。在这里,你可以找到志同道合的朋友,共同探索AI技术的奥秘。
更多推荐

 21
21 0
0- 0


 已为社区贡献1条内容

所有评论(0)