10.three官方示例+编辑器+AI快速学习webgl_buffergeometry_drawrange
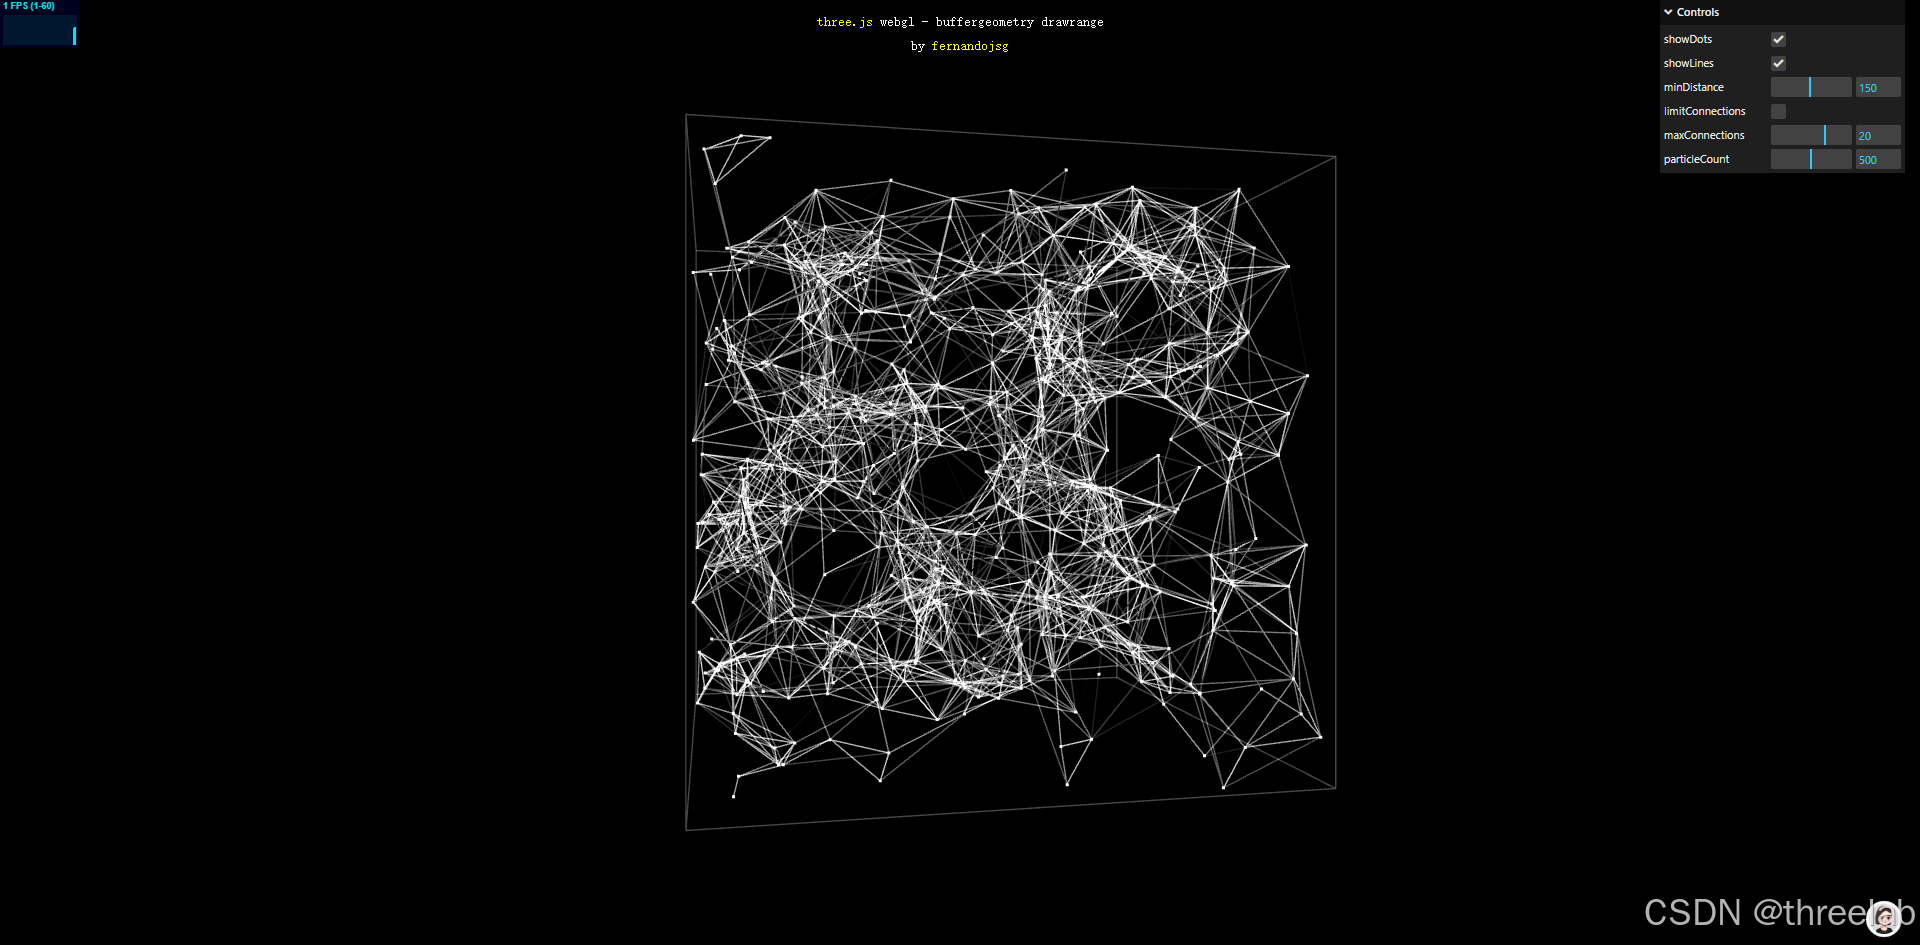
本示例展示了如何使用Three.js的BufferGeometry的drawRange功能创建高性能的粒子连线系统。通过动态计算粒子间的距离并根据条件生成连线,结合setDrawRange方法优化渲染性能,实现了一个可交互的粒子连线效果。核心技术包括动态设置drawRange、粒子间距离计算、连线生成、属性更新与渲染优化,以及通过GUI控制参数。示例代码详细展示了如何初始化场景、粒子系统和连线几何
·
本实例主要讲解内容
这个Three.js示例展示了如何使用BufferGeometry的drawRange功能创建高性能的连线粒子系统。通过动态计算粒子间的距离并根据条件创建连线,结合setDrawRange方法优化渲染性能,实现了一个可交互的粒子连线效果。
核心技术包括:
- BufferGeometry的drawRange动态设置
- 粒子间距离计算与连线生成
- 动态属性更新与渲染优化
- GUI交互控制
完整代码注释
<!DOCTYPE html>
<html lang="en">
	<head>
		<title>three.js webgl - buffergeometry - lines drawrange</title>
		<meta charset="utf-8">
		<meta name="viewport" content="width=device-width, user-scalable=no, minimum-scale=1.0, maximum-scale=1.0">
		<link type="text/css" rel="stylesheet" href="main.css">
	</head>
	<body>

		<div id="container"></div>
		<div id="info">
			<a href="https://threejs.org" target="_blank" rel="noopener">three.js</a> webgl - buffergeometry drawrange<br/>
			by <a href="https://twitter.com/fernandojsg">fernandojsg</a>
		</div>

		<script type="importmap">
			{
				"imports": {
					"three": "../build/three.module.js",
					"three/addons/": "./jsm/"
				}
			}
		</script>

		<script type="module">

			import * as THREE from 'three';

			import Stats from 'three/addons/libs/stats.module.js';
			import { GUI } from 'three/addons/libs/lil-gui.module.min.js';

			import { OrbitControls } from 'three/addons/controls/OrbitControls.js';

			let group;
			let container, stats;
			const particlesData = []; // 存储粒子数据(速度、连接数等)
			let camera, scene, renderer;
			let positions, colors; // 连线的位置和颜色数组
			let particles, pointCloud; // 粒子几何体和粒子系统
			let linesMesh; // 连线网格

			const maxParticleCount = 1000; // 最大粒子数量
			let particleCount = 500; // 当前粒子数量
			const r = 800; // 粒子分布范围
			const rHalf = r / 2;

			// GUI控制参数
			const effectController = {
				showDots: true, // 是否显示粒子点
				showLines: true, // 是否显示连线
				minDistance: 150, // 最小连接距离
				limitConnections: false, // 是否限制最大连接数
				maxConnections: 20, // 最大连接数
				particleCount: 500 // 当前粒子数量
			};

			init();

			// 初始化GUI控制面板
			function initGUI() {

				const gui = new GUI();

				gui.add( effectController, 'showDots' ).onChange( function ( value ) {
					pointCloud.visible = value; // 显示/隐藏粒子点
				} );

				gui.add( effectController, 'showLines' ).onChange( function ( value ) {
					linesMesh.visible = value; // 显示/隐藏连线
				} );

				gui.add( effectController, 'minDistance', 10, 300 ); // 最小连接距离滑块
				gui.add( effectController, 'limitConnections' ); // 是否限制连接数开关
				gui.add( effectController, 'maxConnections', 0, 30, 1 ); // 最大连接数滑块

				// 粒子数量滑块及回调
				gui.add( effectController, 'particleCount', 0, maxParticleCount, 1 ).onChange( function ( value ) {
					particleCount = value;
					particles.setDrawRange( 0, particleCount ); // 设置几何体的绘制范围
				} );

			}

			function init() {

				initGUI(); // 初始化GUI

				container = document.getElementById( 'container' );

				// 初始化相机
				camera = new THREE.PerspectiveCamera( 45, window.innerWidth / window.innerHeight, 1, 4000 );
				camera.position.z = 1750;

				// 添加轨道控制器
				const controls = new OrbitControls( camera, container );
				controls.minDistance = 1000;
				controls.maxDistance = 3000;

				// 初始化场景
				scene = new THREE.Scene();

				// 创建一个组来包含所有对象
				group = new THREE.Group();
				scene.add( group );

				// 添加边界框辅助线
				const helper = new THREE.BoxHelper( new THREE.Mesh( new THREE.BoxGeometry( r, r, r ) ) );
				helper.material.color.setHex( 0x474747 );
				helper.material.blending = THREE.AdditiveBlending;
				helper.material.transparent = true;
				group.add( helper );

				// 为连线预分配最大可能的空间(maxParticleCount²条线段)
				// 注意:这里预分配了足够大的空间,但实际使用的是动态计算的子集
				const segments = maxParticleCount * maxParticleCount;
				positions = new Float32Array( segments * 3 ); // 每个线段两个点,每个点3个坐标
				colors = new Float32Array( segments * 3 ); // 每个顶点一个颜色

				// 创建粒子材质
				const pMaterial = new THREE.PointsMaterial( {
					color: 0xFFFFFF,
					size: 3,
					blending: THREE.AdditiveBlending,
					transparent: true,
					sizeAttenuation: false // 粒子大小不随距离衰减
				} );

				// 创建粒子几何体
				particles = new THREE.BufferGeometry();
				particlePositions = new Float32Array( maxParticleCount * 3 );

				// 初始化粒子位置和数据
				for ( let i = 0; i < maxParticleCount; i ++ ) {

					// 随机位置
					const x = Math.random() * r - r / 2;
					const y = Math.random() * r - r / 2;
					const z = Math.random() * r - r / 2;

					particlePositions[ i * 3 ] = x;
					particlePositions[ i * 3 + 1 ] = y;
					particlePositions[ i * 3 + 2 ] = z;

					// 存储粒子的速度和连接数
					particlesData.push( {
						velocity: new THREE.Vector3( - 1 + Math.random() * 2, - 1 + Math.random() * 2, - 1 + Math.random() * 2 ),
						numConnections: 0
					} );

				}

				// 设置粒子几何体的绘制范围和属性
				particles.setDrawRange( 0, particleCount );
				particles.setAttribute( 'position', new THREE.BufferAttribute( particlePositions, 3 ).setUsage( THREE.DynamicDrawUsage ) );

				// 创建粒子系统
				pointCloud = new THREE.Points( particles, pMaterial );
				group.add( pointCloud );

				// 创建连线几何体
				const geometry = new THREE.BufferGeometry();

				// 设置连线的位置和颜色属性,并标记为动态更新
				geometry.setAttribute( 'position', new THREE.BufferAttribute( positions, 3 ).setUsage( THREE.DynamicDrawUsage ) );
				geometry.setAttribute( 'color', new THREE.BufferAttribute( colors, 3 ).setUsage( THREE.DynamicDrawUsage ) );

				geometry.computeBoundingSphere();
				geometry.setDrawRange( 0, 0 ); // 初始不绘制任何线段

				// 创建连线材质(使用顶点颜色)
				const material = new THREE.LineBasicMaterial( {
					vertexColors: true,
					blending: THREE.AdditiveBlending,
					transparent: true
				} );

				// 创建连线网格
				linesMesh = new THREE.LineSegments( geometry, material );
				group.add( linesMesh );

				// 初始化渲染器
				renderer = new THREE.WebGLRenderer( { antialias: true } );
				renderer.setPixelRatio( window.devicePixelRatio );
				renderer.setSize( window.innerWidth, window.innerHeight );
				renderer.setAnimationLoop( animate );
				container.appendChild( renderer.domElement );

				// 添加性能统计
				stats = new Stats();
				container.appendChild( stats.dom );

				// 窗口大小变化事件监听
				window.addEventListener( 'resize', onWindowResize );

			}

			// 窗口大小变化处理函数
			function onWindowResize() {

				camera.aspect = window.innerWidth / window.innerHeight;
				camera.updateProjectionMatrix();

				renderer.setSize( window.innerWidth, window.innerHeight );

			}

			// 动画循环
			function animate() {

				let vertexpos = 0; // 位置数组索引
				let colorpos = 0; // 颜色数组索引
				let numConnected = 0; // 连接数计数器

				// 重置所有粒子的连接数
				for ( let i = 0; i < particleCount; i ++ )
					particlesData[ i ].numConnections = 0;

				// 遍历所有粒子
				for ( let i = 0; i < particleCount; i ++ ) {

					// 获取当前粒子数据
					const particleData = particlesData[ i ];

					// 更新粒子位置
					particlePositions[ i * 3 ] += particleData.velocity.x;
					particlePositions[ i * 3 + 1 ] += particleData.velocity.y;
					particlePositions[ i * 3 + 2 ] += particleData.velocity.z;

					// 边界检测与反弹
					if ( particlePositions[ i * 3 + 1 ] < - rHalf || particlePositions[ i * 3 + 1 ] > rHalf )
						particleData.velocity.y = - particleData.velocity.y;

					if ( particlePositions[ i * 3 ] < - rHalf || particlePositions[ i * 3 ] > rHalf )
						particleData.velocity.x = - particleData.velocity.x;

					if ( particlePositions[ i * 3 + 2 ] < - rHalf || particlePositions[ i * 3 + 2 ] > rHalf )
						particleData.velocity.z = - particleData.velocity.z;

					// 如果限制连接数且已达到最大连接数,则跳过此粒子
					if ( effectController.limitConnections && particleData.numConnections >= effectController.maxConnections )
						continue;

					// 检测与其他粒子的碰撞并创建连线
					for ( let j = i + 1; j < particleCount; j ++ ) {

						const particleDataB = particlesData[ j ];
						if ( effectController.limitConnections && particleDataB.numConnections >= effectController.maxConnections )
							continue;

						// 计算两粒子之间的距离
						const dx = particlePositions[ i * 3 ] - particlePositions[ j * 3 ];
						const dy = particlePositions[ i * 3 + 1 ] - particlePositions[ j * 3 + 1 ];
						const dz = particlePositions[ i * 3 + 2 ] - particlePositions[ j * 3 + 2 ];
						const dist = Math.sqrt( dx * dx + dy * dy + dz * dz );

						// 如果距离小于设定的最小距离,则创建连线
						if ( dist < effectController.minDistance ) {

							particleData.numConnections ++;
							particleDataB.numConnections ++;

							// 计算连线的透明度(距离越近越不透明)
							const alpha = 1.0 - dist / effectController.minDistance;

							// 添加连线的两个端点位置
							positions[ vertexpos ++ ] = particlePositions[ i * 3 ];
							positions[ vertexpos ++ ] = particlePositions[ i * 3 + 1 ];
							positions[ vertexpos ++ ] = particlePositions[ i * 3 + 2 ];

							positions[ vertexpos ++ ] = particlePositions[ j * 3 ];
							positions[ vertexpos ++ ] = particlePositions[ j * 3 + 1 ];
							positions[ vertexpos ++ ] = particlePositions[ j * 3 + 2 ];

							// 添加连线的颜色(白色,透明度由alpha决定)
							colors[ colorpos ++ ] = alpha;
							colors[ colorpos ++ ] = alpha;
							colors[ colorpos ++ ] = alpha;

							colors[ colorpos ++ ] = alpha;
							colors[ colorpos ++ ] = alpha;
							colors[ colorpos ++ ] = alpha;

							numConnected ++; // 连接数加1

						}

					}

				}

				// 设置连线几何体的绘制范围(仅绘制实际存在的连线)
				linesMesh.geometry.setDrawRange( 0, numConnected * 2 ); // 每个线段由两个顶点组成
				linesMesh.geometry.attributes.position.needsUpdate = true; // 标记位置属性需要更新
				linesMesh.geometry.attributes.color.needsUpdate = true; // 标记颜色属性需要更新

				// 标记粒子位置属性需要更新
				pointCloud.geometry.attributes.position.needsUpdate = true;

				render(); // 渲染场景
				stats.update(); // 更新性能统计

			}

			// 渲染函数
			function render() {

				const time = Date.now() * 0.001;

				group.rotation.y = time * 0.1; // 旋转整个组
				renderer.render( scene, camera ); // 渲染场景

			}

		</script>
	</body>
</html>
BufferGeometry的drawRange技术解析
drawRange的作用与优势
BufferGeometry.setDrawRange(start, count)方法允许我们:
- 限制渲染范围:只渲染几何体中指定范围内的顶点或索引
- 优化性能:避免渲染不需要的几何体部分
- 动态控制:在运行时根据需要调整渲染范围
- 节省内存:预分配较大的几何体空间,但只使用其中一部分
在本示例中,我们预分配了足够大的连线几何体空间(maxParticleCount * maxParticleCount条线段),但实际只渲染满足距离条件的连线,通过setDrawRange动态控制渲染范围。
粒子系统与连线生成
本示例实现了一个完整的粒子系统,包括:
- 粒子初始化:随机分布在空间中,并赋予随机速度
- 物理模拟:粒子按速度移动,遇到边界反弹
- 距离计算:计算每对粒子之间的距离
- 连线生成:当粒子距离小于阈值时创建连线,并根据距离设置透明度
- 动态属性更新:每一帧更新粒子位置和连线数据
这种技术特别适合创建流体模拟、数据可视化、网络拓扑等需要大量点和连线的场景。
性能优化策略
处理大量粒子和连线时的关键优化策略:
- 预分配内存:预先分配足够大的数组空间,避免频繁内存分配
- 使用BufferGeometry:比普通Geometry更高效,适合处理大量顶点数据
- 动态drawRange:只渲染需要的部分,避免渲染不可见或不必要的元素
- 减少计算量:通过限制最大连接数、优化距离计算等方式减少计算量
- 批处理更新:批量更新属性数据,减少GPU和CPU之间的通信
这种优化策略在处理大规模数据可视化或复杂粒子系统时尤为重要。
可交互性与扩展性
本示例通过GUI提供了丰富的交互选项,包括:
- 显示/隐藏粒子点和连线
- 调整最小连接距离
- 限制最大连接数
- 调整粒子数量
可以进一步扩展的方向包括:
- 添加粒子大小、颜色的动态变化
- 实现粒子间的引力或斥力
- 添加不同的布局算法(如网格、圆形等)
- 集成外部数据,实现数据驱动的可视化
这种灵活的粒子连线系统可以应用于社交网络分析、分子结构可视化、电力网络展示等多种场景。

欢迎加入DeepSeek 技术社区。在这里,你可以找到志同道合的朋友,共同探索AI技术的奥秘。
更多推荐

 19
19 0
0- 0


 已为社区贡献1条内容

所有评论(0)