大模型应用开发
1、 熟练对接国内外大模型:deepSeek、豆包、kimi。
·
一、总览
一、需要掌握的技能
	1、熟练对接国内外大模型:deepSeek、豆包、kimi
	2、训练与微调大模型
	3、部署 框架
	4、算法


二、专业术语说明
	1、LLM:large language model,大型语言模型,它是一种基于深度学习技术的人工智能模型,旨在理解和生成人类语言
	2、RAG:RAG(Retrieval-Augmented Generation,检索增强生成)是一种结合检索技术和生成模型的自然语言处理框架,旨在通过从外部知识库中检索相关信息来增强生成模型的性能
	     检索:Retrieval
	     增强:Augmented:
	     生成:Generation:

		RAG和微调的区别:RAG不会更改基座模型,而微调会去改变基座模型

	3、Agent(智能体):是一种能够感知环境、自主决策并执行行动以实现特定目标的实体。它通常由以下核心组件构成
		 模型(Model):作为Agent的“大脑”,负责理解用户输入、进行推理和规划,并选择合适的工具执行任务。
         工具(Tools):Agent通过工具与外部世界交互,例如搜索引擎、数据库查询工具、邮件发送工具等,从而扩展其能力。
         编排层(Orchestration Layer):作为“指挥中心”,管理Agent的内部状态,协调模型和工具的使用,并指导Agent的行动
    4、LangChain 框架
    5、LangGraph 库, 是 langChain 生态系统中的一个重要工具库
    7、hugging face 模型库,理解为github  https://huggingface.co/   ,国内的叫modelScope:https://www.modelscope.cn/home
    8、Bert Model: hugging face里面的一种一款大模型,理解为github里面的一个开源项目,用来作自然语言处理
    9、Embedding:将复杂数据转换为低维向量,例如将用户上传的文档,句子等格式数据转为向量, 进而可以存储在向量数据库
        常见的向量数据:  开源---Chroma、Weaviate、Faiss      商业:Amazon OpenSearch Service、Elasticsearch
   10、Pytorch:一个开源的机器学习库,基于 Python,主要用于深度学习任务。它由 Facebook 的人工智能研究团队开发,并于2016年首次发布。
          官网:https://pytorch.org/
   11、Cuda: CUDA(Compute Unified Device Architecture,计算统一设备架构)是 NVIDIA 推出的一种并行计算平台和编程模型,用于利用 NVIDIA GPU(图形处理单元)进行通用计算
   12、Xtuner: 微调工具
         下载:git clone https://github.com/InternLM/xtuner.git
         配置加速环境:进入xtuner文件夹, pip install -e '.[deepseed]'     加速模型的训练/节约模型训练的显存
   15、查询linux显存工具:nvitop
   16、不管是训练框架(xtuner)还是部署框架(lmdeploy),都有最基本的模型调用方法,如:模型转换、模型合并、模型对话等


三、大模型优缺点
   优点:
   缺点:  幻觉(没有这个知识,回答不出来)
          精度(回答的不够精致)
二、Hugging Face 模型库
1、介绍
	1、什么是Hugging Face?
	   是一个提供先进自然语言处理(NLP)工具的平台,支持transformer模型的开发和应用。
	   它拥有庞大的模型库和社区资源,可以理解为github

	2、登录可以获取token,点击头像——设置——Access Tokens
	    账号421946786@qq.com

2、环境准备
	1、Python     Python或者Anaconda)      python -V
	2、Pytorch库(带有cuda)
	     6GB显存的独立英伟达显卡
		 安装:  pip install torch torchvision torchaudio
	     校验是否安装成功 python -c "import torch; print(torch.__version__); print(torch.cuda.is_available())"
	     Pytorch官网:https://pytorch.org/


3、下载大模型:bert-base-chinese 到本地
	1、安装Hugging Face模型库
	    pip install --upgrade pip   #更新pip
	    pip install transformers datasets tokenizers


	2、下载大模型:bert-base-chinese
		from transformers import AutoModel, AutoTokenizer

	    # 模型名称
	    model_name = "bert-base-chinese"
	    # 如果不指定路径,默认存放 C:\Users\A22219\.cache\huggingface\hub
	    cache_dir = r"D:\python\cache"    #当前目录下  cache_dir = "./my_model_cache/bert-base-chinese"

		#下载模型
	    model = AutoModel.from_pretrained(model_name, cache_dir=cache_dir)
	    #下载分词器
	    tokenizer = AutoTokenizer.from_pretrained(model_name, cache_dir=cache_dir)


	判断一个模型是否下载完整,D:\python\cache\models--bert-base-chinese\snapshots\c30a6ed22ab4564dc1e3b2ecbf6e766b0611a33f
	  下应该有五个文件:
	    config.json             对当前模型的配置
	  	model.safetensors
	  	tokenizer.json          分词工具
	  	tokenizer_config.json   分词配置
	  	vocat.txt               字典


4、使用大模型:uer/gpt2-chinese-cluecorpussmall
	如果之前没有安装模型库,也要先安装Hugging Face模型库
    pip install transformers datasets tokenizers

	1、代码方式使用示例
	  		from transformers import AutoTokenizer, pipeline, GPT2LMHeadModel

			# Download model and tokenizer locally
			model_name = "uer/gpt2-chinese-cluecorpussmall"
			cache_dir = r"D:\python\cache"

			# Load model
			model = GPT2LMHeadModel.from_pretrained(model_name, cache_dir=cache_dir)
			# Load tokenizer
			tokenizer = AutoTokenizer.from_pretrained(model_name, cache_dir=cache_dir)

			# Create text generation pipeline
			generator = pipeline("text-generation", model=model, tokenizer=tokenizer, device=1)
			out = generator("为什么我这么帅",  # Seed text for generation
			                max_length=50,  # Maximum length of generated text
			                num_return_sequences=1,  # Number of generated sequences to return
			                truncation=True  # Enable truncation explicitly
			                )
			print(out)


	2、匿名API访问大模型接口
	    import requests
		if __name__ == '__main__':
		    Domain = 'https://api-interface.huggingface.co/models' # The domain
		    URL = '/uer/gpt2-chinese-cluecorpussmall'              # 页面搜索模型复制完整路径
		    API_URL = Domain + URL
	        response = requests.post(API_URL, json={"inputs": "今天天气不错"})
	        print(response.json())


 	3、带上token访问
		import requests
		if __name__ == '__main__':
		    API_URL = 'https://api-interface.huggingface.co/models/uer/gpt2-chinese-cluecorpussmall'

		    API_TOKEN = "xxxxxx"  # replace with your API token
		    headers = {"Authorization": f"Bearer {API_TOKEN}"}

		    response = requests.post(API_URL, headers, json={"inputs": "今天天气不错"})
		    print(response.json())
三、ModelScope 模型库
1、安装modelscope模型库
   pip install --upgrade pip   #更新pip
   pip install modelscope

2、下载模型  Shanghai_AI_Laboratory/internlm2_5-7b-chat
  modelScope搜索到这个模型,点击Files and versions,点击Download this model,就有各种下载方式

   git方式:
        git clone https://www.modelscope.cn/Shanghai_AI_Laboratory/internlm2_5-7b-chat.git  # modelscope搜索这个大模型,点击files and versions —— 点击Download this model

   编码方式:
        from modelscope import snapshot_download
        model_dir = snapshot_download('shanghai_ai_laboratory/internlm2_5-7b-chat',cache_dir='/root/11m/internlm2_5-7b-chat')
四、langChain
主要模块
    chat models PromptTemplates          输入提示词模块
    outputParses Chains                  输出模块(输出格式为*.xml、 *.yml、 *.txt等)
    lcel                                 语法(langChain有一套它自己的语法)
    runable interface                    异步接口函数
    debug                                上线部署的debug,开发者使用的debug
    LangSmith Tracing                    监控
    LangGraph                            库
    Semantic search                      语义搜索,一种先进的搜索技术,旨在通过理解用户查询的意图和上下文含义,而不仅仅是匹配关键词,从而提高搜索结果的准确性和相关性
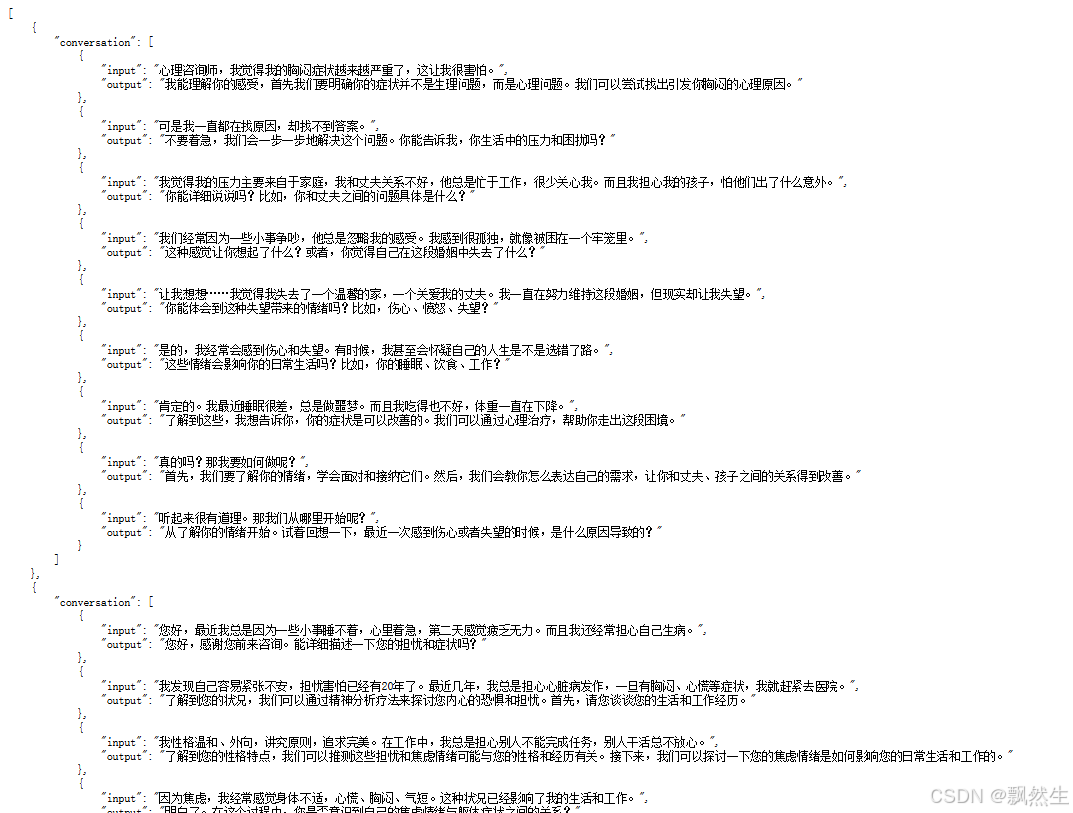
五、项目实战——模型微调 在线心理问诊系统(基于modelScope的书生浦语 internlm2_5-7b-chat大模型)
1、安装环境和依赖库
模型转换: 模型训练后会自动保存为PyTorch模型,我们需要利用工具(如Xtuner)将其转为HuggingFace模型,以便后续使用,具体命令如下:
模型合并/打包
模型量化: 量化是为了性能,推理速度变得更快,但是精度会有一定的受损
模型部署

开源指令微调数据集:
   HuggingFace Hub中有众多优秀的开源数据,可以作为指令微调数据,进行大模型的训练

服务器:
   RTX 4090D  24GB
   基础镜像:Pytorch(2.1.2)  Python(3.10 ubu)  Cuda(12.1)

1、安装依赖库环境
	a、升级pip到最新版本  pip install --upgrade pip
	     查看当前版本    pip --version

	b、安装量化依赖包
	    pip install bitsandbytes>=0.39.0    bitsandbytes主要用于实现高效的 k-bit 量化技术,以优化大规模语言模型(LLMs)的推理和训练

	c、Xtuner微调工具
	    下载:git clone https://github.com/InternLM/xtuner.git
		给Xtuner安装加速软件: deepspeed框架 可以加速模型的训练/节约模型训练的显存
		   cd xtuner
		   pip install -e '.[deepspeed]
2、下载大模型
推荐采用第一种

 SDK方式:
	    pip install modelscope
		from modelscope import snapshot_download
		model_dir = snapshot_download('shanghai_ai_laboratory/internlm2_5-7b-chat',cache_dir='/root/11m/internlm2_5-7b-chat')

   git方式:
        git clone https://www.modelscope.cn/Shanghai_AI_Laboratory/internlm2_5-7b-chat.git

   书生浦语官网:https://intern-ai.org.cn/home
3、下载数据集
可以在modelScope、github等下载
   git clone https://www.modelscope.cn/datasets/5CD-AI/sendo_vietnamese_multiturn_gemini_50k.git

   本次项目使用的是:https://github.com/SmartFlowAI/EmoLLM/blob/main/datasets/multi_turn_dataset_2.json
4、下载微调工具Xtuner 、加速配置 和 微调参数配置
下载微调工具Xtuner:
   git clone https://github.com/InternLM/xtuner.git

   Llama-Factory也是一个微调工具

给Xtuner安装加速软件: deepspeed框架 可以加速模型的训练/节约模型训练的显存
   cd xtuner
   pip install -e '.[deepspeed]

微调参数配置
	打开Xtuner文件夹,root\xtuner\xtuner\configs\internlm\internlm2_5_chat_7b\,
	    里面有三个文件,复制文件internlm2_5_chat_7b_qlora_oasst1_e3.py 到 root\根目录
	    编辑复制的这个文件

	    PART 1:
	         模型的位置
	         数据集存放的位置
	         max_length: 单挑数据最大长度 2048 -> 512
	         batch_size: 1 -> 3
	         max_epochs:训练轮次  3 -> 100
	    PART 2:
	        不用动
	    PART 3
	        dataset=dict(type=load_dataset, path=data_path) 改为
	        dataset=dict(type=load_dataset, path='json', daata_files=dict(train=data_path))    由于训练数据是json所以要改成json并指定数据路径

	        dataset_map_fn=oasst1_map_fn,  改为   dataset_map_fn=None
5、微调训练
在编辑文件所在目录下,输入以下命令启动微调脚本:
   xtuner train internlm2_5_chat_7b_qlora_oasst1_e3.py(微调文件)  --work-dir your_work_dir(指定生成的新模型路径)

    1、如果没有指定生成的路径,训练后会在微调文件所在目录生成一个文件夹work_dir,指定生成路径:xtuner train config.py --work-dir your_work_dir
    2、后台挂起训练(nohup、tmux、screen)
       命令前后分别加 nohup 和 &: nohup xtuner train config.py --work-dir your_work_dir  &
    3、训练加策略
		  具体见官网 训练——>开源指令微调数据集(LLM): https://xtuner.readthedocs.io/zh-cn/latest/index.html
			  单机单卡:xtuner train ./config.py --deepspeed deepspeed_zero2
			  单机多卡:NPROC_PER_NODE=${GPU_NUM} xtuner train ./config.py --deepspeed deepspeed_zero2
			  多机多卡(以 2 * 8 GPUs 为例)
					# excuete on node 0
					NPROC_PER_NODE=8 NNODES=2 PORT=$PORT ADDR=$NODE_0_ADDR NODE_RANK=0 xtuner train mixtral_8x7b_instruct_full_oasst1_e3 --deepspeed deepspeed_zero2
					# excuete on node 1
					NPROC_PER_NODE=8 NNODES=2 PORT=$PORT ADDR=$NODE_0_ADDR NODE_RANK=1 xtuner train mixtral_8x7b_instruct_full_oasst1_e3 --deepspeed deepspeed_zero2
6、模型转换、合并、对话测试
1、模型转换:训练出来的模型是pth格式参数,需要将其转为Hugging Face格式,LORA模型
	xtuner convert pth_to_hf  $CONFIG_NAME_OR_PATH   $PTH                      $SAVE_PATH
	                          微调配置文件            训练后生成出来的pth模型     转换后的LORA模型保存路径

	例如:
	    xtuner convert pth_to_hf ./internlm2_5_chat_7b_qlora_oasst1_e3.py  /work_dirs/internlm_chat_7b_qlora_oasst1_e3/iter_1050.pth ./hf

2、模型合并(将base模型与转换后的LORA模型合并)
    xtuner convert merge $NAME_OR_PATH_TO_LLM SNAME_OR_PATH_TO_ADAPTER  $SAVE_PATH            --max-shard-size 2GB
                          base模型                                       转换后的lora模型路径
	例如:
	xtuner convert merge ./internlm2_5-7b-chat                        ./hf./merged            --max-shard-size 2GB

3、与合并后的模型对话
   Xtuner命令方式:xtuner chat ./merged --prompt-template internlm_chat   具体见Xtuner文件——>训练——>开源指令微调数据集(LLM)往下拉

   代码方式:和上面HuggingFace、modelScope
   		import torch
		from transformers import Autolokenizer,AutoModelForCausall

		model_name_or_path -"/root/autodl-tmp/merged"#这里请修改
		tokenizer - Autolokenizer.from_pretrained(model_name_or_path, truБАРГИРИФТА АЗ "HTTPS://TG.WIKIPEDIA.O
		model = AutomodelforCausalu.from_pretrained(model_name_or_path, truist renote codeafrue, tonch atypertanch ofloatio, device map- aut٥٠
		model = model.eval()

		systee_prompt."你的名字叫小聚,你由Aron团队打造的中文领域心理健康的手,是一个研究过无数具有心理健康问题的病人与心理健康医生对话的心理专家,在心里方面拥有广博的知识储备和丰富的研究
		messages - [(systen_prompt,''')]

		print(************Melcome to Internlm chatbot, type'exit'to exit...............")
		while True:
			input_text • input("User >>> ")
			input_text.replace(' ,
			if input_text == "exit":
			break
			response, history - model.chat(tokenizer, input_text, history=messages)
			messages.append((input_text, response))
			print(f"robot >>> (response)")
7、LMDeploy 量化部署
1、对模型显存评估
    查询InternLM2.5-7b-chat的config.json文件的torch_dtype可知,该模型的权重被存储为bfloat16格式:

    对于一个7B(70亿)参数的模型,每个参数使用16位浮点数(等于2个Byte)表示,则模型的权重大小约为:14GB(70亿个参数×每个参数占用2个字节=14GB)
    所以我们需要大于14GB的显存。

2、环境:
  python使用LmDeploy部署,python版本不能太高,用3.10
  Pytorch、tochvision、cuda
  依赖:lmdeploy、timm、openai

	    conda create -n lmdeploy python=3.10 -y    # -n 后面接虚拟环境的名称    -y 表示自动确认
		conda activate lmdeploy
		conda install pytorch==2.1.2 torchvision==0.16.2 torchaudio==2.1.2 pytorch-
		cuda=12.1 -c pytorch -c nvidia -y
		#以上基础环境有的可以忽略
		#安装1mdeploy及其依赖
		pip install timm==1.0.8 openai==1.40.3 Imdeploy[a11]==0.5.3


3、验证微调后的模型是否正确并且能加载( 不管是训练框架还是部署框架,都有最基本的模型调用方法,如:模型对话、模型转换)
    lmdeploy chat /root/autodl-tmp/merged(与模型对话)


4、启动API服务(无量化部署)
	   Lmdeploy serve api_server \
	     /root/autodl-tmp/merged \
	    --model-format hf
		--quant-policy O    #量化策略 0-无量化
		--server-name 0.0.0.0 \
		--server-port 23333 \
		--tp 1

		访问http://127.0.0.1:23333/,打开swagger的页面

	命令说明:
		lmdeploy serve api_server:这个命令用于启动API服务器
		/root/models/internlm2_5-7b-chat:这是模型的路径。
		--model-formathf:这个参数指定了模型的格式。hf代表"Hugging Face"格式
		--quant-policy 0:这个参数指定了量化策略。
		--server-name 0.0.0.0:这个参数指定了服务器的名称。在这里,0.0.0.0是一个特殊的IP地址,它表示所有网络接口。
		--server-port2333333:这个参数指定了服务器的端口号。在这里,2333是服务器将监听的端口号。
		--tp 1:这个参数表示并行数量(GPU数量)。


5、连接开启的服务
   以命令行形式连接:Lmdeploy serve api_client http://localhost:23333
     然后也就可以开始对话


6、对模型进行优化量化部署
   (随着模型变得越来越大,我们需要一些大模型压缩技术来降低模型部署的成本,并提升模型的推理性能。LMDeploy提供了kv cache和权重量化两种策略)

		   方式一:在线 kv cache int4/int8 量化
		   		lmdeploy serve api_server \
					/root/models/internlm2_5-7b-chat\
					--model-format hf \
					--quant-policy 4 \              #量化权重级别
					--cache-max-entry-count 0.4 \   #设置kv cache缓存
					--server-name 0.0.0.0
					--server-port 23333
					--tp 1                          #显卡数量


		   方式二:离线 W4A16模型量化部署
		       a、离线量化
					lmdeploy lite auto_awq \
						/root/models/internlm2_5-7b-chat\
						--calib-dataset 'ptb
						--calib-samples 128
						--calib-seqlen 2048
						--w-bits 4
						--w-group-size 128
						--batch-size 1 \
						--search-scale False \
						--work-dir /root/models/internlm2_5-7b-chat-w4aa16-4bit

					命令解释:
						lmdeploy lite auto_awq:lite这是LMDeploy的命令,用于启动量化过程,而auto_awq代表自动权重
						量化(auto-weight-quantization)。
						/root/models/internlm2_5-7b-chat:模型文件的路径
						--calib-dataset'ptb':这个参数指定了一个校准数据集,这里使用的是'ptb'(PennTreebank
						个常用的语言模型数据集)。
						--calib-samples 128:这指定了用于校准的样本数量-128个样本
						--calib-seqlen 2048:这指定了校准过程中使用的序列长度-1024
						--w-bits4:这表示权重(weights)的位数将被量化为4位
						--work-dir /root/models/internlm2_5-7b-chat-w4a16-4bit:这是工作目录的路径,用于存储量
						化后的模型和中间结果。


                 b、将模型转为Imdeploy TurboMind的格式
					#转换模型(FastTransformer格式)TurboMind
					Lmdeploy convert interlm2       /path/to/intern1m-chat-7b
					                 目标模型格式      原始模型

                     执行完成后将会在当前目录生成一个workspace的文件夹。这里面包含的就是TurboMind和Triton"模型推理"需要到的文件。


                 c、模型转换完成后,我们就具备了使用模型推理的条件,接下来就可以进行真正的模型推理环节。
					 我们可以尝试本地对话,执行命令:Lmdeploy chat ./workspace
					 没问题就执行部署命令,启动服务


7、Gradio页面(客户端)与大模型交互
  #Gradio+ApiServer。必须先开启 Server,此时 Gradio为Client
  lmdeploy serve gradio http://0.0.0.0.0:23333
                           大模型ip和端口

    运行后,浏览器输入:localhost:6006( gradio默认端口),打开gradios页面与大模型交互
六、项目实战—— RAG 检索增强生成
1、安装conda作为环境管理工具,pip安装各个依赖库
2、下载基座模型
    可以去hugging face 或者 modelScope
    下载方式:pip安装modelScope库,然后调用该库的方法snapshot_download,参数传模型id(modelScope找该模型)和存储位置
3、本地加载基座模型测试
   pip安装llam_index库,然后函数HuggingFaceLLM,参数传模型存储的位置
4、RGA Flow
   a、准备文档资料(知识库)
   b、加载文档到内存,函数SimpleDirectionReader
   c、将内存的文档构建成向量数据, Embedding model,函数:VectorStoreIndex   向量数据库vector_database
七、项目实战 ——yolo骨龄检测
八、开源项目:OCRAutoScore 自动阅卷

欢迎加入DeepSeek 技术社区。在这里,你可以找到志同道合的朋友,共同探索AI技术的奥秘。
更多推荐


 3
3 0
0- 0


 已为社区贡献1条内容

所有评论(0)