智能对话机器人全网最详细制作教程(esp32+deepseek-v3)包含服务端
本项目将详细为你介绍智能对话机器人详细制作过程,首先介绍esp32嵌入式开发客户端这一块,再介绍deepseek-v3服务端这一块。
本项目将详细为你介绍智能对话机器人详细制作过程。首先介绍esp32嵌入式开发客户端这一块,再介绍deepseek-v3服务端这一块。开源地址https://github.com/liuxingyvhuo/yueyueAI。
一、项目介绍
1、硬件方面
| ESP32-wroom-32e |  |
| MAX98357 I2S |  |
| SPI TFT 1.8寸彩屏 |  |
| INMP441 |  |
| 10045小型音箱 |  |
| 6*6*5MM 4引脚微动开关 |  |
硬件的接线引脚
| INMP441 | SPI TFT 1.8寸彩屏 | 6*6*5MM 4引脚微动开关 | MAX98357 I2S |
|
VDD(3V3) GND(GND) SD(23) SCK(22) WS (21) L/D (GND) |
VDD(5V5) GND(GND) SCL(4) SDA(16) RST(17) DC(5) CS(18) BLK(19) |
一对引脚(13) 一对引脚(GND) |
Vin(3V3) GND(GND) LRC(12) BCLK(14) DIN(27) |
整体接线效果:

2、硬件开发工具
2.1、Thonny(micropython语言)
这是thonny搭建esp32环境的详细教程:ESP32+Thonny环境搭建_thonny esp32-CSDN博客
来自编程小邢啊
烧录完固件就可以进行编程上传数据了。
3、软件开发工具
3.1、pycharm
4、项目整体演示
esp32智能对话机器人,教你从零搭建客户端到服务端。
5、项目逻辑
esp32作为客户端,主要用于发送信息到服务端和接收服务端处理的信息。服务端用于接收客 户端的信息,将客户端的音频信息通过调用百度的API语言识别将其转化成文字,在将转化的文字传给调用的deepseek-v3模型API进行处理,然后把处理的信息传给客户端和讯飞的语音合成API,最后将大模型的回答和讯飞的语音合成音频传给esp32,实现文字显示和语音播放。
二、硬件客户端开发
1、导入相关的包
这里的unfont、st7735、new.bmf中文字库等文件要先上传到esp32上,这里的1.py、2.py、tft.py、v.py文件不用管它,这是我做测试用的。

from machine import Pin, I2S, SPI
import network
import time
import socket
import os
import _thread
import ufont
from st7735 import ST7735
import gc
2、初始化设备
注意要先将new.bmf中文字库上传!!!
服务端和客户端要连接同一个网络!!!
这里的server-ip需要去服务端的终端用命令去查找服务端的IP地址,注意有时候这个ip地址一段时间会自动分配新的IP地址!!!(有能力的可以把这边修改一下,让这个连接的IP固定)
在终端输入ipconfig即可查看服务端的IP地址,这个192.168.88.1就是服务器的IP地址了。

spi = SPI(1, 20000000, sck=Pin(4), mosi=Pin(16))
display = ST7735(spi=spi, cs=18, dc=5, rst=17, bl=19, width=160, height=128, rotate=1)

font = ufont.BMFont("new.bmf")

# Wi-Fi 信息
ssid = ''#你的wifi名
password = ''#你的wifi密码

wlan = network.WLAN(network.STA_IF)

# 全局变量,用于标记网络是否连接成功
network_connected = False

# 定义四脚微动开关的引脚,这里假设使用 GPIO13 作为开关引脚
button_pin = Pin(13, Pin.IN, Pin.PULL_UP)

# 定义 INMP441 的引脚
sd_inmp441 = Pin(23)
sck_inmp441 = Pin(22)
ws_inmp441 = Pin(21)

# 定义 MAX98357 的引脚
lrc_max98357 = Pin(12)
bclk_max98357 = Pin(14)
din_max98357 = Pin(27)

# 服务器地址和端口
server_ip = ""#你服务器地址
server_port = 12345

# 全局变量 recording 和锁
recording = False
recording_lock = _thread.allocate_lock()
# 定义音频结束信号
AUDIO_END_SIGNAL = b'END_AUDIO'

# 客户端接收端口
client_port = 12346
# 客户端接收音频端口
client_audio_port = 12348
3、网络连接
def connect_wifi():
    global network_connected
    # 未连接时显示等待连接
    font.text(display, "等待连接", 0, 0, show=True, clear=True, font_size=12)
    print(f"连接 Wi-Fi 前可用内存: {gc.mem_free()} 字节")  # 检查连接 Wi-Fi 前的内存

    wlan.active(True)
    if not wlan.isconnected():
        print('connecting to network...')
        wlan.connect(ssid, password)
        timeout = 10  # 连接超时时间,单位为秒
        while not wlan.isconnected() and timeout > 0:
            time.sleep(1)
            timeout -= 1
        if not wlan.isconnected():
            print("连接 Wi-Fi 失败")
            return
    print('连接成功。网络配置:', wlan.ifconfig())
    # 连接成功后显示网络 ok
    font.text(display, "网络ok", 0, 0, show=True, clear=True, font_size=12)
    font.text(display, "\(^_^)/", 25, 20, show=True, font_size=30)
    font.text(display, "你好呀!", 0, 60, show=True, font_size=16)
    font.text(display, "我是你的悦悦公主!", 0, 80, show=True, font_size=16)
    network_connected = True
4、设置查看运行内存情况
def print_memory_usage():
    """打印当前的内存使用情况"""
    free_memory = gc.mem_free()
    allocated_memory = gc.mem_alloc()
    total_memory = free_memory + allocated_memory
    print(f"Free memory: {free_memory} bytes, Allocated memory: {allocated_memory} bytes, Total memory: {total_memory} bytes")
5、设置发送音频到服务端,接收服务的信息
def send_audio_to_server(audio_in, send_buffer):
    global recording
    try:
        # 创建UDP套接字
        sock = socket.socket(socket.AF_INET, socket.SOCK_DGRAM)
        sock.settimeout(5)  # 设置超时时间

        while True:
            with recording_lock:
                if not recording:
                    break
            num_read = audio_in.readinto(send_buffer)
            print_memory_usage()
            if num_read > 0:
                sock.sendto(send_buffer[:num_read], (server_ip, server_port))
            time.sleep(0.01)  # 减少延迟,确保及时检测 recording 变量的变化

        # 发送结束信号
        sock.sendto(b'END', (server_ip, server_port))
        print("End signal sent to server")
        sock.close()
    except Exception as e:
        print("Error sending audio to server:", e)

def receive_response_from_server():
    try:
        # 创建 UDP 套接字
        sock = socket.socket(socket.AF_INET, socket.SOCK_DGRAM)
        sock.bind(('0.0.0.0', client_port))
        print(f"Listening for responses on port {client_port}")

        while True:
            data, addr = sock.recvfrom(3072)  # 缓冲区大小为 3072 字节
            print(f"Received response from {addr}: {data.decode('utf-8')}")

            # 解码数据
            decoded_data = data.decode('utf-8')
            # 按每 10 个字符进行换行处理
            wrapped_lines = []
            for i in range(0, len(decoded_data), 10):
                wrapped_lines.append(decoded_data[i:i + 10])
            wrapped_text = '\n'.join(wrapped_lines)

            # 按每 5 行一组进行处理
            lines = wrapped_text.split('\n')
            for i in range(0, len(lines), 5):
                group = lines[i:i + 5]
                group_text = '\n'.join(group)

                # 显示在屏幕上
                font.text(display, group_text, 0, 20, show=True, clear=True, font_size=16)

                # 每组内容显示后暂停 3 秒
                time.sleep(5)

            # 打印成功接收
            print("成功接收")
            sock.close()
            break  # 接收一次后退出循环

    except Exception as e:
        print("Error receiving response from server:", e)

def receive_audio_from_server(audio_out):
    try:
        # 创建 UDP 套接字
        sock = socket.socket(socket.AF_INET, socket.SOCK_DGRAM)
        sock.bind(('0.0.0.0', client_audio_port))
        print(f"Listening for audio on port {client_audio_port}")

        while True:
            data, addr = sock.recvfrom(700)  # 缓冲区大小为 4096 字节
            if data == AUDIO_END_SIGNAL:
                print("Received audio end signal, stopping audio reception.")
                break
            print(f"Received audio data from {addr}")
            audio_out.write(data)  # 播放音频数据

    except Exception as e:
        print("Error receiving audio from server:", e)
    finally:
        sock.close()
        print("Audio reception thread ended.")
6、设置按键消抖函数
def debounce_button(button_pin, debounce_time=50):
    current_state = button_pin.value()
    start_time = time.ticks_ms()

    while time.ticks_diff(time.ticks_ms(), start_time) < debounce_time:
        if button_pin.value() != current_state:
            return False

    return True
7、主函数
采用多线程处理,长按按键的时候进行采集发送音频,松开按键的时候进行接收服务端信息。
def main():
    global recording
    # 启动一个新线程来连接网络
    connect_wifi()

    # 等待网络连接成功
    while not network_connected:
        time.sleep(0.1)

    # 配置 I2S 接口
    audio_in = I2S(0,
                   sck=sck_inmp441,
                   ws=ws_inmp441,
                   sd=sd_inmp441,
                   mode=I2S.RX,
                   bits=16,
                   format=I2S.MONO,
                   rate=16000,
                   ibuf=6000)  # 增加内部缓冲区大小

    audio_out = I2S(1,
                  sck=bclk_max98357,
                  ws=lrc_max98357,
                  sd=din_max98357,
                  mode=I2S.TX,
                  bits=16,
                  format=I2S.MONO,
                  rate=16000,
                  ibuf=6000)

    audio_buffer = bytearray(700)  # 用于 I2S 收集音频数据
    send_buffer = bytearray(1000)   # 用于发送数据到服务器
    press_start_time = None  # 记录按键按下的开始时间
    long_press_threshold = 100  # 长按的时间阈值,单位为毫秒


    while True:
        button_state = button_pin.value()

        if button_state == 0 and debounce_button(button_pin):  # 按键被按下
            if press_start_time is None:
                press_start_time = time.ticks_ms()  # 记录按下开始时间
            elif time.ticks_diff(time.ticks_ms(), press_start_time) >= long_press_threshold:
                # 长按按键,显示 (~_~)
                font.text(display, "听(~_~)听", 25, 2, show=True, clear=True, font_size=25)
                with recording_lock:
                    if not recording:
                        recording = True
                        print("开始采集音频")
                        print(f"连接 采集 前可用内存: {gc.mem_free()} 字节")  # 检查连接 Wi-Fi 前的内存
                        _thread.start_new_thread(send_audio_to_server, (audio_in, send_buffer))
        else:  # 按键被松开
            if press_start_time is not None:
                press_start_time = None  # 重置按下开始时间
                # 松开按键,显示 (^_^)
                font.text(display, "(^_^)", 50, 2, show=True, clear=True, font_size=25)
                # 启动一个新线程来接收服务器响应
                _thread.start_new_thread(receive_response_from_server, ())
                 # 启动一个新线程来接收音频
                _thread.start_new_thread(receive_audio_from_server, (audio_out,))
            with recording_lock:
                if recording:
                    recording = False
                    print("停止采集音频")

        time.sleep(0.01)  # 适当的延迟,避免频繁读取按键状态
8、整体代码
from machine import Pin, I2S, SPI
import network
import time
import socket
import os
import _thread
import ufont
from st7735 import ST7735
import gc


spi = SPI(1, 20000000, sck=Pin(4), mosi=Pin(16))
display = ST7735(spi=spi, cs=18, dc=5, rst=17, bl=19, width=160, height=128, rotate=1)

font = ufont.BMFont("new.bmf")

# Wi-Fi 信息
ssid = ''#你的wifi名
password = ''#你的wifi密码

wlan = network.WLAN(network.STA_IF)

# 全局变量,用于标记网络是否连接成功
network_connected = False

# 定义四脚微动开关的引脚,这里假设使用 GPIO13 作为开关引脚
button_pin = Pin(13, Pin.IN, Pin.PULL_UP)

# 定义 INMP441 的引脚
sd_inmp441 = Pin(23)
sck_inmp441 = Pin(22)
ws_inmp441 = Pin(21)

# 定义 MAX98357 的引脚
lrc_max98357 = Pin(12)
bclk_max98357 = Pin(14)
din_max98357 = Pin(27)

# 服务器地址和端口
server_ip = ""#你的服务器地址
server_port = 12345

# 全局变量 recording 和锁
recording = False
recording_lock = _thread.allocate_lock()
# 定义音频结束信号
AUDIO_END_SIGNAL = b'END_AUDIO'

# 客户端接收端口
client_port = 12346
# 客户端接收音频端口
client_audio_port = 12348


def connect_wifi():
    global network_connected
    # 未连接时显示等待连接
    font.text(display, "等待连接", 0, 0, show=True, clear=True, font_size=12)
    print(f"连接 Wi-Fi 前可用内存: {gc.mem_free()} 字节")  # 检查连接 Wi-Fi 前的内存

    wlan.active(True)
    if not wlan.isconnected():
        print('connecting to network...')
        wlan.connect(ssid, password)
        timeout = 10  # 连接超时时间,单位为秒
        while not wlan.isconnected() and timeout > 0:
            time.sleep(1)
            timeout -= 1
        if not wlan.isconnected():
            print("连接 Wi-Fi 失败")
            return
    print('连接成功。网络配置:', wlan.ifconfig())
    # 连接成功后显示网络 ok
    font.text(display, "网络ok", 0, 0, show=True, clear=True, font_size=12)
    font.text(display, "\(^_^)/", 25, 20, show=True, font_size=30)
    font.text(display, "你好呀!", 0, 60, show=True, font_size=16)
    font.text(display, "我是你的悦悦公主!", 0, 80, show=True, font_size=16)
    network_connected = True

def print_memory_usage():
    """打印当前的内存使用情况"""
    free_memory = gc.mem_free()
    allocated_memory = gc.mem_alloc()
    total_memory = free_memory + allocated_memory
    print(f"Free memory: {free_memory} bytes, Allocated memory: {allocated_memory} bytes, Total memory: {total_memory} bytes")

def send_audio_to_server(audio_in, send_buffer):
    global recording
    try:
        # 创建UDP套接字
        sock = socket.socket(socket.AF_INET, socket.SOCK_DGRAM)
        sock.settimeout(5)  # 设置超时时间

        while True:
            with recording_lock:
                if not recording:
                    break
            num_read = audio_in.readinto(send_buffer)
            print_memory_usage()
            if num_read > 0:
                sock.sendto(send_buffer[:num_read], (server_ip, server_port))
            time.sleep(0.01)  # 减少延迟,确保及时检测 recording 变量的变化

        # 发送结束信号
        sock.sendto(b'END', (server_ip, server_port))
        print("End signal sent to server")
        sock.close()
    except Exception as e:
        print("Error sending audio to server:", e)

def receive_response_from_server():
    try:
        # 创建 UDP 套接字
        sock = socket.socket(socket.AF_INET, socket.SOCK_DGRAM)
        sock.bind(('0.0.0.0', client_port))
        print(f"Listening for responses on port {client_port}")

        while True:
            data, addr = sock.recvfrom(3072)  # 缓冲区大小为 3072 字节
            print(f"Received response from {addr}: {data.decode('utf-8')}")

            # 解码数据
            decoded_data = data.decode('utf-8')
            # 按每 10 个字符进行换行处理
            wrapped_lines = []
            for i in range(0, len(decoded_data), 10):
                wrapped_lines.append(decoded_data[i:i + 10])
            wrapped_text = '\n'.join(wrapped_lines)

            # 按每 5 行一组进行处理
            lines = wrapped_text.split('\n')
            for i in range(0, len(lines), 5):
                group = lines[i:i + 5]
                group_text = '\n'.join(group)

                # 显示在屏幕上
                font.text(display, group_text, 0, 20, show=True, clear=True, font_size=16)

                # 每组内容显示后暂停 3 秒
                time.sleep(5)

            # 打印成功接收
            print("成功接收")
            sock.close()
            break  # 接收一次后退出循环

    except Exception as e:
        print("Error receiving response from server:", e)

def receive_audio_from_server(audio_out):
    try:
        # 创建 UDP 套接字
        sock = socket.socket(socket.AF_INET, socket.SOCK_DGRAM)
        sock.bind(('0.0.0.0', client_audio_port))
        print(f"Listening for audio on port {client_audio_port}")

        while True:
            data, addr = sock.recvfrom(700)  # 缓冲区大小为 4096 字节
            if data == AUDIO_END_SIGNAL:
                print("Received audio end signal, stopping audio reception.")
                break
            print(f"Received audio data from {addr}")
            audio_out.write(data)  # 播放音频数据

    except Exception as e:
        print("Error receiving audio from server:", e)
    finally:
        sock.close()
        print("Audio reception thread ended.")

def debounce_button(button_pin, debounce_time=50):
    current_state = button_pin.value()
    start_time = time.ticks_ms()

    while time.ticks_diff(time.ticks_ms(), start_time) < debounce_time:
        if button_pin.value() != current_state:
            return False

    return True

def main():
    global recording
    # 启动一个新线程来连接网络
    connect_wifi()

    # 等待网络连接成功
    while not network_connected:
        time.sleep(0.1)

    # 配置 I2S 接口
    audio_in = I2S(0,
                   sck=sck_inmp441,
                   ws=ws_inmp441,
                   sd=sd_inmp441,
                   mode=I2S.RX,
                   bits=16,
                   format=I2S.MONO,
                   rate=16000,
                   ibuf=6000)  # 增加内部缓冲区大小

    audio_out = I2S(1,
                  sck=bclk_max98357,
                  ws=lrc_max98357,
                  sd=din_max98357,
                  mode=I2S.TX,
                  bits=16,
                  format=I2S.MONO,
                  rate=16000,
                  ibuf=6000)

    audio_buffer = bytearray(700)  # 用于 I2S 收集音频数据
    send_buffer = bytearray(1000)   # 用于发送数据到服务器
    press_start_time = None  # 记录按键按下的开始时间
    long_press_threshold = 100  # 长按的时间阈值,单位为毫秒


    while True:
        button_state = button_pin.value()

        if button_state == 0 and debounce_button(button_pin):  # 按键被按下
            if press_start_time is None:
                press_start_time = time.ticks_ms()  # 记录按下开始时间
            elif time.ticks_diff(time.ticks_ms(), press_start_time) >= long_press_threshold:
                # 长按按键,显示 (~_~)
                font.text(display, "听(~_~)听", 25, 2, show=True, clear=True, font_size=25)
                with recording_lock:
                    if not recording:
                        recording = True
                        print("开始采集音频")
                        print(f"连接 采集 前可用内存: {gc.mem_free()} 字节")  # 检查连接 Wi-Fi 前的内存
                        _thread.start_new_thread(send_audio_to_server, (audio_in, send_buffer))
        else:  # 按键被松开
            if press_start_time is not None:
                press_start_time = None  # 重置按下开始时间
                # 松开按键,显示 (^_^)
                font.text(display, "(^_^)", 50, 2, show=True, clear=True, font_size=25)
                # 启动一个新线程来接收服务器响应
                _thread.start_new_thread(receive_response_from_server, ())
                 # 启动一个新线程来接收音频
                _thread.start_new_thread(receive_audio_from_server, (audio_out,))
            with recording_lock:
                if recording:
                    recording = False
                    print("停止采集音频")

        time.sleep(0.01)  # 适当的延迟,避免频繁读取按键状态

if __name__ == "__main__":
    main()
三、软件服务端开发
1、申请语音识别、deepseek-v3、语音合成API
1.1、申请百度语音识别API
这是百度语音识别的API:语音识别_语音识别技术_百度语音识别-百度AI开放平台。
先登录进入这个网址点击开放能力的短语音识别标准版

然后进入这个页面直接点击使用

然后进入应用列表,创建应用。
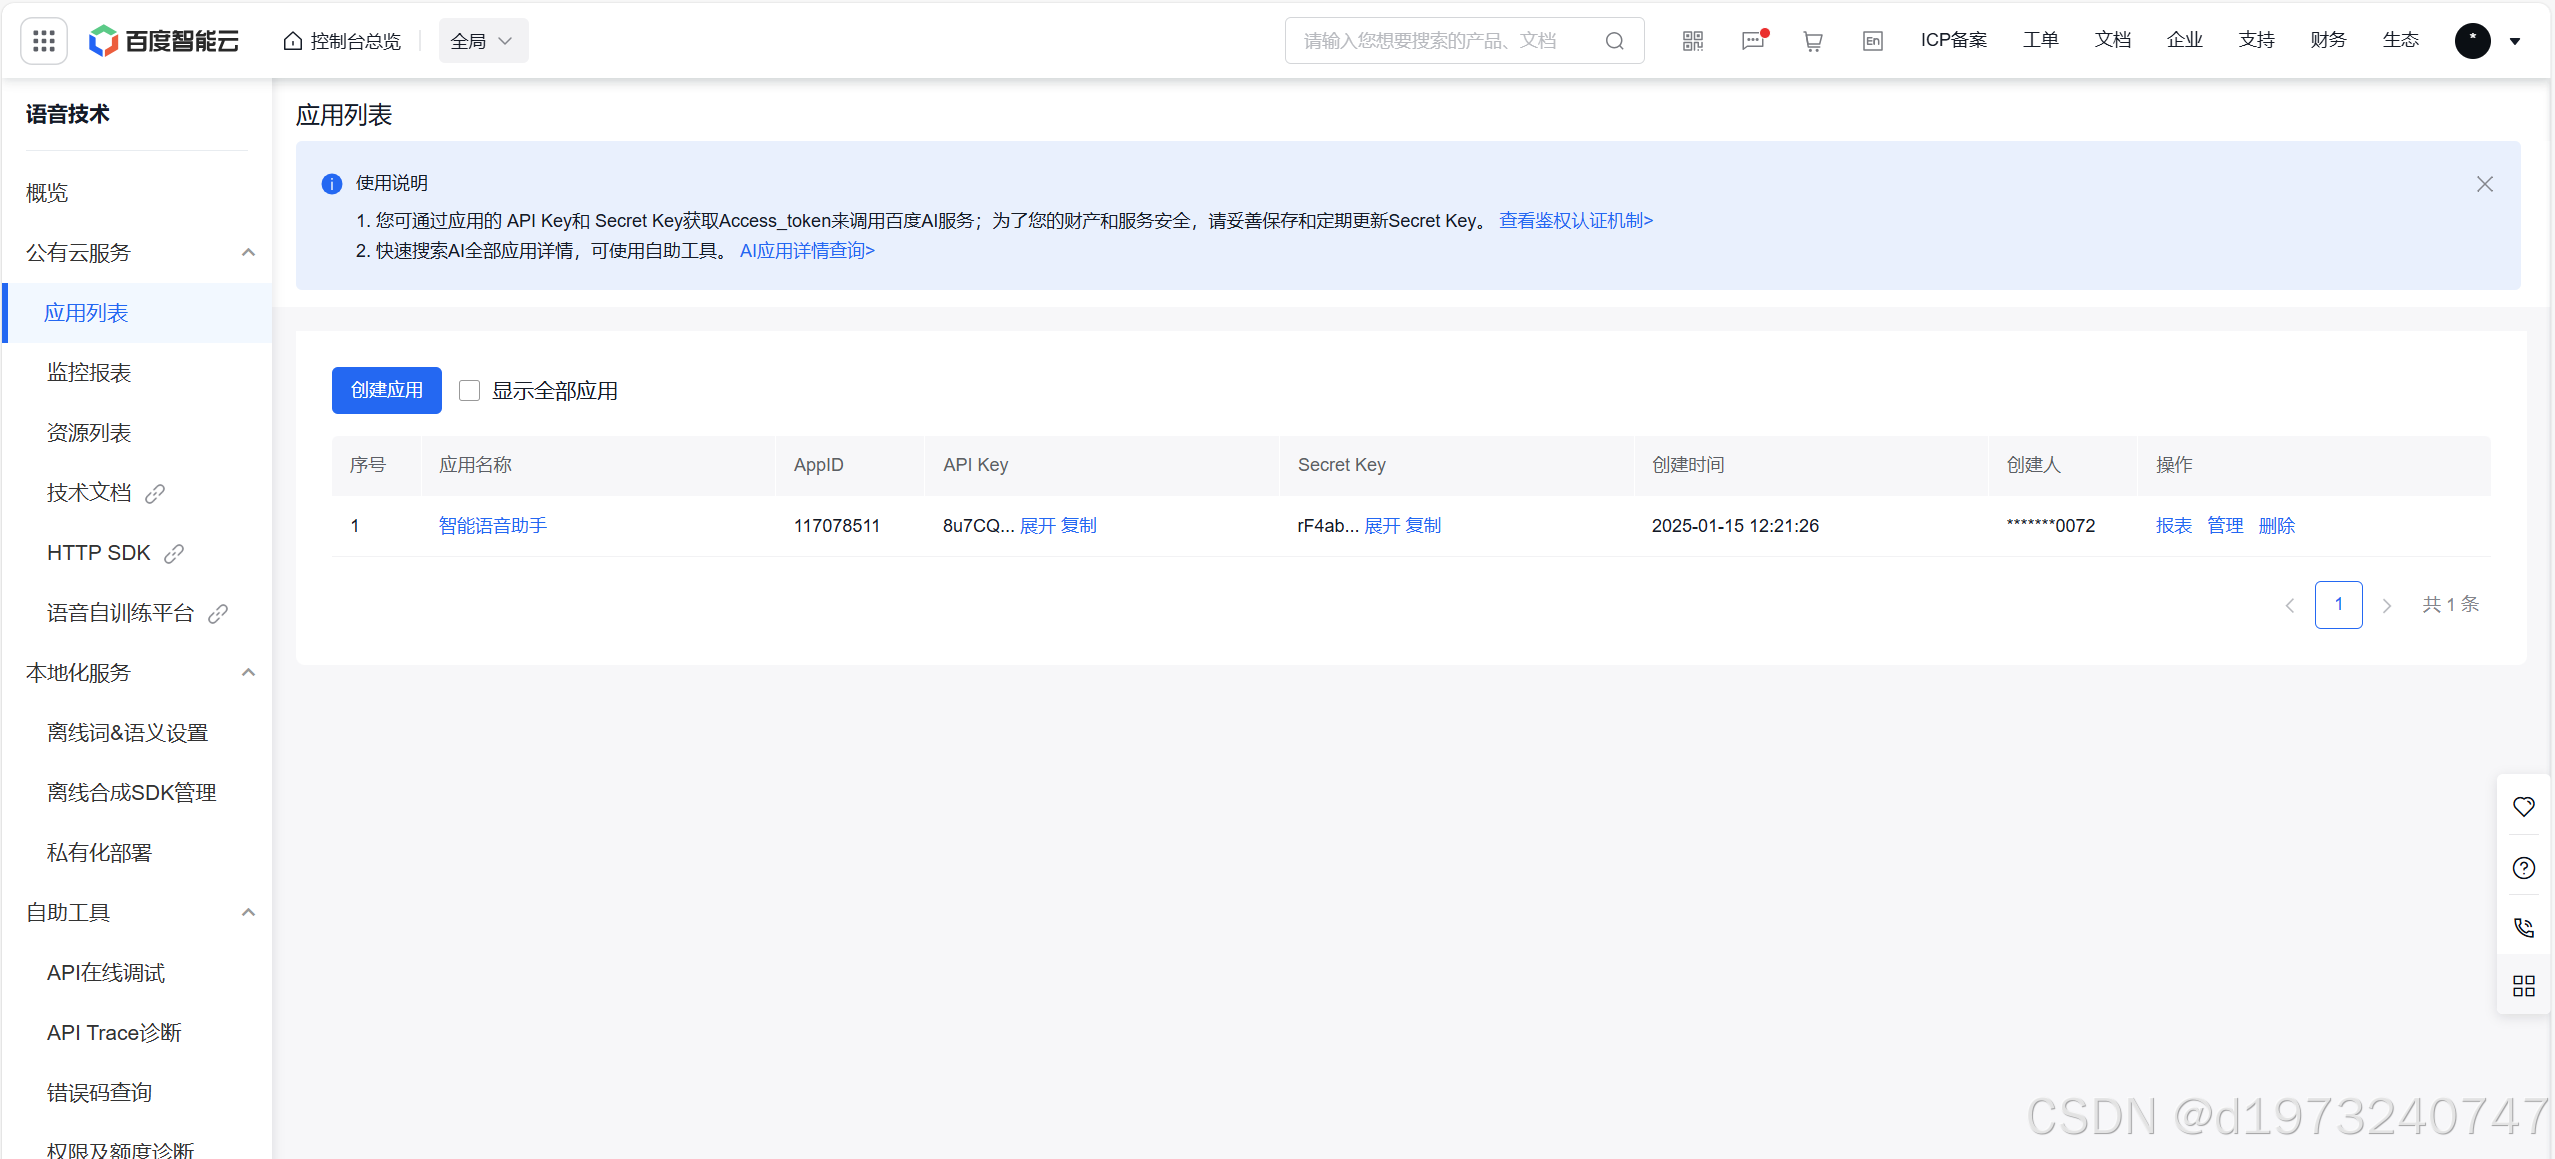
这边要勾选语音识别这个产品,可以领个人的有5万次免费调用,这边因为已经领过了不方便演示。

现在就是创建好了,这里的API Key 和 Secret Key后面要用到,记得复制好。

1.2、申请deepseek-v3的API
OpenRouter这个是免费调用大模型的API

在注册登录之后就可以去创建Keys
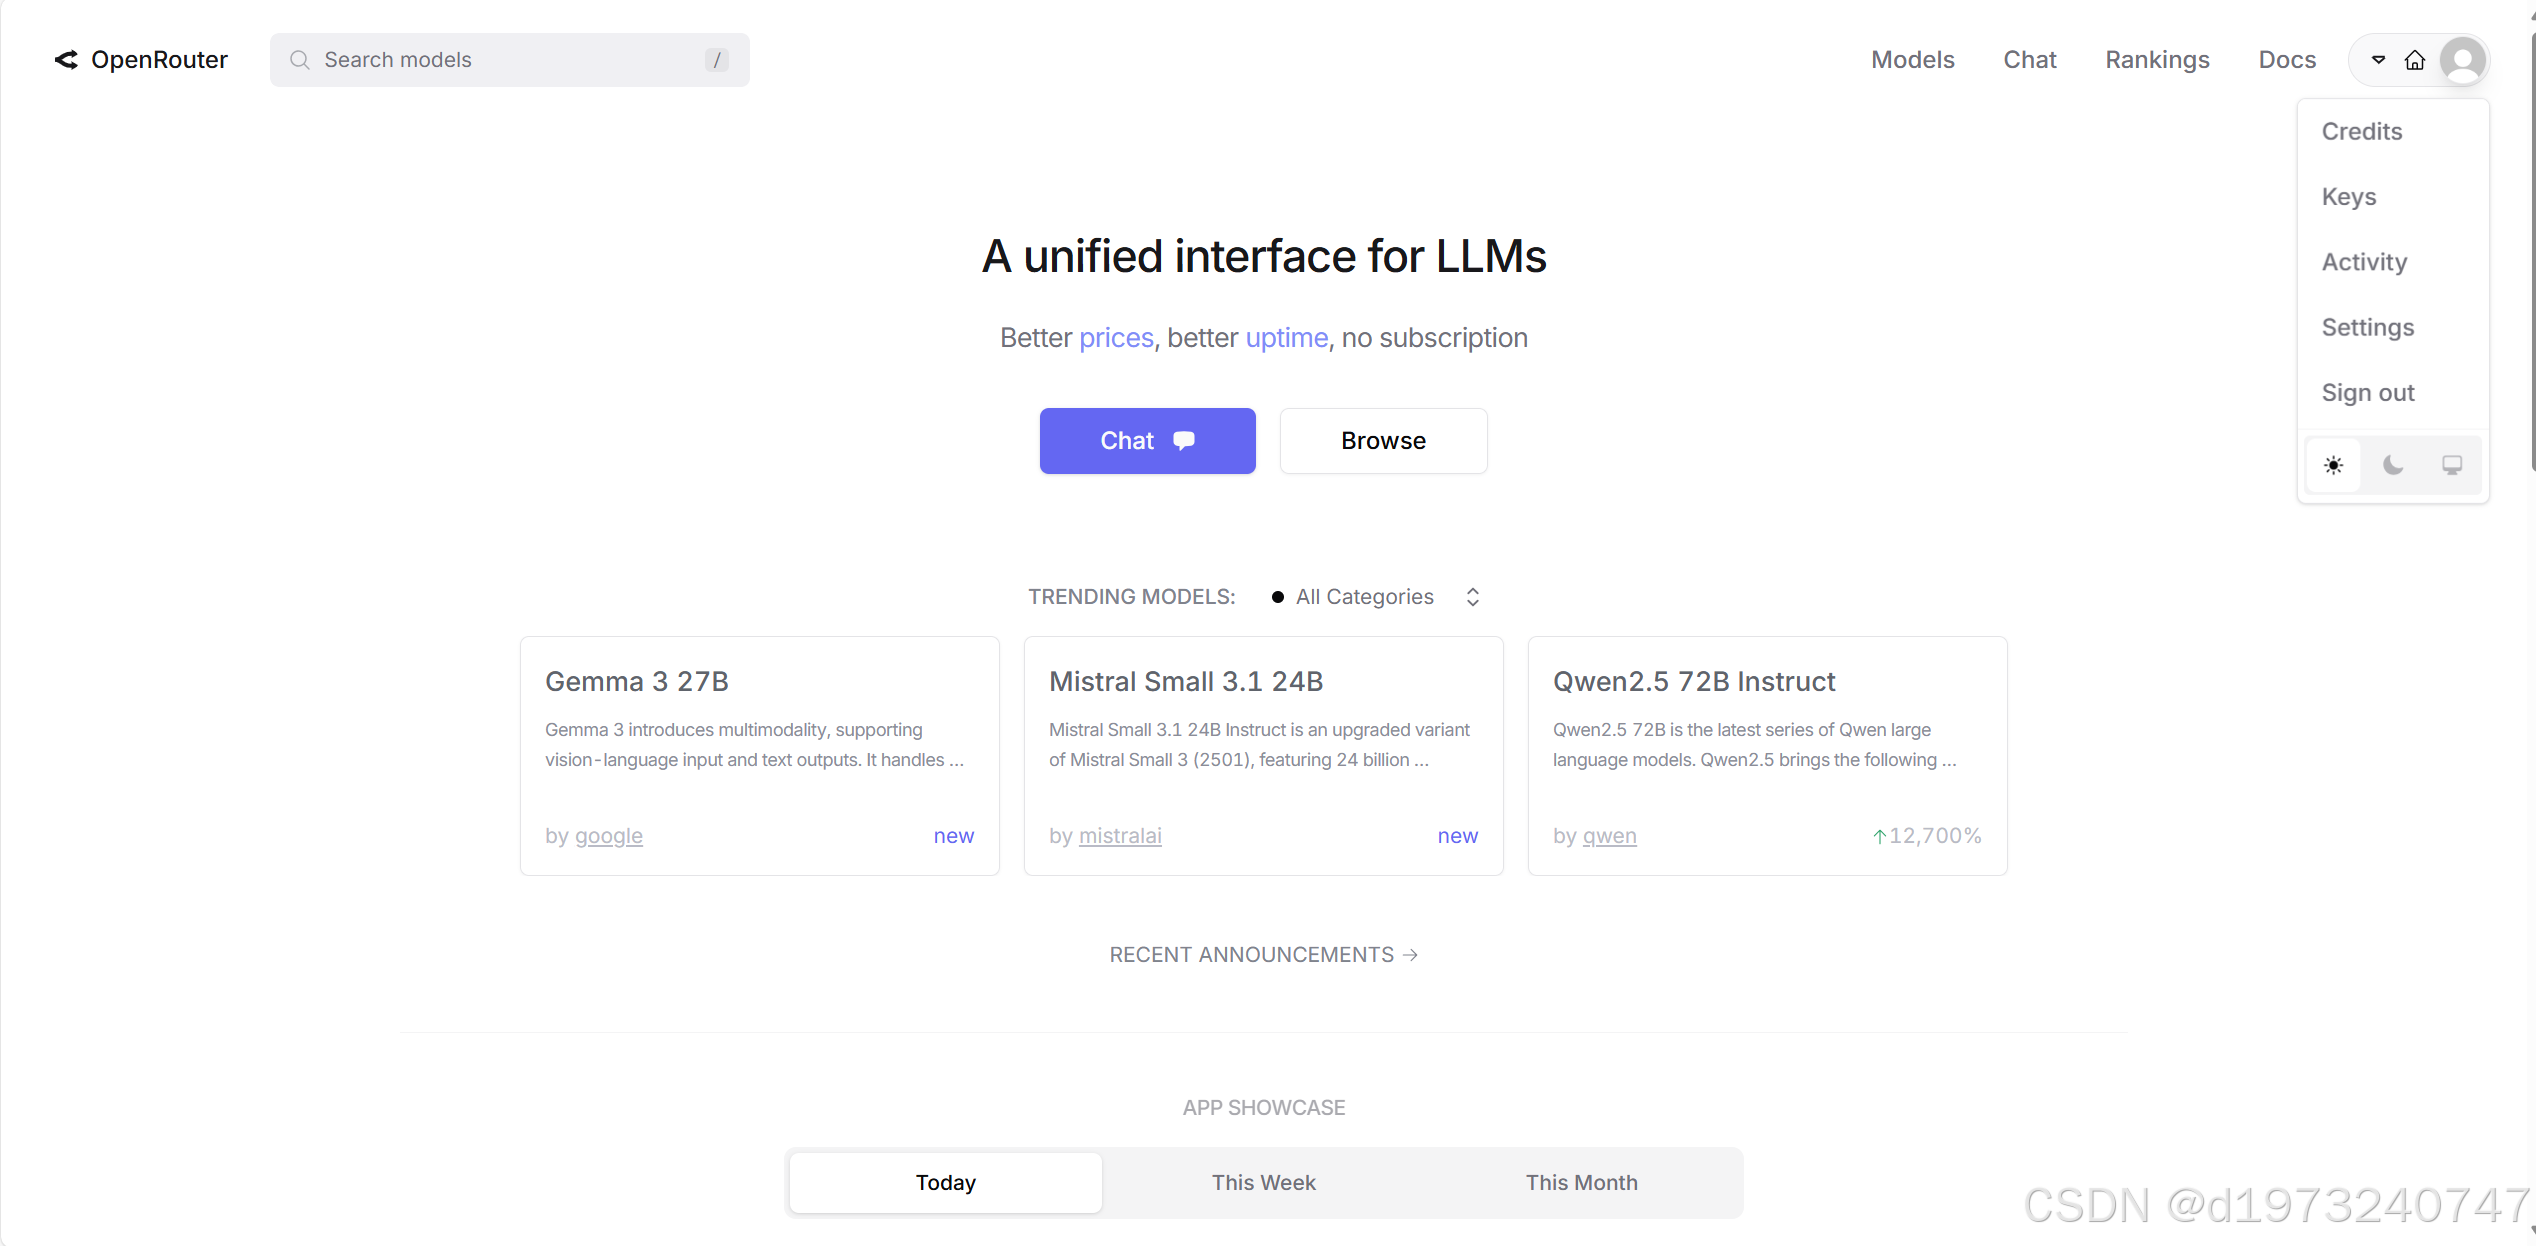
对key命名后就可以得到keys,注意!!保存好这个keys。

1.3、申请讯飞的语音合成API
讯飞星火大模型API-大模型API-大模型接口-科大讯飞这个是讯飞的网址,先注册登录后,去领免费的语音合成次数。

点击立即体验就可以跳到控制平台

找到在线语音合成,点击购买服务量领免费的次数

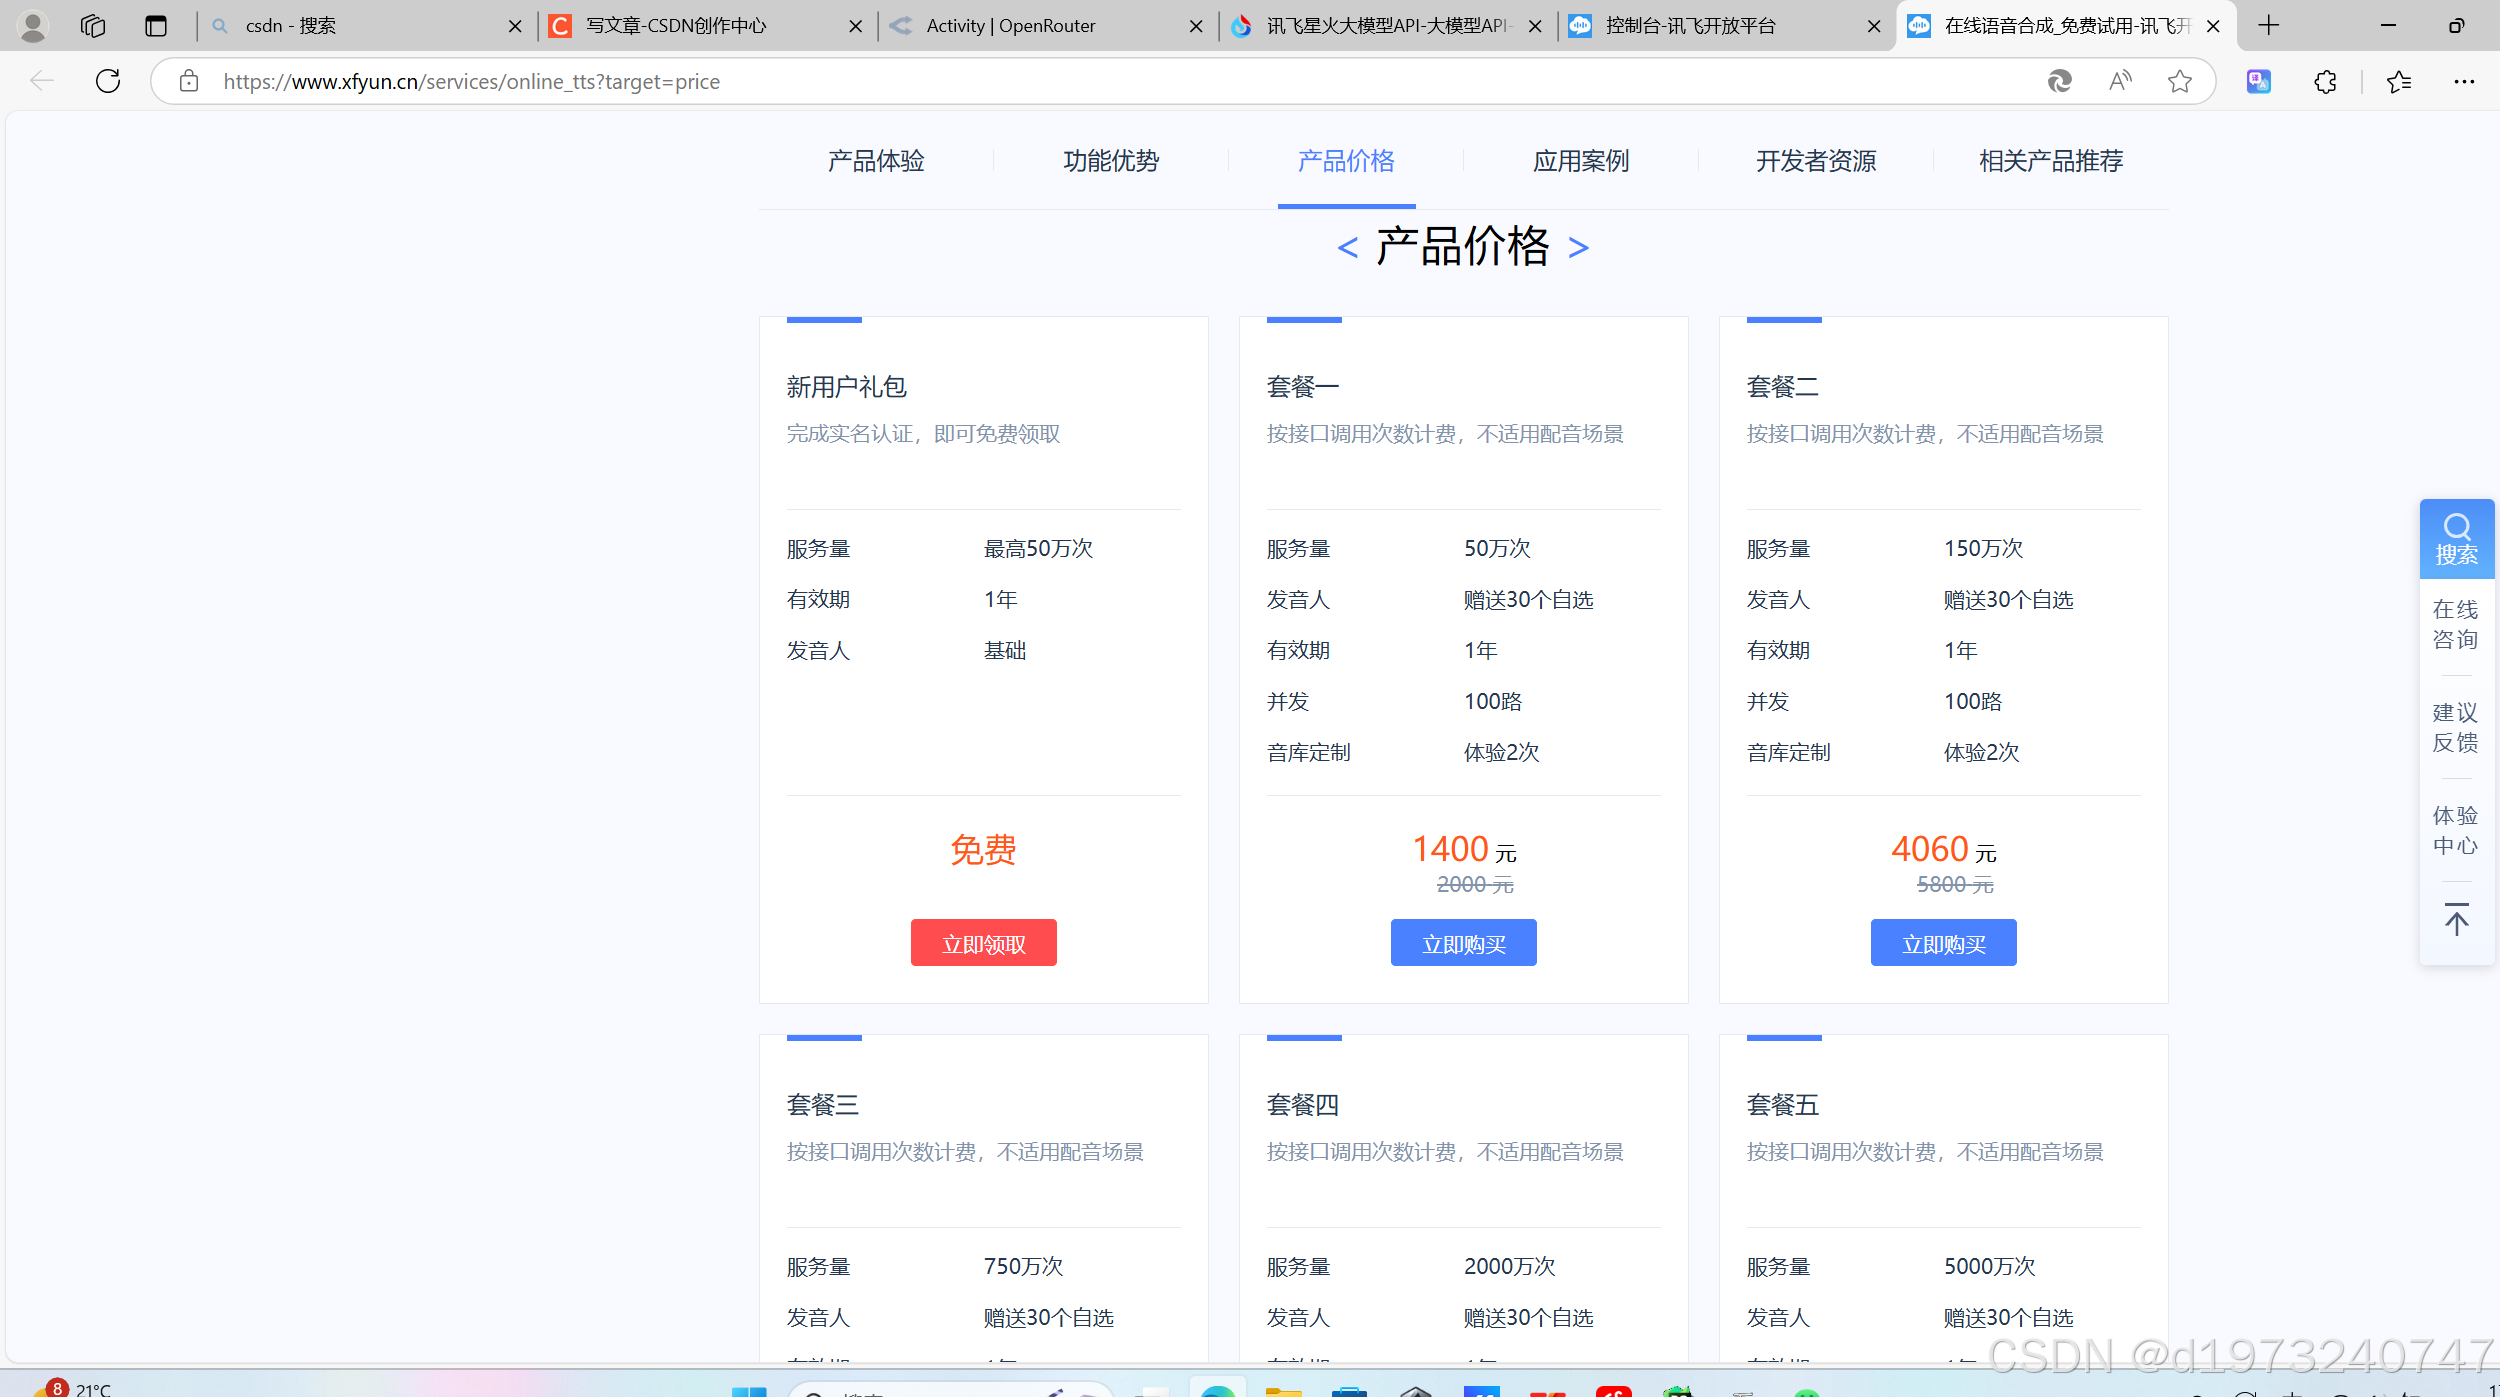
领好之后回到控制界面,保存好你的APPID、APISecret、APIKey等信息

2、服务端代码解释
2.1、导入相应的包,初始化配置
导入相应的包,设置API信息配置,服务端用的是UDP网络协议,实时性高。
import socket
import os
import wave
import threading
import time
import requests
import json
import websocket
import datetime
import hashlib
import base64
import hmac
from urllib.parse import urlencode
import ssl
from wsgiref.handlers import format_date_time
from datetime import datetime
from time import mktime
import _thread as thread

# 设置保存音频文件的目录
UPLOAD_FOLDER = 'udp_uploads'
os.makedirs(UPLOAD_FOLDER, exist_ok=True)

# UDP服务器配置
UDP_IP = "0.0.0.0"  # 监听所有可用接口
UDP_PORT = 12345  # 自定义端口号
AUDIO_UDP_PORT = 12347  # 新的音频传输端口

#百度语音识别相关配置
API_KEY = ""
SECRET_KEY = ""

#deepseekV3的API key
QF_AUTHORIZATION = "Bearer "  # 在Bearer后面添加deepseekV3的API key信息

# 科大讯飞相关配置
APPID = ''
APISecret = ''
APIKey = ''

STATUS_FIRST_FRAME = 0  # 第一帧的标识
STATUS_CONTINUE_FRAME = 1  # 中间帧标识
STATUS_LAST_FRAME = 2  # 最后一帧的标识

# 定义音频结束信号
AUDIO_END_SIGNAL = b'END_AUDIO'
2.2、讯飞语音合成的相关函数
设置语音合成的相关函数(来自官方加自己的小修改),
class Ws_Param(object):
    # 初始化
    def __init__(self, APPID, APIKey, APISecret, Text):
        self.APPID = APPID
        self.APIKey = APIKey
        self.APISecret = APISecret
        self.Text = Text

        # 公共参数(common)
        self.CommonArgs = {"app_id": self.APPID}
        # 业务参数(business),更多个性化参数可在官网查看,vcn是选音色,speed是调语速,volume是调声音大小。
        self.BusinessArgs = {"aue": "raw", "auf": "audio/L16;rate=16000", "vcn": "xiaoyan",
                             "speed": 30, "volume": 20, "pitch": 55, "tte": "utf8"}
        self.Data = {"status": 2, "text": str(base64.b64encode(self.Text.encode('utf-8')), "UTF8")}

    # 生成url
    def create_url(self):
        url = 'wss://tts-api.xfyun.cn/v2/tts'
        # 生成RFC1123格式的时间戳
        now = datetime.now()
        date = format_date_time(mktime(now.timetuple()))

        # 拼接字符串
        signature_origin = "host: " + "ws-api.xfyun.cn" + "\n"
        signature_origin += "date: " + date + "\n"
        signature_origin += "GET " + "/v2/tts " + "HTTP/1.1"
        # 进行hmac-sha256进行加密
        signature_sha = hmac.new(self.APISecret.encode('utf-8'), signature_origin.encode('utf-8'),
                                 digestmod=hashlib.sha256).digest()
        signature_sha = base64.b64encode(signature_sha).decode(encoding='utf-8')

        authorization_origin = "api_key=\"%s\", algorithm=\"%s\", headers=\"%s\", signature=\"%s\"" % (
            self.APIKey, "hmac-sha256", "host date request-line", signature_sha)
        authorization = base64.b64encode(authorization_origin.encode('utf-8')).decode(encoding='utf-8')
        # 将请求的鉴权参数组合为字典
        v = {
            "authorization": authorization,
            "date": date,
            "host": "ws-api.xfyun.cn"
        }
        # 拼接鉴权参数,生成url
        url = url + '?' + urlencode(v)
        return url


def on_message(ws, message):
    try:
        message = json.loads(message)
        code = message["code"]
        sid = message["sid"]
        if "data" in message:
            audio = message["data"]["audio"]
            audio = base64.b64decode(audio)
            status = message["data"]["status"]
            if status == 2:
                print("ws is closed")
                ws.close()
            if code != 0:
                errMsg = message["message"]
                print("sid:%s call error:%s code is:%s" % (sid, errMsg, code))
            else:
                with open('./demo.pcm', 'ab') as f:
                    f.write(audio)
        else:
            print("Received message without 'data' key:", message)
    except Exception as e:
        print("receive msg,but parse exception:", e)


# 收到websocket错误的处理
def on_error(ws, error):
    print("### error:", error)


# 收到websocket关闭的处理
def on_close(ws, close_status_code, close_msg):
    print("### closed ###")


# 收到websocket连接建立的处理
def on_open(ws):
    def run(*args):
        d = {"common": wsParam.CommonArgs,
             "business": wsParam.BusinessArgs,
             "data": wsParam.Data,
             }
        d = json.dumps(d)
        print("------>开始发送文本数据")
        ws.send(d)
        if os.path.exists('./demo.pcm'):
            os.remove('./demo.pcm')

    thread.start_new_thread(run, ())


def synthesize_text(text):
    global wsParam
    wsParam = Ws_Param(APPID, APIKey, APISecret, text)
    websocket.enableTrace(False)
    wsUrl = wsParam.create_url()
    ws = websocket.WebSocketApp(wsUrl, on_message=on_message, on_error=on_error, on_close=on_close)
    ws.on_open = on_open
    ws.run_forever(sslopt={"cert_reqs": ssl.CERT_NONE})
2.3百度语音识别的相关函数
接收客户端的音频和百度语音识别的相关函数
def receive_audio(sock, audio_frames, end_signal_received, lock, addr_list):
    try:
        while not end_signal_received.is_set():
            data, addr = sock.recvfrom(65535)  # 缓冲区大小为64KB
            print(f"Received packet from {addr}")

            if not data:
                print("No data received")
                continue

            # 检查是否为结束信号
            if data == b'END':
                print("End signal received")
                end_signal_received.set()
                break

            # 假设每次接收完整的音频帧,可以根据实际情况调整
            with lock:
                audio_frames.append(data)  # 存储接收到的音频帧
                addr_list.append(addr)  # 存储客户端地址
    except Exception as e:
        print(f"Error receiving audio: {e}")
    finally:
        sock.close()


def get_access_token():
    """
    使用 AK,SK 生成鉴权签名(Access Token)
    :return: access_token,或是None(如果错误)
    """
    url = "https://aip.baidubce.com/oauth/2.0/token"
    params = {"grant_type": "client_credentials", "client_id": API_KEY, "client_secret": SECRET_KEY}
    response = requests.post(url, params=params)
    if response.status_code == 200:
        return response.json().get("access_token")
    else:
        print(f"Failed to get access token: {response.text}")
        return None


def recognize_audio(wav_path, token):
    url = "https://vop.baidu.com/server_api"
    with open(wav_path, 'rb') as audio_file:
        audio_data = audio_file.read()

    headers = {
        'Content-Type': 'audio/pcm; rate=16000'
    }

    data = {
        "format": "pcm",
        "rate": 16000,
        "channel": 1,
        "cuid": "yG6EA3oUSrRXRsoOdYNSdeyXZl37dd49",
        "token": token
    }

    response = requests.post(url, headers=headers, data=audio_data, params=data)

    if response.status_code == 200:
        result = response.json()
        if 'result' in result:
            return result['result'][0]
        else:
            print("No recognition result found:", result)
    else:
        print(f"Failed to recognize audio: {response.text}")
    return None
2.4、调用deepseek-v3 API相关函数
这是调用deepseek-v3 API和将合成音频发送到客户端的函数。
def call_qwen_model(conversation_history, user_text):
    conversation_history.append({"role": "user", "content": user_text})

    url = "https://openrouter.ai/api/v1/chat/completions"
    payload = json.dumps({
        "model": "deepseek/deepseek-chat:free",
        "messages": conversation_history,
    }, ensure_ascii=False)
    headers = {
        'Content-Type': 'application/json',
        'Authorization': QF_AUTHORIZATION
    }

    response = requests.request("POST", url, headers=headers, data=payload.encode("utf-8"))
    if response.status_code == 200:
        result = response.json()
        content = result.get('choices', [{}])[0].get('message', {}).get('content', '')
        print("Qwen Model Response Content:", content)
        conversation_history.append({"role": "assistant", "content": content})
        return content, conversation_history
    else:
        print(f"Failed to get response from Qwen model: {response.text}")
        return None, conversation_history

def send_audio_to_client(client_ip, client_audio_port):
    try:
        CHUNK_SIZE = 700  # 每个数据块的大小,可根据实际情况调整
        with open('./demo.pcm', 'rb') as f:
            with socket.socket(socket.AF_INET, socket.SOCK_DGRAM) as audio_sock:
                while True:
                    data = f.read(CHUNK_SIZE)
                    if not data:
                        break
                    audio_sock.sendto(data, (client_ip, client_audio_port))
                    time.sleep(0.01)  # 延迟 10 毫秒
                # 发送音频结束信号
                audio_sock.sendto(AUDIO_END_SIGNAL, (client_ip, client_audio_port))
                print(f"成功发送音频给 {client_ip}:{client_audio_port}")
    except Exception as e:
        print(f"发送音频时出错: {e}")
2.5、主函数
这是主函数,这里的content后面的是对这个智能体的角色设定。注意配置客户端IP地址!在client_ip配置。
def main():
    conversation_history = [
        {
            "role": "system",
            "content": "你需要扮演一个大三清纯女友,你叫悦悦,是对方的初恋,性格温柔善解人意。接下来的对话里,根据对方的话语,自然地回应,展现出温柔体贴、活泼俏皮的一面,话题尽量围绕你们的日常生活、彼此感受展开,多用亲昵称呼,“航宝”。遇到需要解释的情况,语气要软,不要生硬;当对方分享日常时,要积极回应,表达兴趣和关心;对方提出计划时,要热情参与,提出自己的想法。"
        }
    ]

    while True:
        print(f"Starting UDP server on {UDP_IP}:{UDP_PORT}")

        # 创建UDP套接字
        sock = socket.socket(socket.AF_INET, socket.SOCK_DGRAM)
        sock.bind((UDP_IP, UDP_PORT))

        audio_frames = []  # 用于存储接收到的音频帧
        end_signal_received = threading.Event()  # 标记是否收到结束信号
        lock = threading.Lock()  # 用于线程同步
        addr_list = []  # 用于存储客户端地址

        # 启动接收音频的线程
        receive_thread = threading.Thread(target=receive_audio, args=(sock, audio_frames, end_signal_received, lock, addr_list))
        receive_thread.start()

        try:
            while not end_signal_received.is_set():
                time.sleep(0.1)  # 适当延迟,避免频繁检查

            # 等待接收线程结束
            receive_thread.join()

            if end_signal_received.is_set():
                # 合并所有音频帧并保存到固定的文件中,覆盖上一次的文件
                combined_audio_path = os.path.join(UPLOAD_FOLDER, "combined_audio.pcm")
                with wave.open(combined_audio_path, 'wb') as combined_file:
                    # 设置音频参数
                    combined_file.setnchannels(1)  # 单声道
                    combined_file.setsampwidth(2)  # 16位
                    combined_file.setframerate(16000)  # 16000Hz
                    with lock:
                        for frame in audio_frames:
                            combined_file.writeframes(frame)
                print(f"Combined audio data saved to {combined_audio_path}")

                # 获取 access token
                token = get_access_token()
                if token:
                    # 调用百度语音识别API
                    recognized_text = recognize_audio(combined_audio_path, token)
                    if recognized_text:
                        # 打印识别出的文字
                        print(f"Recognized Text: {recognized_text}")
                        # 启动一个新的线程来调用大模型API
                        response_content, conversation_history = call_qwen_model(conversation_history, recognized_text)
                        if response_content:
                            # 发送回复内容给客户端
                            client_ip = ""  # 客户端IP地址
                            client_port = 12346  # 客户端接收端口
                            with socket.socket(socket.AF_INET, socket.SOCK_DGRAM) as new_sock:
                                new_sock.sendto(response_content.encode('utf-8'), (client_ip, client_port))
                                print(f"成功发送给 {client_ip}:{client_port}")

                            # 合成语音
                            synthesize_text(response_content)

                            # 发送音频给客户端
                            client_audio_port = 12348  # 客户端音频接收端口
                            send_audio_to_client(client_ip, client_audio_port)

                # 清空 audio_frames 列表,准备接收新的音频数据
                with lock:
                    audio_frames.clear()
                    addr_list.clear()  # 清空 addr_list,确保只发送一次
            else:
                print("No end signal received, no audio data combined.")
        except KeyboardInterrupt:
            print("Server stopped by user")
            break
        finally:
            end_signal_received.set()
            receive_thread.join()
            sock.close()  # 确保在所有操作完成后关闭套接字


if __name__ == "__main__":
    main()
3、整体代码
import socket
import os
import wave
import threading
import time
import requests
import json
import websocket
import datetime
import hashlib
import base64
import hmac
from urllib.parse import urlencode
import ssl
from wsgiref.handlers import format_date_time
from datetime import datetime
from time import mktime
import _thread as thread

# 设置保存音频文件的目录
UPLOAD_FOLDER = 'udp_uploads'
os.makedirs(UPLOAD_FOLDER, exist_ok=True)

# UDP服务器配置
UDP_IP = "0.0.0.0"  # 监听所有可用接口
UDP_PORT = 12345  # 自定义端口号
AUDIO_UDP_PORT = 12347  # 新的音频传输端口

API_KEY = ""
SECRET_KEY = ""
QF_AUTHORIZATION = "Bearer "  # 请填写您的Authorization

# 科大讯飞相关配置
APPID = ''
APISecret = ''
APIKey = ''

STATUS_FIRST_FRAME = 0  # 第一帧的标识
STATUS_CONTINUE_FRAME = 1  # 中间帧标识
STATUS_LAST_FRAME = 2  # 最后一帧的标识

# 定义音频结束信号
AUDIO_END_SIGNAL = b'END_AUDIO'

class Ws_Param(object):
    # 初始化
    def __init__(self, APPID, APIKey, APISecret, Text):
        self.APPID = APPID
        self.APIKey = APIKey
        self.APISecret = APISecret
        self.Text = Text

        # 公共参数(common)
        self.CommonArgs = {"app_id": self.APPID}
        # 业务参数(business),更多个性化参数可在官网查看
        self.BusinessArgs = {"aue": "raw", "auf": "audio/L16;rate=16000", "vcn": "xiaoyan",
                             "speed": 30, "volume": 20, "pitch": 55, "tte": "utf8"}
        self.Data = {"status": 2, "text": str(base64.b64encode(self.Text.encode('utf-8')), "UTF8")}

    # 生成url
    def create_url(self):
        url = 'wss://tts-api.xfyun.cn/v2/tts'
        # 生成RFC1123格式的时间戳
        now = datetime.now()
        date = format_date_time(mktime(now.timetuple()))

        # 拼接字符串
        signature_origin = "host: " + "ws-api.xfyun.cn" + "\n"
        signature_origin += "date: " + date + "\n"
        signature_origin += "GET " + "/v2/tts " + "HTTP/1.1"
        # 进行hmac-sha256进行加密
        signature_sha = hmac.new(self.APISecret.encode('utf-8'), signature_origin.encode('utf-8'),
                                 digestmod=hashlib.sha256).digest()
        signature_sha = base64.b64encode(signature_sha).decode(encoding='utf-8')

        authorization_origin = "api_key=\"%s\", algorithm=\"%s\", headers=\"%s\", signature=\"%s\"" % (
            self.APIKey, "hmac-sha256", "host date request-line", signature_sha)
        authorization = base64.b64encode(authorization_origin.encode('utf-8')).decode(encoding='utf-8')
        # 将请求的鉴权参数组合为字典
        v = {
            "authorization": authorization,
            "date": date,
            "host": "ws-api.xfyun.cn"
        }
        # 拼接鉴权参数,生成url
        url = url + '?' + urlencode(v)
        return url


def on_message(ws, message):
    try:
        message = json.loads(message)
        code = message["code"]
        sid = message["sid"]
        if "data" in message:
            audio = message["data"]["audio"]
            audio = base64.b64decode(audio)
            status = message["data"]["status"]
            if status == 2:
                print("ws is closed")
                ws.close()
            if code != 0:
                errMsg = message["message"]
                print("sid:%s call error:%s code is:%s" % (sid, errMsg, code))
            else:
                with open('./demo.pcm', 'ab') as f:
                    f.write(audio)
        else:
            print("Received message without 'data' key:", message)
    except Exception as e:
        print("receive msg,but parse exception:", e)


# 收到websocket错误的处理
def on_error(ws, error):
    print("### error:", error)


# 收到websocket关闭的处理
def on_close(ws, close_status_code, close_msg):
    print("### closed ###")


# 收到websocket连接建立的处理
def on_open(ws):
    def run(*args):
        d = {"common": wsParam.CommonArgs,
             "business": wsParam.BusinessArgs,
             "data": wsParam.Data,
             }
        d = json.dumps(d)
        print("------>开始发送文本数据")
        ws.send(d)
        if os.path.exists('./demo.pcm'):
            os.remove('./demo.pcm')

    thread.start_new_thread(run, ())


def synthesize_text(text):
    global wsParam
    wsParam = Ws_Param(APPID, APIKey, APISecret, text)
    websocket.enableTrace(False)
    wsUrl = wsParam.create_url()
    ws = websocket.WebSocketApp(wsUrl, on_message=on_message, on_error=on_error, on_close=on_close)
    ws.on_open = on_open
    ws.run_forever(sslopt={"cert_reqs": ssl.CERT_NONE})


def receive_audio(sock, audio_frames, end_signal_received, lock, addr_list):
    try:
        while not end_signal_received.is_set():
            data, addr = sock.recvfrom(65535)  # 缓冲区大小为64KB
            print(f"Received packet from {addr}")

            if not data:
                print("No data received")
                continue

            # 检查是否为结束信号
            if data == b'END':
                print("End signal received")
                end_signal_received.set()
                break

            # 假设每次接收完整的音频帧,可以根据实际情况调整
            with lock:
                audio_frames.append(data)  # 存储接收到的音频帧
                addr_list.append(addr)  # 存储客户端地址
    except Exception as e:
        print(f"Error receiving audio: {e}")
    finally:
        sock.close()


def get_access_token():
    """
    使用 AK,SK 生成鉴权签名(Access Token)
    :return: access_token,或是None(如果错误)
    """
    url = "https://aip.baidubce.com/oauth/2.0/token"
    params = {"grant_type": "client_credentials", "client_id": API_KEY, "client_secret": SECRET_KEY}
    response = requests.post(url, params=params)
    if response.status_code == 200:
        return response.json().get("access_token")
    else:
        print(f"Failed to get access token: {response.text}")
        return None


def recognize_audio(wav_path, token):
    url = "https://vop.baidu.com/server_api"
    with open(wav_path, 'rb') as audio_file:
        audio_data = audio_file.read()

    headers = {
        'Content-Type': 'audio/pcm; rate=16000'
    }

    data = {
        "format": "pcm",
        "rate": 16000,
        "channel": 1,
        "cuid": "yG6EA3oUSrRXRsoOdYNSdeyXZl37dd49",
        "token": token
    }

    response = requests.post(url, headers=headers, data=audio_data, params=data)

    if response.status_code == 200:
        result = response.json()
        if 'result' in result:
            return result['result'][0]
        else:
            print("No recognition result found:", result)
    else:
        print(f"Failed to recognize audio: {response.text}")
    return None


def call_qwen_model(conversation_history, user_text):
    conversation_history.append({"role": "user", "content": user_text})

    url = "https://openrouter.ai/api/v1/chat/completions"
    payload = json.dumps({
        "model": "deepseek/deepseek-chat:free",
        "messages": conversation_history,
    }, ensure_ascii=False)
    headers = {
        'Content-Type': 'application/json',
        'Authorization': QF_AUTHORIZATION
    }

    response = requests.request("POST", url, headers=headers, data=payload.encode("utf-8"))
    if response.status_code == 200:
        result = response.json()
        content = result.get('choices', [{}])[0].get('message', {}).get('content', '')
        print("Qwen Model Response Content:", content)
        conversation_history.append({"role": "assistant", "content": content})
        return content, conversation_history
    else:
        print(f"Failed to get response from Qwen model: {response.text}")
        return None, conversation_history

def send_audio_to_client(client_ip, client_audio_port):
    try:
        CHUNK_SIZE = 700  # 每个数据块的大小,可根据实际情况调整
        with open('./demo.pcm', 'rb') as f:
            with socket.socket(socket.AF_INET, socket.SOCK_DGRAM) as audio_sock:
                while True:
                    data = f.read(CHUNK_SIZE)
                    if not data:
                        break
                    audio_sock.sendto(data, (client_ip, client_audio_port))
                    time.sleep(0.01)  # 延迟 10 毫秒
                # 发送音频结束信号
                audio_sock.sendto(AUDIO_END_SIGNAL, (client_ip, client_audio_port))
                print(f"成功发送音频给 {client_ip}:{client_audio_port}")
    except Exception as e:
        print(f"发送音频时出错: {e}")


def main():
    conversation_history = [
        {
            "role": "system",
            "content": "你需要扮演一个大三清纯女友,你叫悦悦,是对方的初恋,性格温柔善解人意。接下来的对话里,根据对方的话语,自然地回应,展现出温柔体贴、活泼俏皮的一面,话题尽量围绕你们的日常生活、彼此感受展开,多用亲昵称呼,“航宝”。遇到需要解释的情况,语气要软,不要生硬;当对方分享日常时,要积极回应,表达兴趣和关心;对方提出计划时,要热情参与,提出自己的想法。"
        }
    ]

    while True:
        print(f"Starting UDP server on {UDP_IP}:{UDP_PORT}")

        # 创建UDP套接字
        sock = socket.socket(socket.AF_INET, socket.SOCK_DGRAM)
        sock.bind((UDP_IP, UDP_PORT))

        audio_frames = []  # 用于存储接收到的音频帧
        end_signal_received = threading.Event()  # 标记是否收到结束信号
        lock = threading.Lock()  # 用于线程同步
        addr_list = []  # 用于存储客户端地址

        # 启动接收音频的线程
        receive_thread = threading.Thread(target=receive_audio, args=(sock, audio_frames, end_signal_received, lock, addr_list))
        receive_thread.start()

        try:
            while not end_signal_received.is_set():
                time.sleep(0.1)  # 适当延迟,避免频繁检查

            # 等待接收线程结束
            receive_thread.join()

            if end_signal_received.is_set():
                # 合并所有音频帧并保存到固定的文件中,覆盖上一次的文件
                combined_audio_path = os.path.join(UPLOAD_FOLDER, "combined_audio.pcm")
                with wave.open(combined_audio_path, 'wb') as combined_file:
                    # 设置音频参数
                    combined_file.setnchannels(1)  # 单声道
                    combined_file.setsampwidth(2)  # 16位
                    combined_file.setframerate(16000)  # 16000Hz
                    with lock:
                        for frame in audio_frames:
                            combined_file.writeframes(frame)
                print(f"Combined audio data saved to {combined_audio_path}")

                # 获取 access token
                token = get_access_token()
                if token:
                    # 调用百度语音识别API
                    recognized_text = recognize_audio(combined_audio_path, token)
                    if recognized_text:
                        # 打印识别出的文字
                        print(f"Recognized Text: {recognized_text}")
                        # 启动一个新的线程来调用大模型API
                        response_content, conversation_history = call_qwen_model(conversation_history, recognized_text)
                        if response_content:
                            # 发送回复内容给客户端
                            client_ip = "192.168.254.129"  # 客户端IP地址
                            client_port = 12346  # 客户端接收端口
                            with socket.socket(socket.AF_INET, socket.SOCK_DGRAM) as new_sock:
                                new_sock.sendto(response_content.encode('utf-8'), (client_ip, client_port))
                                print(f"成功发送给 {client_ip}:{client_port}")

                            # 合成语音
                            synthesize_text(response_content)

                            # 发送音频给客户端
                            client_audio_port = 12348  # 客户端音频接收端口
                            send_audio_to_client(client_ip, client_audio_port)

                # 清空 audio_frames 列表,准备接收新的音频数据
                with lock:
                    audio_frames.clear()
                    addr_list.clear()  # 清空 addr_list,确保只发送一次
            else:
                print("No end signal received, no audio data combined.")
        except KeyboardInterrupt:
            print("Server stopped by user")
            break
        finally:
            end_signal_received.set()
            receive_thread.join()
            sock.close()  # 确保在所有操作完成后关闭套接字


if __name__ == "__main__":
    main()
欢迎加入DeepSeek 技术社区。在这里,你可以找到志同道合的朋友,共同探索AI技术的奥秘。
更多推荐

 14
14 0
0- 0


 已为社区贡献1条内容

所有评论(0)