JAVA不使用第三方库调用DeepseekAPI,用反射机制将API返回的语句作为代码执行
使用JAVA自带库实现的调用DeepseekAPI,并将返回的字符串作为JAVA代码运行,类似于pyhton的eval()
想写一个程序,不使用任何第三方库,只用java自带的库实现。话不多说直接上步骤
一、使用java自带库调用DeepseekAPI
调用API可以分成三步 :
(1)看API文档了解请求格式和请求必须变量
(2)在idea创建请求变量并向DeepseekAPI文档中指定的链接发送请求
(3)接收API的响应并处理
1、查DeepseekAPI文档看请求格式
这里附上Deepseek的API链接DeepSeek 开放平台,使用前必须先充值然后获取key,key只能在创建的时候看见所以务必记好!!

点开左下角开发文档可以看到首次调用的提醒,调用的URL和必须附带有Key
下面有其他语言的请求示例、但是并没有提到java请求的具体格式,基础好的看其他语言的格式就已经能构建请求了。不会构建没事,我们继续往下翻
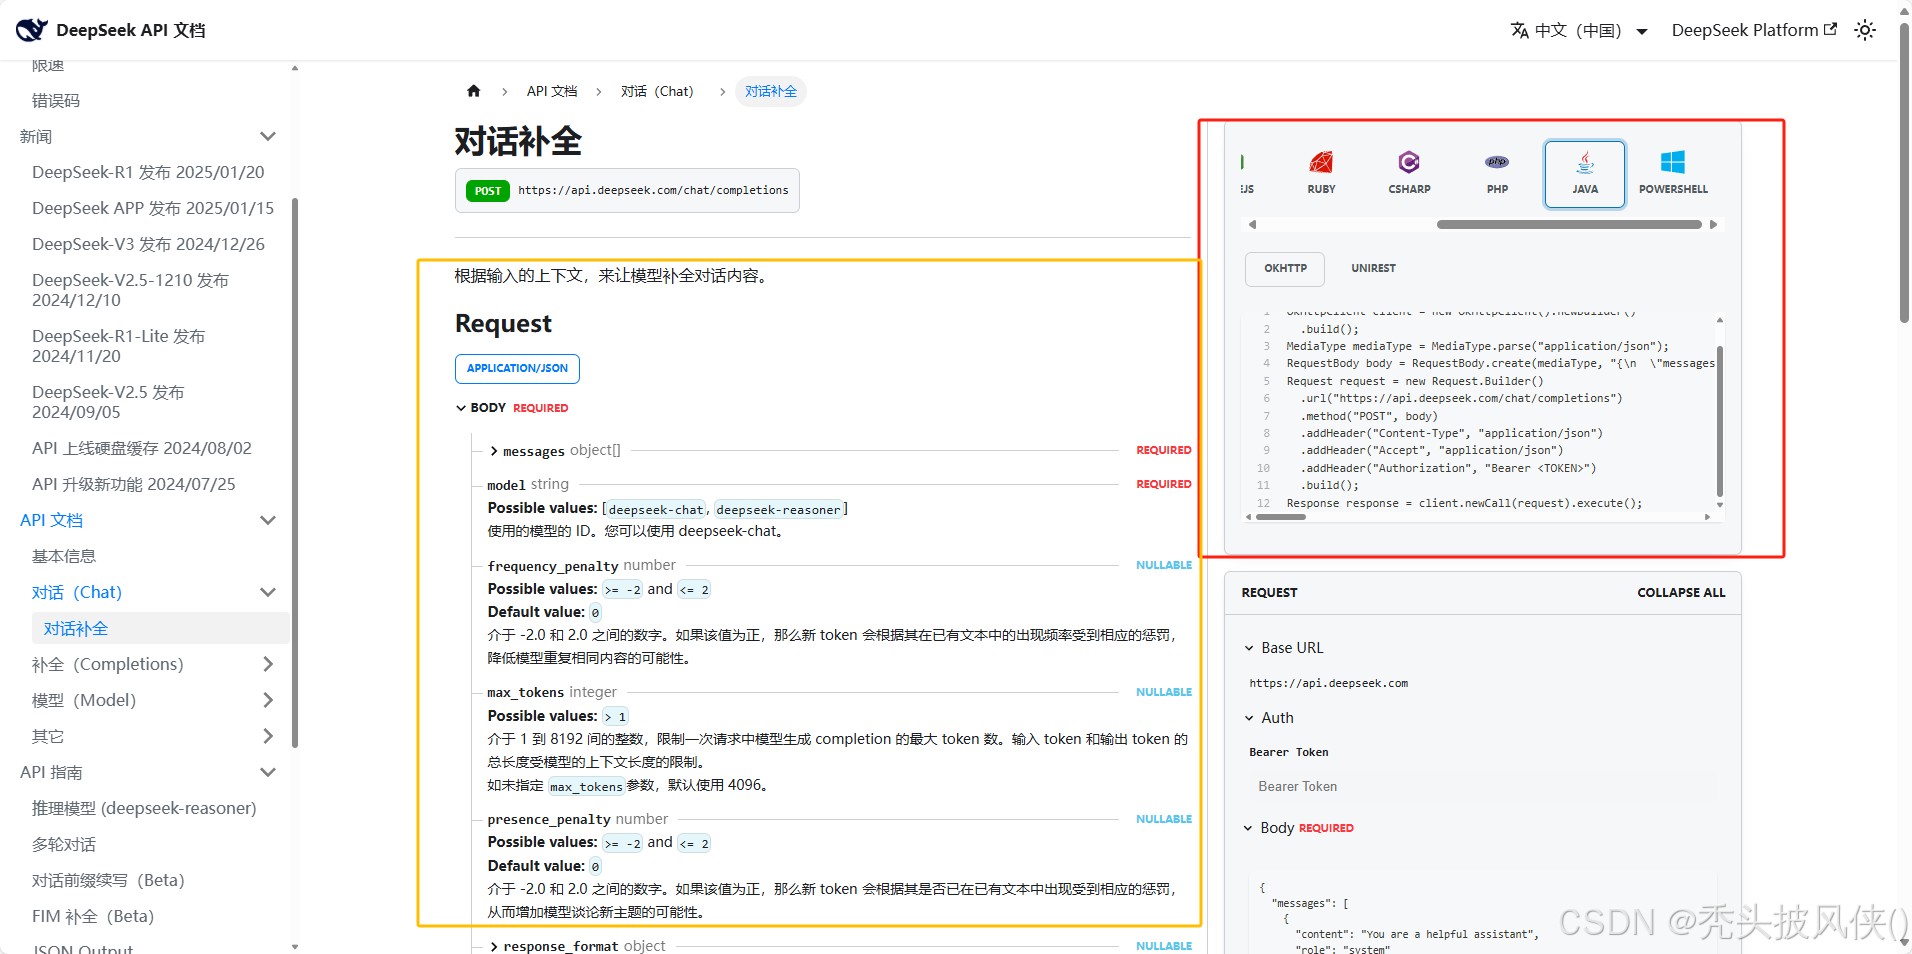 翻翻文档可以看到在对话->对话补全页面有java用OKHTTP发送请求的示例,但是我的目的是用java自带库解决,不能用OKHTTP,中间有请求内容的说明,到现在我们就可以根据请求说明来构建请求了。
右边有请求头的信息,一会配置请求头时可以回来看
观察请求里必须的Require选项可以看到
Request主体里面必须的元素有:一个的数组元素message、 一个model元素。
message元素里面还有东西,再打开看

message里面必须要有content、role,其中role的值是固定只有四个,我们是用户就使用user。
现在需要的请求内容已经知道了,可以去构建请求了
2、在idea构建请求
首先url和key准备
    String url = "https://api.deepseek.com/chat/completions";
    String key = 你自己在API官网申请的Key;
创建一个call函数方便调用
API里要求发送POST请求,而POST请求里的内容是使用json储存的,所以将请求体转换json,这一步就让Deepseek做,告诉Deepseek:"我要调用你的API,给我一个java调用你API的json字符串。"
public String call(String message){

        String jsonString = "{\n" +
                "  \"model\": \"deepseek-chat\",\n" +
                "  \"messages\": [\n" +
                "    {\n" +
                "      \"content\": \""+message+"\",\n" +
                "      \"role\": \"user\"\n" +
                "    }\n" +
                "  ]\n" +
                "}";
}使用JAVA自带的HttpRequest 构建请求,这一步我是查看HttpRequest的源码说明做的
      HttpRequest request = HttpRequest.newBuilder()
                .uri(URI.create(url))
                .header("Content-Type", "application/json")
                .header("Accept", "application/json")
                .header("Authorization", "Bearer "+key)
                .POST(HttpRequest.BodyPublishers.ofString(jsonString))
.build();其中的header请求头是从API文档复制的,把TOKEN改成自己的Key就行

整个请求体是参照了HttpRequest源码的示例构建

下一步就是发送请求了,其实当时我是不知道怎么发送的,这步是问了Deepseek并且翻阅了java.net.http包,发现了一个HttpClient类
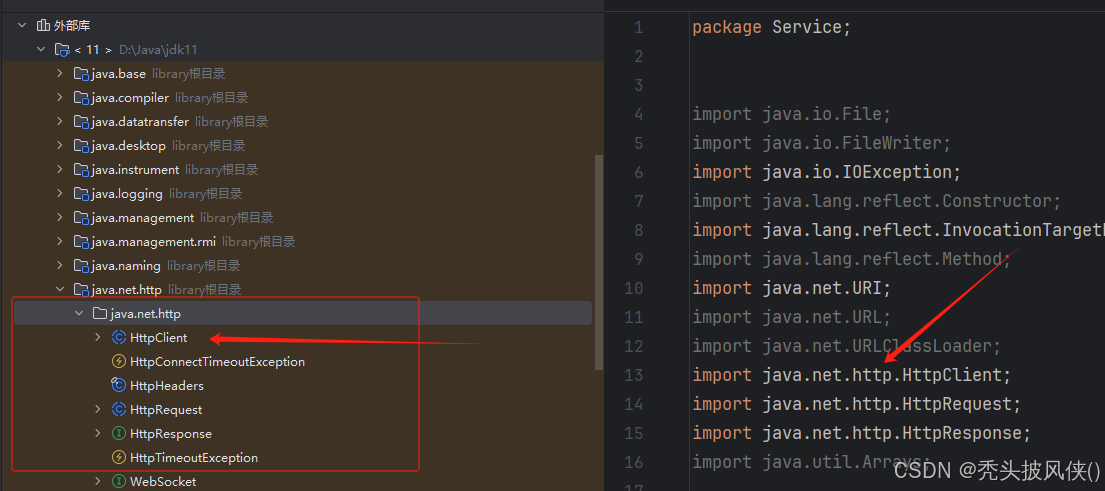
点开之后找到了一个示例,知道了发送请求的方法

然后就是创建,发送请求
        //创建client以发送请求
        HttpClient client = HttpClient.newHttpClient();
        HttpResponse<String> response;
        try {
            //发送请求并接受相应
             response = client.send(request,HttpResponse.BodyHandlers.ofString());
        } catch (IOException | InterruptedException e) {
            throw new RuntimeException(e);
        }
3、发送请求并处理响应内容
接收到response也是一个JSON字符串把他输出查看:
{"id":"969e09fb-571a-43a7-b5b5-61d11d4a13b3","object":"chat.completion","created":1742095628,"model":"deepseek-chat","choices":[{"index":0,"message":{"role":"assistant","content":"你好!很高兴见到你!有什么我可以帮忙的吗?"},"logprobs":null,"finish_reason":"stop"}],"usage":{"prompt_tokens":6,"completion_tokens":11,"total_tokens":17,"prompt_tokens_details":{"cached_tokens":0},"prompt_cache_hit_tokens":0,"prompt_cache_miss_tokens":6},"system_fingerprint":"fp_3a5770e1b4_prod0225"}
懵比了,这什么东西啊??好长啊。仔细一看原来这就是响应的内容,而我们需要的content在这中间,接下来只需要提取出来就行了。
写一个提取内容的函数来提取我们要的部分。这个函数不定,我是代码需要才提取成这样,因为我的目的是把Deepseek返回的内容作为JAVA代码来运行,大家可以按自己的需求来写这个函数,不要照抄我的。
    public String extract(String json){
        //提取字符串内容
        int contentIndex = json.indexOf("\"content\":\"")+11;
        int end = json.indexOf(";",contentIndex);
        return json.substring(contentIndex,end).replaceAll("\\\\","")+";";
}到目前为止,我们的JAVA自带库调用DeepseekAPI就做好了
完整代码如下
public class DeepSeekService {
    String url = "https://api.deepseek.com/chat/completions";
    String key = 你自己在官网申请的Key;
    public String call(String message){

        String jsonString = "{\n" +
                "  \"model\": \"deepseek-chat\",\n" +
                "  \"messages\": [\n" +
                "    {\n" +
                "      \"content\": \""+message+"\",\n" +
                "      \"role\": \"user\"\n" +
                "    }\n" +
                "  ]\n" +
                "}";

        HttpRequest request = HttpRequest.newBuilder()
                .uri(URI.create(url))
                .header("Content-Type", "application/json")
                .header("Accept", "application/json")
                .header("Authorization", "Bearer "+key)
                .POST(HttpRequest.BodyPublishers.ofString(jsonString))
                .build();

        //创建client以发送请求
        HttpClient client = HttpClient.newHttpClient();
        HttpResponse<String> response;
        try {
            //发送请求并接受相应
             response = client.send(request,HttpResponse.BodyHandlers.ofString());
        } catch (IOException | InterruptedException e) {
            throw new RuntimeException(e);
        }

        return extract(response.body());
    }
  public static void main(String[] args) throws IOException, NoSuchMethodException, InvocationTargetException, InstantiationException, IllegalAccessException {
        new DeepSeekService().call("泥嚎!");
    }

    public String extract(String json){
        //提取字符串内容
        int contentIndex = json.indexOf("\"content\":\"")+11;
        int end = json.indexOf(";",contentIndex);
        return json.substring(contentIndex,end).replaceAll("\\\\","")+";";
    }
}
二、把字符串作为JAVA代码运行
1、实时编译JAVA文件
JAVA运行时必须把文件全部编译之后才能运行,并不能实时更新代码。
通过百度查资料和Deepseek,我得知了一个工具
javax.tools.JavaCompiler
使用方法也很简单,只需要作为参数传入一个路径,他会编译路径下所有JAVA文件,如下
         //写入临时类字符串
        String code =  "public class "+className +" {public void invoke() { " + statement +         " }}";
        //获取系统临时目录
        File tempDir = new File(System.getProperty("java.io.tmpdir"));
        //创建JAVA文件,并把准备好的字符串类写入
        File file = new File(tempDir, className+".java");// 文件名必须与类名一致
        try (FileWriter writer = new FileWriter(file)) {
            writer.write(code);
        } catch (IOException e) {
            throw new RuntimeException(e);
        }
      //获取编译器
        JavaCompiler compiler = ToolProvider.getSystemJavaCompiler();
        //编译文件,会在file所在的目录产生一个对应的.class文件
compiler.run(null, null, null, file.getPath());className是自由指定的临时编译类名,statement是放在临时类中函数的语句。
code字符串里面是不是就是一个类呀。
所以整体使用步骤就是:
(1)在一个字符串里写你要临时编译的JAVA类。
(2)将字符串写入一个空文件,并为文件加上 .java 后缀
(3)用工具类JavaCompiler编译你新写的 .java 文件所在的目录。
关于这个函数为什么传入的前三个参数是null就不说明了(我也不知道XD)。
compiler.run(null, null, null, file.getPath());
2、用加载器加载类并获取函数运行
由于我的项目是老师布置的课后作业,有点特殊,必须所有的类都用同一个加载器加载。
正常来说是不需要用到加载器的,但是依照我的想法,需要实时编译并运行一个临时类,这个临时类需要调用到其他常驻的类。
运行临时类必须使用到加载器。然而不同加载器之间都是独立的,不能相互调用并影响。
就好像海里的鱼和内陆湖里的鱼,他们处在不同的容器,不管怎样他们都是无关的。也无法交流。
言归正传,还有最重要的一点-------------加载器的父类委派机制。
意思是:加载器在加载JAVA类的时候会先委托他的加载器父类加载,当父类加载不了的时候才会由他自己加载。
比如一个程序员拿到一个需求,但是他不想做,就先告诉他的主管:“这个需求你来做吧,我忙不过来了”。 如果他的主管能做,就直接做了,如果做不了,主管就会说:“自己的事情你自己做!”。 XD
回到正题,想要动态加载类呢,需要用到一个加载器:URLClassLoader ,但是他也有双亲委派机制,对于临时创建的类,他会委派给自己即URLClassLoader,但是对于常驻的类,他会委派给父类加载器AppClassLoader。
这就很头疼了,我需要他临时创建出来并调用其他类的函数,比如调用新增员工函数
HashTabDemo.hashTab.updateEmp(1,张三,23,男)
但是由于父类委托机制又无法调用,于是我又查资料问DeepSeek,找到了一个办法:
创建自定义加载器继承URLClassLoader ,重写他的父类委派函数loadClass!!!
1、2、3 上代码!!!!(接下来会有大量代码)
具体操作如下:HashTablDemo、HashTab、EmpLinkedList、Emp、TempClass是我项目中的类。
public  class MyClassLoader extends URLClassLoader {
    public MyClassLoader(URL[] urls, ClassLoader parent) {
        super(urls, parent);
    }

    @Override
    public Class<?> loadClass(String name) throws ClassNotFoundException {
        // 如果类名是指定的类,则由当前类加载器加载
        if (name.equals("HashTabDemo")||name.equals("HashTab")||
                name.equals("EmpLinkedList")||name.equals("Emp")||
        name.equals("TempClass\\d+")) {
            return findClass(name);
        }
        // 否则委托给父类加载器
        return super.loadClass(name);
    }

    public void addURL(URL url){
        super.addURL(url);
    }

}
为什么还要写一个addURL函数呢,这是实时添加临时类的,留待下面再说。
现在我做出解释:loadClass函数里修改了他的父类委派机制,if()语句的作用是当加载的类名是我项目里的几个类的时候,不要委派父类,就用你自己:URLClassLoader加载。
这是我们只需要使用自定义MyClassLoader类加载器来加载所有的类就不会有父类委派,类和类之间就不会有隔阂了!
(^-^)V!!!
顺带一提,URLClassLoader的使用方法是
        //获取类路径  URL
        URL dir = HashTabDemo.class.getProtectionDomain().getCodeSource().getLocation();
        URL dir2 = Emp.class.getProtectionDomain().getCodeSource().getLocation();
        URL dir3 = HashTab.class.getProtectionDomain().getCodeSource().getLocation();
        URL dir4 = EmpLinkedList.class.getProtectionDomain().getCodeSource().getLocation();
        //把要用的类全部加载到自定义加载器
URLClassLoader loader = new URLClassLoader(new URL[] {dir,dir2,dir4,dir3});而我们刚才自定义了加载器,破除了父类委派的机制,所以上面的代码要写成
      //配置加载路径
        URL dir = HashTabDemo.class.getProtectionDomain().getCodeSource().getLocation();
        URL dir2 = Emp.class.getProtectionDomain().getCodeSource().getLocation();
        URL dir3 = HashTab.class.getProtectionDomain().getCodeSource().getLocation();
        URL dir4 = EmpLinkedList.class.getProtectionDomain().getCodeSource().getLocation();
        //把要用的类全部加载到自定义加载器
MyClassLoader loader = new MyClassLoader(new URL[]{dir,dir2,dir4,dir3});现在加载类的问题已经解决,是时候运行了,运行必须用反射的方式。Java反射这里就不解释了,是JAVA必学的内容。
这是我项目的主要函数,大家可以跳过,知道有个doMain函数是主要函数即可。不必理会
 public void doMain(MyClassLoader loader1) {
        loader = loader1;
        Scanner scanner = new Scanner(System.in);
//        System.out.println(HashTabDemo.class.getClassLoader().toString());

        hashTab.add(new Emp(101, "张三",23,"男"));
        hashTab.add(new Emp(102, "张伟",25,"男"));
        hashTab.add(new Emp(103, "李四",22,"男"));
        hashTab.add(new Emp(104, "李雷",26,"男"));
        hashTab.add(new Emp(105, "王五",27,"男"));
        hashTab.add(new Emp(106, "王小明",22,"男"));
        hashTab.add(new Emp(107, "赵六",23,"男"));
        hashTab.add(new Emp(108, "赵云",24,"男"));
        hashTab.add(new Emp(109, "陈奕迅",21,"男"));
        hashTab.add(new Emp(110, "陈小春",23,"男"));

        int menu = 0;
        DeepSeekService ds = new DeepSeekService();

        while (menu != 8) {
            //添加修改和删除功能
            System.out.println("------1:添加 2:显示 3:查找 4:删除 5:修改 6:AI操作 7:退出------");
            menu = scanner.nextInt();
            switch (menu) {
                case 1:
                    System.out.print("输入id: ");
                    int id = scanner.nextInt();
                    System.out.print("输入姓名: ");
                    String name = scanner.next();
                    System.out.print("输入年龄: ");
                    int age = scanner.nextInt();
                    System.out.print("输入性别: ");
                    String gender = scanner.next();
                    hashTab.add(new Emp(id, name, age, gender));
                    break;
                case 2:
                    hashTab.list();
                    break;
                case 3:
                    this.search();
                    break;

                case 4:
                    System.out.print("输入删除id: ");
                    hashTab.deleteEmpById(scanner.nextInt());
                    break;
                case 5:
                    System.out.print("输入修改id: ");
                    int updateId = scanner.nextInt();
                    System.out.print("输入新姓名: ");
                    String newName = scanner.next();
                    System.out.print("输入新年龄: ");
                    int newAge = scanner.nextInt();
                    System.out.print("输入新性别: ");
                    String newGender = scanner.next();
                    hashTab.updateEmp(updateId, newName, newAge, newGender);
                    break;
                case 6:
                    scanner.nextLine();

                    System.out.println("用文字描述需要执行的操作:");
                    String statement = ds.call(
                                    "你的身份是作为我的哈希表项目的机器人," +
                                    "你需要根据我的需求给出对应函数的调用的执行代码," +
                                    "不需要补全代码,不需要解释," +
                                    "只返回一行代码给我," +
                                    "例如我要新增一个职员:id是10,名字叫张三,年龄是18,性别是男。你只需要返回一行代码,HashTabDemo.hashTab.add(new Emp(1,张三,18,男));" +
                                    "删除id是2的员工:HashTabDemo.hashTab.deleteEmpById(2);" +
                                    "修改id为1的员工 名字修改为张三,年龄修改为23,性别修改为男:HashTabDemo.hashTab.updateEmp(1,张三,23,男);" +
                                    "查询所有员工:HashTabDemo.hashTab.list();" +
                                    "查询id是3的员工:HashTabDemo.hashTab.findEmpById(int id);" +
                                    "查询姓名是张三的员工:HashTabDemo.hashTab.findEmpsByName(String.ValueOf(张三));" +
                                    "现在我给你下指令:"+scanner.nextLine()
                    );

                    try {
                        justDoIt(statement);

                    } catch (MalformedURLException | ClassNotFoundException | IllegalAccessException |
                             InstantiationException | InvocationTargetException e) {
                        throw new RuntimeException(e);
                    }
                    break;
                case 7:
                    System.out.println("退出系统");
                    break;
                default:
                    System.out.println("输入错误");
            }
        }
这是启动类,运行这个类来启动,需要从加载器中找相关的类并获取主函数执行。
public class boot {
    public static void main(String[] args) throws ClassNotFoundException, NoSuchMethodException, InvocationTargetException, InstantiationException, IllegalAccessException {
        //配置加载路径
        URL dir = HashTabDemo.class.getProtectionDomain().getCodeSource().getLocation();
        URL dir2 = Emp.class.getProtectionDomain().getCodeSource().getLocation();
        URL dir3 = HashTab.class.getProtectionDomain().getCodeSource().getLocation();
        URL dir4 = EmpLinkedList.class.getProtectionDomain().getCodeSource().getLocation();
        //把要用的类全部加载到自定义加载器
        MyClassLoader loader = new MyClassLoader(new URL[]{dir,dir2,dir4,dir3},ClassLoader.getSystemClassLoader());
//        System.out.println(loader);
        //获取主类的信息
        Class<?> cla = Class.forName("HashTabDemo",true,loader);
        //获取主类的无参构造函数并实例化
        Object obj = cla.getDeclaredConstructor().newInstance();
        //获取主方法,运行并传递加载器
        Method method = cla.getMethod("doMain", MyClassLoader.class);
        method.invoke(obj,loader);
    }
}
3、接受DeepSeek获取的JAVA语句并执行
前面我们做到了获取Deepseek返回的内容,接下来就进行处理就行,现在可以重点关注这些代码
 String statement = ds.call(
                                    "你的身份是作为我的哈希表项目的机器人," +
                                    "你需要根据我的需求给出对应函数的调用的执行代码," +
                                    "不需要补全代码,不需要解释," +
                                    "只返回一行代码给我," +
                                    "例如我要新增一个职员:id是10,名字叫张三,年龄是18,性别是男。你只需要返回一行代码,HashTabDemo.hashTab.add(new Emp(1,张三,18,男));" +
                                    "删除id是2的员工:HashTabDemo.hashTab.deleteEmpById(2);" +
                                    "修改id为1的员工 名字修改为张三,年龄修改为23,性别修改为男:HashTabDemo.hashTab.updateEmp(1,张三,23,男);" +
                                    "查询所有员工:HashTabDemo.hashTab.list();" +
                                    "查询id是3的员工:HashTabDemo.hashTab.findEmpById(int id);" +
                                    "查询姓名是张三的员工:HashTabDemo.hashTab.findEmpsByName(String.ValueOf(张三));" +
                                    "现在我给你下指令:"+scanner.nextLine()
                    );
不要忘记我们的初心:把Deepseek返回的字符串作为JAVA语句执行!!!
在输入前面的一大堆字是对Deepseek的引导,这是为了确保他返回给我一个没有语法错误的语句。
之后将语句传入处理函数,也就是前面说要写的创建初始类并运行的函数。
代码不难也有注释,如下:
    public static void justDoIt(String statement ) throws MalformedURLException, InvocationTargetException, InstantiationException, IllegalAccessException, ClassNotFoundException {
        System.out.println("执行指令:"+statement);
        System.out.println();
        //让类名每次调用时变化,不必理会
        String className = "TempClass"+count++;
        //写入临时类字符串
        String code =  "public class "+className +" {public void invoke() { " + statement + " }}";
        //获取系统临时目录
        File tempDir = new File(System.getProperty("java.io.tmpdir"));
        //创建JAVA文件,并把准备好的字符串类写入
        File file = new File(tempDir, className+".java");// 文件名必须与类名一致
        try (FileWriter writer = new FileWriter(file)) {
            writer.write(code);
        } catch (IOException e) {
            throw new RuntimeException(e);
        }
        //获取编译器
        JavaCompiler compiler = ToolProvider.getSystemJavaCompiler();
        //编译文件,会在file所在的目录产生一个对应的.class文件
        compiler.run(null, null, null, file.getPath());


        //在自定义加载器中公开暴露URLClassLoader的私有函数addURL
        loader.addURL(tempDir.toURI().toURL());


        try {
//            加载临时类
            loader.loadClass(className);
            // 加载 TempClass
            Class<?> cla = Class.forName(className, true, loader);

            // 获取构造函数并设置可访问
            Constructor<?> constructor = cla.getDeclaredConstructor();
            constructor.setAccessible(true); // 允许访问包级私有构造函数

            // 创建实例并调用方法
            Object obj = constructor.newInstance();
            Method print = cla.getMethod("invoke");
            print.invoke(obj);
        } catch (NoSuchMethodException e) {
            throw new RuntimeException(e);
        } finally {
            // 清理临时文件
            file.deleteOnExit();
            new File(tempDir, className+".class").deleteOnExit();
        }

}这里漏了一个问题,加载器是不能实时添加类的,而我们的函数又要重复调用,当两次添加同一个类的时候,会报错显示添加重复类。所以必须保证每次创建的临时类是不同的,也就是类名要变化。
所以使用了一个count来使类名实时变化。
往加载器添加类时必须添加URL和类名,但是!!!!!!!!!
URLClassLoader类里面的addURL()函数是私有的(private)。
我们想用这个函数只有两个办法:
(1)在自定义加载器中把他公开。
(2)利用JAVA反射调用。
JAVA反射写起来不太方便(我不想写),所以我选在在自定义加载器公开他,反正前面我们已经自定义了加载器。
这是前面提到但是没解释的自定义加载器中的函数addURL(),即

    public void addURL(URL url){
        super.addURL(url);
    }
三、效果展示
总体代码到这里就结束了,可以看一下效果:


也是肥肠的智能啊
四、全部代码
代码详解到这里就结束了,下面附上我的全部代码
调用的Deepseek服务类
public class DeepSeekService {
    String url = "https://api.deepseek.com/chat/completions";
    String key = 用你自己的key :)   ;
    public String call(String message){

        String jsonString = "{\n" +
                "  \"model\": \"deepseek-chat\",\n" +
                "  \"messages\": [\n" +
                "    {\n" +
                "      \"content\": \""+message+"\",\n" +
                "      \"role\": \"user\"\n" +
                "    }\n" +
                "  ]\n" +
                "}";

        HttpRequest request = HttpRequest.newBuilder()
                .uri(URI.create(url))
                .header("Content-Type", "application/json")
                .header("Accept", "application/json")
                .header("Authorization", "Bearer "+key)
                .POST(HttpRequest.BodyPublishers.ofString(jsonString))
                .build();

        //创建client以发送请求
        HttpClient client = HttpClient.newHttpClient();
        HttpResponse<String> response;
        try {
            //发送请求并接受相应
             response = client.send(request,HttpResponse.BodyHandlers.ofString());
        } catch (IOException | InterruptedException e) {
            throw new RuntimeException(e);
        }

        return extract(response.body());
    }
  public static void main(String[] args) throws IOException, NoSuchMethodException, InvocationTargetException, InstantiationException, IllegalAccessException {
        new DeepSeekService().call("泥嚎!");
    }

    //裁剪出代码再去除转义字符
    public String extract(String json){
        //提取字符串内容
        int contentIndex = json.indexOf("\"content\":\"")+11;
        int end = json.indexOf(";",contentIndex);
        return json.substring(contentIndex,end).replaceAll("\\\\","")+";";
    }
}
HashTableDemo类
import Service.DeepSeekService;

import java.io.File;
import java.io.FileWriter;
import java.io.IOException;
import java.lang.reflect.Constructor;
import java.lang.reflect.InvocationTargetException;
import java.lang.reflect.Method;
import java.net.MalformedURLException;
import java.net.URL;
import java.net.URLClassLoader;
import java.util.ArrayList;
import java.util.List;
import java.util.Scanner;
import javax.tools.JavaCompiler;
import javax.tools.ToolProvider;

//表示一个雇员节点
class Emp {
    public int id;
    public String name;
    //添加年龄和性别属性
    public int age;
    public String gender;
    public Emp next;

    public Emp(int id, String name,int age,String gender) {
        this.id = id;
        this.name = name;
        this.age = age;
        this.gender = gender;
    }
}

//创建EmpLinkedList,表示哈希表中的某个链表
class EmpLinkedList {
    // 头指针,直接指向第一个Emp,默认null
    private Emp head;

    // 添加雇员到链表(直接添加到尾部)
    public void add(Emp emp) {
        if (head == null) { // 即添加第一个雇员
            head = emp;
            return;
        }
        // 如果不是第一个雇员,则遍历链表找到尾指针
        Emp curEmp = head;
        // 注意:因为头指针定义为指向第一个节点,所以不能使用while(curEmp.next!=null)
        // 否则,当链表中只有一个节点时,第一次while(curEmp.next!=null)即为假
        while (true) {
            if (curEmp.next == null) {
                break;
            }
            curEmp = curEmp.next;
        }
        // 退出时直接将emp 加入链表
        curEmp.next = emp;
    }

    // 遍历链表的雇员信息
    public void list(int no) {
        if (head == null) { // 说明链表为空
            System.out.println("第" + no + "链表为空");
            return;
        }
        System.out.print("第" + no + "链表的信息为: ");
        Emp curEmp = head; // 辅助指针
        while (true) {
            //添加输出的属性
            System.out.printf("=>id=%d name=%s age=%d gender=%s\t", curEmp.id, curEmp.name, curEmp.age, curEmp.gender);
            if (curEmp.next == null) {
                break;
            }
            curEmp = curEmp.next;
        }
        System.out.println();
    }

    // 根据id查找雇员
    public Emp findEmpById(int id) {
        if (head == null) {
            System.out.println("链表为空");
            return null;
        }
        // 辅助指针
        Emp curEmp = head;
        while (true) {
            if (curEmp.id == id) {
                break;                // 这时curEmp就指向要查找的雇员
            }
            // 退出
            if (curEmp.next == null) {// 说明遍历当前链表没有找到该雇员
                curEmp = null;
                break;
            }
            curEmp = curEmp.next;
        }
        return curEmp;
    }

    // 根据id删除雇员
    public boolean deleteEmpById(int id) {
        if (head == null) return false;
        if (head.id == id) {
            head = head.next;
            return true;
        }
        Emp prev = head;
        Emp curEmp = head.next;
        while (curEmp != null) {
            if (curEmp.id == id) {
                prev.next = curEmp.next;
                return true;
            }
            prev = curEmp;
            curEmp = curEmp.next;
        }
        return false;
    }
    // **新增功能:按姓名片段查找雇员**
    public List<Emp> findEmpsByName(String namePart) {
        List<Emp> result = new ArrayList<>();
        Emp curEmp = head;
        while (curEmp != null) {
            if (curEmp.name.contains(namePart)) { // 如果雇员名字包含用户输入的部分字符串
                result.add(curEmp); // 添加到结果列表
            }
            curEmp = curEmp.next;
        }
        return result; // 返回匹配到的所有雇员
    }
}

//创建哈希表, 管理多条链表
class HashTab {
    private EmpLinkedList[] empLinkedListArray;
    private int size; // 表示有多少个链表

    public HashTab(int size) {
        this.size = size;
        empLinkedListArray = new EmpLinkedList[size];
        for (int i = 0; i < size; i++) {
            empLinkedListArray[i] = new EmpLinkedList();
        }
    }

    // 添加雇员
    public void add(Emp emp) {
        // 根据员工的id ,得到该员工应当添加到哪条链表
        int empLinkedListNO = emp.id % size;
        empLinkedListArray[empLinkedListNO].add(emp);
    }

    // 遍历所有的链表,遍历哈希表
    public void list() {
        for (int i = 0; i < size; i++) {
            empLinkedListArray[i].list(i);
        }
    }

    // 根据输入的id,查找雇员
    public void findEmpById(int id) {
        // 使用散列函数确定到哪条链表查找
        int empLinkedListNO = id % size;
        Emp emp = empLinkedListArray[empLinkedListNO].findEmpById(id);
        if (emp != null) {// 找到
            System.out.printf("在第%d条链表中找到雇员: id=%d, name=%s, age=%d,gander=%s\n", empLinkedListNO, id, emp.name,emp.age,emp.gender);
        } else {
            System.out.println("在哈希表中,没有找到该雇员~");
        }
    }

    //根据id删除员工
    public void deleteEmpById(int id) {
        int empLinkedListNO = id % size;
        boolean deleted = empLinkedListArray[empLinkedListNO].deleteEmpById(id);
        if (deleted) {
            System.out.printf("已删除第%d条链表的雇员%d\n", empLinkedListNO, id);
        } else {
            System.out.println("删除失败,雇员不存在");
        }
    }

    //根据id,修改员工的姓名,年龄,性别
    public void updateEmp(int id, String newName, int newAge, String newGender) {
        int empLinkedListNO = id % size;
        Emp emp = empLinkedListArray[empLinkedListNO].findEmpById(id);
        if (emp != null) {
            emp.name = newName;
            emp.age = newAge;
            emp.gender = newGender;
            System.out.printf("已更新雇员%d的信息\n", id);
        } else {
            System.out.println("更新失败,雇员不存在");
        }
    }


    // **新增功能:模糊查找**
    public void findEmpsByName(String namePart) {
        List<Emp> matchedEmps = new ArrayList<>();

        // 遍历哈希表中的所有链表
        for (EmpLinkedList empLinkedList : empLinkedListArray) {
            matchedEmps.addAll(empLinkedList.findEmpsByName(namePart)); // 合并所有匹配的雇员
        }

        if (!matchedEmps.isEmpty()) {
            System.out.println("匹配的雇员如下:");
            for (Emp emp : matchedEmps) {
                System.out.printf("id=%d, name=%s, age=%d,gander=%s\n", emp.id, emp.name,emp.age,emp.gender);
            }
        } else {
            System.out.println("没有找到匹配的雇员");
        }
    }
}

public class HashTabDemo {

//    static URL dir = HashTabDemo.class.getProtectionDomain().getCodeSource().getLocation();
//    static URL dir2 = Emp.class.getProtectionDomain().getCodeSource().getLocation();
//    static URL dir3 = HashTab.class.getProtectionDomain().getCodeSource().getLocation();
//    static URL dir4 = EmpLinkedList.class.getProtectionDomain().getCodeSource().getLocation();
//    static MyClassLoader loader = new MyClassLoader(new URL[]{dir,dir2,dir4,dir3},HashTabDemo.class.getClassLoader());

    static int count = 1;
    static HashTab hashTab = new HashTab(10);
    static MyClassLoader loader;

    public void doMain(MyClassLoader loader1) {
        loader = loader1;
        Scanner scanner = new Scanner(System.in);
//        System.out.println(HashTabDemo.class.getClassLoader().toString());

        hashTab.add(new Emp(101, "张三",23,"男"));
        hashTab.add(new Emp(102, "张伟",25,"男"));
        hashTab.add(new Emp(103, "李四",22,"男"));
        hashTab.add(new Emp(104, "李雷",26,"男"));
        hashTab.add(new Emp(105, "王五",27,"男"));
        hashTab.add(new Emp(106, "王小明",22,"男"));
        hashTab.add(new Emp(107, "赵六",23,"男"));
        hashTab.add(new Emp(108, "赵云",24,"男"));
        hashTab.add(new Emp(109, "陈奕迅",21,"男"));
        hashTab.add(new Emp(110, "陈小春",23,"男"));

        int menu = 0;
        DeepSeekService ds = new DeepSeekService();

        while (menu != 8) {
            //添加修改和删除功能
            System.out.println("------1:添加 2:显示 3:查找 4:删除 5:修改 6:AI操作 7:退出------");
            menu = scanner.nextInt();
            switch (menu) {
                case 1:
                    System.out.print("输入id: ");
                    int id = scanner.nextInt();
                    System.out.print("输入姓名: ");
                    String name = scanner.next();
                    System.out.print("输入年龄: ");
                    int age = scanner.nextInt();
                    System.out.print("输入性别: ");
                    String gender = scanner.next();
                    hashTab.add(new Emp(id, name, age, gender));
                    break;
                case 2:
                    hashTab.list();
                    break;
                case 3:
                    this.search();
                    break;

                case 4:
                    System.out.print("输入删除id: ");
                    hashTab.deleteEmpById(scanner.nextInt());
                    break;
                case 5:
                    System.out.print("输入修改id: ");
                    int updateId = scanner.nextInt();
                    System.out.print("输入新姓名: ");
                    String newName = scanner.next();
                    System.out.print("输入新年龄: ");
                    int newAge = scanner.nextInt();
                    System.out.print("输入新性别: ");
                    String newGender = scanner.next();
                    hashTab.updateEmp(updateId, newName, newAge, newGender);
                    break;
                case 6:
                    scanner.nextLine();

                    System.out.println("用文字描述需要执行的操作:");
                    String statement = ds.call(
                                    "你的身份是作为我的哈希表项目的机器人," +
                                    "你需要根据我的需求给出对应函数的调用的执行代码," +
                                    "不需要补全代码,不需要解释," +
                                    "只返回一行代码给我," +
                                    "例如我要新增一个职员:id是10,名字叫张三,年龄是18,性别是男。你只需要返回一行代码,HashTabDemo.hashTab.add(new Emp(1,张三,18,男));" +
                                    "删除id是2的员工:HashTabDemo.hashTab.deleteEmpById(2);" +
                                    "修改id为1的员工 名字修改为张三,年龄修改为23,性别修改为男:HashTabDemo.hashTab.updateEmp(1,张三,23,男);" +
                                    "查询所有员工:HashTabDemo.hashTab.list();" +
                                    "查询id是3的员工:HashTabDemo.hashTab.findEmpById(int id);" +
                                    "查询姓名是张三的员工:HashTabDemo.hashTab.findEmpsByName(String.ValueOf(张三));" +
                                    "现在我给你下指令:"+scanner.nextLine()
                    );

                    try {
                        justDoIt(statement);

                    } catch (MalformedURLException | ClassNotFoundException | IllegalAccessException |
                             InstantiationException | InvocationTargetException e) {
                        throw new RuntimeException(e);
                    }
                    break;
                case 7:
                    System.out.println("退出系统");
                    break;
                default:
                    System.out.println("输入错误");
            }
        }
    }

    public static void justDoIt(String statement ) throws MalformedURLException, InvocationTargetException, InstantiationException, IllegalAccessException, ClassNotFoundException {
        System.out.println("执行指令:"+statement);
        System.out.println();
        //让类名每次调用时变化,不必理会
        String className = "TempClass"+count++;
        //写入临时类字符串
        String code =  "public class "+className +" {public void invoke() { " + statement + " }}";
        //获取系统临时目录
        File tempDir = new File(System.getProperty("java.io.tmpdir"));
        //创建JAVA文件,并把准备好的字符串类写入
        File file = new File(tempDir, className+".java");// 文件名必须与类名一致
        try (FileWriter writer = new FileWriter(file)) {
            writer.write(code);
        } catch (IOException e) {
            throw new RuntimeException(e);
        }
        //获取编译器
        JavaCompiler compiler = ToolProvider.getSystemJavaCompiler();
        //编译文件,会在file所在的目录产生一个对应的.class文件
        compiler.run(null, null, null, file.getPath());


        //在自定义加载器中公开暴露URLClassLoader的私有函数addURL
        loader.addURL(tempDir.toURI().toURL());


        try {
//            加载临时类
            loader.loadClass(className);
            // 加载 TempClass
            Class<?> cla = Class.forName(className, true, loader);

            // 获取构造函数并设置可访问
            Constructor<?> constructor = cla.getDeclaredConstructor();
            constructor.setAccessible(true); // 允许访问包级私有构造函数

            // 创建实例并调用方法
            Object obj = constructor.newInstance();
            Method print = cla.getMethod("invoke");
            print.invoke(obj);
        } catch (NoSuchMethodException e) {
            throw new RuntimeException(e);
        } finally {
            // 清理临时文件
            file.deleteOnExit();
            new File(tempDir, className+".class").deleteOnExit();
        }

    }

    public void search(){
        Scanner scanner = new Scanner(System.in);
        int menu = 0 ;
        while (menu != 5){
            System.out.println("------1:按ID查找 2:按姓名查找 5:退出------");
            menu = scanner.nextInt();
            switch (menu){
                case 1:
                    System.out.print("输入查找id: ");
                    hashTab.findEmpById(scanner.nextInt());
                    break;
                case 2:
                    System.out.println("请输入姓名关键词:");
                    String namePart = scanner.next();
                    hashTab.findEmpsByName(namePart);
                    break;
                case 5:
                    break;
                default:
                    System.out.println("输入错误");
                    break;
            }
        }
    }


}
自定义加载器类
public  class MyClassLoader extends URLClassLoader {
    public MyClassLoader(URL[] urls, ClassLoader parent) {
        super(urls, parent);
    }

    @Override
    public Class<?> loadClass(String name) throws ClassNotFoundException {
        // 如果类名是指定的类,则由当前类加载器加载
        if (name.equals("HashTabDemo")||name.equals("HashTab")||
                name.equals("EmpLinkedList")||name.equals("Emp")||
        name.equals("TempClass\\d+")) {
            return findClass(name);
        }
        // 否则委托给父类加载器
        return super.loadClass(name);
    }

    public void addURL(URL url){
        super.addURL(url);
    }

}
boot启动类
public class boot {
    public static void main(String[] args) throws ClassNotFoundException, NoSuchMethodException, InvocationTargetException, InstantiationException, IllegalAccessException {
        //配置加载路径
        URL dir = HashTabDemo.class.getProtectionDomain().getCodeSource().getLocation();
        URL dir2 = Emp.class.getProtectionDomain().getCodeSource().getLocation();
        URL dir3 = HashTab.class.getProtectionDomain().getCodeSource().getLocation();
        URL dir4 = EmpLinkedList.class.getProtectionDomain().getCodeSource().getLocation();
        //把要用的类全部加载到自定义加载器
        MyClassLoader loader = new MyClassLoader(new URL[]{dir,dir2,dir4,dir3},ClassLoader.getSystemClassLoader());
//        System.out.println(loader);
        //获取主类的信息
        Class<?> cla = Class.forName("HashTabDemo",true,loader);
        //获取主类的无参构造函数并实例化
        Object obj = cla.getDeclaredConstructor().newInstance();
        //获取主方法,运行并传递加载器
        Method method = cla.getMethod("doMain", MyClassLoader.class);
        method.invoke(obj,loader);
    }
}
至此,非常感谢前来观看我文章的大家,当时这个问题把我难了一整天,尤其是加载器之间的问题,后来睡了一觉才想到修改父类委派机制然后把所有类加载进同一个加载器中。希望这篇文章可以帮到被同样问题困扰的其他人。
再次,感谢观摩!!!

欢迎加入DeepSeek 技术社区。在这里,你可以找到志同道合的朋友,共同探索AI技术的奥秘。
更多推荐

 12
12 0
0- 0


 已为社区贡献2条内容

所有评论(0)