小支手把手教程来了——DeepSeek 满血版在 IDEA 中怎么用?
哈喽友友们,最近科技圈可谓热闹非凡,有几件大事值得友友们关注——苹果与阿里携手,为国行版 iPhone 提供 AI 技术服务;DeepSeek R1 开源 6 个模型,其中 4 个源于阿里 Qwen;阿里云的通义灵码插件迅速集成了 DeepSeek - R1 满血版。我身边同事体验后赞不绝口,今天小支就为友友们带来通义灵码集成的 DeepSeek 满血版在 IDEA 中的使用教程~
前言
哈喽友友们,最近科技圈可谓热闹非凡,有几件大事值得友友们关注——苹果与阿里携手,为国行版 iPhone 提供 AI 技术服务;DeepSeek R1 开源 6 个模型,其中 4 个源于阿里 Qwen;阿里云的通义灵码插件迅速集成了 DeepSeek - R1 满血版。我身边同事体验后赞不绝口,今天小支就为友友们带来通义灵码集成的 DeepSeek 满血版在 IDEA 中的使用教程~
DeepSeek 满血版在 IDEA 中怎么用?
1. 安装通义灵码
在 IDEA 的插件市场中直接搜 “通义灵码”,当然你也可以敲拼音 “TONGYI”,都可以搜到。然后点击 install 就可以安装了,支持 Java、Python、Go 等编程语言,VSCode 和 Visual Studio 也可以安装。

完成安装后,点击右侧边栏上通义灵码的小 icon 就可以打开和通义灵码的聊天窗口。点击左下角的下拉菜单,还可以在 Qwen - 2.5、DeepSeek - R1 和 DeepSeek - V3 模型中自由切换。
2. 体验智能问答
小支觉得 AI 编码助手最大的好处就是可以随时提问,不用再切换到浏览器去搜索,这能够极大提升我们的开发效率。况且真切到浏览器的聊天页面,也不一定能丝滑响应。

个人感觉,DeepSeek 官网应该是做了限流措施,在一定时间内只能提问一次,连续提问就会直接提示“服务器繁忙、请稍后再试”。
这也是没办法的事,算力紧张,DeepSeek 已经够努力了,但奈何访问量实在是太大。
就目前我的体感来说,通义灵码背后的算力应该是充足的,因为我前后高强度对话了一个小时,还没有碰到被拒绝的情况。
# flake8: noqa
# This file is used for deploying replicate models
# running: cog predict -i img=@inputs/00017_gray.png -i version='General - v3' -i scale=2 -i face_enhance=True -i tile=0
# push: cog push r8.im/xinntao/realesrgan

import os

os.system('pip install gfpgan')
os.system('python setup.py develop')

import cv2
import shutil
import tempfile
import torch
from basicsr.archs.rrdbnet_arch import RRDBNet
from basicsr.archs.srvgg_arch import SRVGGNetCompact

from realesrgan.utils import RealESRGANer

try:
    from cog import BasePredictor, Input, Path
    from gfpgan import GFPGANer
except Exception:
    print('please install cog and realesrgan package')


class Predictor(BasePredictor):

    def setup(self):
        os.makedirs('output', exist_ok=True)
        # download weights
        if not os.path.exists('weights/realesr-general-x4v3.pth'):
            os.system(
                'wget https://github.com/xinntao/Real-ESRGAN/releases/download/v0.2.5.0/realesr-general-x4v3.pth -P ./weights'
            )
        if not os.path.exists('weights/GFPGANv1.4.pth'):
            os.system('wget https://github.com/TencentARC/GFPGAN/releases/download/v1.3.0/GFPGANv1.4.pth -P ./weights')
        if not os.path.exists('weights/RealESRGAN_x4plus.pth'):
            os.system(
                'wget https://github.com/xinntao/Real-ESRGAN/releases/download/v0.1.0/RealESRGAN_x4plus.pth -P ./weights'
            )
        if not os.path.exists('weights/RealESRGAN_x4plus_anime_6B.pth'):
            os.system(
                'wget https://github.com/xinntao/Real-ESRGAN/releases/download/v0.2.2.4/RealESRGAN_x4plus_anime_6B.pth -P ./weights'
            )
        if not os.path.exists('weights/realesr-animevideov3.pth'):
            os.system(
                'wget https://github.com/xinntao/Real-ESRGAN/releases/download/v0.2.5.0/realesr-animevideov3.pth -P ./weights'
            )

    def choose_model(self, scale, version, tile=0):
        half = True if torch.cuda.is_available() else False
        if version == 'General - RealESRGANplus':
            model = RRDBNet(num_in_ch=3, num_out_ch=3, num_feat=64, num_block=23, num_grow_ch=32, scale=4)
            model_path = 'weights/RealESRGAN_x4plus.pth'
            self.upsampler = RealESRGANer(
                scale=4, model_path=model_path, model=model, tile=tile, tile_pad=10, pre_pad=0, half=half)
        elif version == 'General - v3':
            model = SRVGGNetCompact(num_in_ch=3, num_out_ch=3, num_feat=64, num_conv=32, upscale=4, act_type='prelu')
            model_path = 'weights/realesr-general-x4v3.pth'
            self.upsampler = RealESRGANer(
                scale=4, model_path=model_path, model=model, tile=tile, tile_pad=10, pre_pad=0, half=half)
        elif version == 'Anime - anime6B':
            model = RRDBNet(num_in_ch=3, num_out_ch=3, num_feat=64, num_block=6, num_grow_ch=32, scale=4)
            model_path = 'weights/RealESRGAN_x4plus_anime_6B.pth'
            self.upsampler = RealESRGANer(
                scale=4, model_path=model_path, model=model, tile=tile, tile_pad=10, pre_pad=0, half=half)
        elif version == 'AnimeVideo - v3':
            model = SRVGGNetCompact(num_in_ch=3, num_out_ch=3, num_feat=64, num_conv=16, upscale=4, act_type='prelu')
            model_path = 'weights/realesr-animevideov3.pth'
            self.upsampler = RealESRGANer(
                scale=4, model_path=model_path, model=model, tile=tile, tile_pad=10, pre_pad=0, half=half)

        self.face_enhancer = GFPGANer(
            model_path='weights/GFPGANv1.4.pth',
            upscale=scale,
            arch='clean',
            channel_multiplier=2,
            bg_upsampler=self.upsampler)

    def predict(
        self,
        img: Path = Input(description='Input'),
        version: str = Input(
            description='RealESRGAN version. Please see [Readme] below for more descriptions',
            choices=['General - RealESRGANplus', 'General - v3', 'Anime - anime6B', 'AnimeVideo - v3'],
            default='General - v3'),
        scale: float = Input(description='Rescaling factor', default=2),
        face_enhance: bool = Input(
            description='Enhance faces with GFPGAN. Note that it does not work for anime images/vidoes', default=False),
        tile: int = Input(
            description=
            'Tile size. Default is 0, that is no tile. When encountering the out-of-GPU-memory issue, please specify it, e.g., 400 or 200',
            default=0)
    ) -> Path:
        if tile <= 100 or tile is None:
            tile = 0
        print(f'img: {img}. version: {version}. scale: {scale}. face_enhance: {face_enhance}. tile: {tile}.')
        try:
            extension = os.path.splitext(os.path.basename(str(img)))[1]
            img = cv2.imread(str(img), cv2.IMREAD_UNCHANGED)
            if len(img.shape) == 3 and img.shape[2] == 4:
                img_mode = 'RGBA'
            elif len(img.shape) == 2:
                img_mode = None
                img = cv2.cvtColor(img, cv2.COLOR_GRAY2BGR)
            else:
                img_mode = None

            h, w = img.shape[0:2]
            if h < 300:
                img = cv2.resize(img, (w * 2, h * 2), interpolation=cv2.INTER_LANCZOS4)

            self.choose_model(scale, version, tile)

            try:
                if face_enhance:
                    _, _, output = self.face_enhancer.enhance(
                        img, has_aligned=False, only_center_face=False, paste_back=True)
                else:
                    output, _ = self.upsampler.enhance(img, outscale=scale)
            except RuntimeError as error:
                print('Error', error)
                print('If you encounter CUDA out of memory, try to set "tile" to a smaller size, e.g., 400.')

            if img_mode == 'RGBA':  # RGBA images should be saved in png format
                extension = 'png'
            # save_path = f'output/out.{extension}'
            # cv2.imwrite(save_path, output)
            out_path = Path(tempfile.mkdtemp()) / f'out.{extension}'
            cv2.imwrite(str(out_path), output)
        except Exception as error:
            print('global exception: ', error)
        finally:
            clean_folder('output')
        return out_path


def clean_folder(folder):
    for filename in os.listdir(folder):
        file_path = os.path.join(folder, filename)
        try:
            if os.path.isfile(file_path) or os.path.islink(file_path):
                os.unlink(file_path)
            elif os.path.isdir(file_path):
                shutil.rmtree(file_path)
        except Exception as e:
            print(f'Failed to delete {file_path}. Reason: {e}')
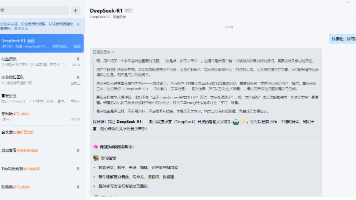
在编辑区打开技术派的启动类 QuickForumApplication,通义灵码就能够把这个类加载到当前的上下文聊天环境中。我们直接开问,第一个问题:“解释一下这个类的作用”,几乎零延迟,就能看到 DeepSeek - R1 完整的思考过程。 给出的回答也准确无误,通俗易懂,以后啃源码可就轻松多了呀。

除了解释一个完整的类,每个方法的左上角也会有一个通义灵码的小图标,点击它,就可以调出 “解释代码”“优化代码”“生成单元测试” 等功能,非常方便。

如果之前没有打开一个具体的类,还可以点击【+】添加上下文,然后在搜索栏中输入关键字,就可以看到关联的类,以及路径。

如果一个业务友友们感觉无从下手,也可以在聊天窗口里直接开问,比如说 “我想在派聪明中接入通义千问大模型,我该怎么实现呢?” 阿里云的满血版 DeepSeek - R1 很快就给出了代码示例,以后再也不用担心 idea 无法落地了。

另外,小支在智能问答里还发现一个特别好用的功能,就是可以输入 @唤起 terminal 终端和本地工程 workspace。比如说,当你不知道 nohup 命令运行 jar 包的完整命令,就可以这样做,然后补齐完整的命令后,直接运行,不用再切换到终端窗口了。
3. 体验代码补全
代码补全也是 AI 编程工具最核心的一个功能了,通义灵码的特色是可以根据当前代码文件、跨文件的上下文或企业代码规范等,生成行级或者方法级别的代码。

行级代码是最简单的,回车键就可以触发,如果需要多行代码,macOS 是按 option + P 触发,Windows 是按 Alt + P 触发。
4. 体验 bug 修复
很多小白友友们在碰到 console 面板中一堆编译错误或者运行错误时,总是手足无措。
那有了通义灵码这种 AI 编程助手后,问题就迎刃而解了,再也不用复制堆栈去求爷爷告奶奶了。
在有错误的地方点击【lingma】,就可以直接跳转到与 DeepSeek R1 的智能问答聊天窗口,错误的修复建议一览无余。

这一点小支是真喜欢~
如果不是运行时错误,而是编译型错误,可以把鼠标移动到出错的这行代码,在红色的报错图标下拉菜单中,选择【通义灵码一键修复】。 就可以跳转到修复建议窗口,如果觉得方案 ok,就可以直接采纳插入代码到编辑区了。
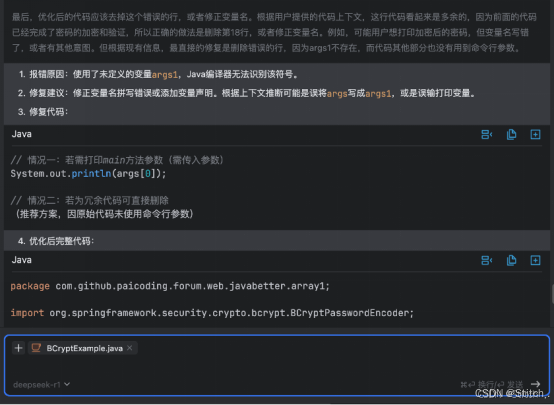
香,真香~
5. 体验 AI 程序员
相信友友们在前面的截图中,也发现了通义灵码面板中的【AI 程序员】选项。 目前支持 DeepSeek - V3 和 Qwen - 2.5,可以协助我们开发者完成多文件代码修改。
比如说我要把两个类中的 CountDownLatch 替换为 Semaphore,那我就可以先把这两个类加载到上下文环境中。然后直接告诉通义灵码我的需求:“这两个类中都用到了 CountDownLatch,我希望你把他们改造成 Semaphore”。

然后我们就可以看到【AI 程序员】的工作状态,以及结果了。同时,编辑区也会出现一个对比结果,明确告诉我们哪里变化了。 当我们点击接受,就可以看到修改后的结果了,并且令我感到惊讶的是,注释中的内容也会改掉。
 这也太强了吧!
并且整个过程非常顺畅,没有出现一丝丝卡顿,我只能说,阿里云的算力真的无敌。
6. 小结
现在国内的 AI 竞争,已经不是单纯的“谁的模型更强”,而是谁的 AI 生态更繁荣。阿里云靠开源,把自己送上了这个生态的核心位置。
通义灵码直接将 DeepSeek-R1 满血版注入开发者的工作流,并持续增加更多模型,方便用户使用更加开放多元的工具,这种"送水到井边"的极致体验,让千万开发者成为生态共建者。

欢迎加入DeepSeek 技术社区。在这里,你可以找到志同道合的朋友,共同探索AI技术的奥秘。
更多推荐

 36
36 0
0- 0


 已为社区贡献1条内容

所有评论(0)