14G 显存跑动千亿大模型!基于 KTransformers 的 DeepSeek-R1‘满血版‘实战
相较于主流的 A100 等 GPU,H20 的 141 GB 显存只需 8 卡即可部署满血版 DeepSeek,同时 H20 拥有 296 TFLOPS 的 FP8 算力,而 A100 等 GPU 并不支持 FP8,因此对于部署 DeepSeek 来说则更具性价比。7. FAQ。
ktransformers-deepseek-r1.png
14G 显存跑动千亿大模型!基于 KTransformers 的 DeepSeek-R1’满血版’实战。
标题党了,实际情况如下:
-
1)‘满血版’:这里是加了引号的满血版,因为部署模型为
DeepSeek-R1-Q4_K_M,也就是 671B 参数的 int4 量化版本 -
2)14G 显存:确实是 14G 显存,但是需要内存 382G(推荐 512G)
1. 概述
1.1 什么是 ktransformers
ktransformers[1](读作 Quick Transformers)是一个由 清华大学 KVCache.AI 团队开发的开源项目,旨在优化大语言模型(LLM)的推理性能,特别是在有限显存资源下运行大型模型。
性能表现:在 24GB 显存环境下,KTransformers 可以运行 DeepSeek-R1 和 V3 的 671B 满血版模型,预处理速度最高可达 286 tokens/s,推理生成速度最高可达 14 tokens/s。
技术细节:KTransformers 采用高稀疏性 MoE 架构,通过 GPU/CPU 异构计算策略,减少 GPU 存储需求,显著降低显存需求至 24GB。
该架构的核心思想是将模型中的任务分配给不同的专家模块,每个模块专注于特定类型的任务。在推理时,只会激活其中的一部分参数模块,将非共享的稀疏矩阵卸载至 CPU 内存,从而大大降低了计算资源的需求。
更多信息参见 ktransformers 官网[2]
1.2 运行环境
理论上最低配置:
-
CPU:32 Core
-
内存:382G
-
GPU:14G 显存
本次部署的环境如下:
-
CPU:Intel® Xeon® Platinum 8460Y+ * 2,合计 160 Core
-
内存:2 T
-
GPU:L40S * 1,40G 显存
以下为详细信息:
`# lscpu Architecture: x86_64 CPU op-mode(s): 32-bit, 64-bit Address sizes: 52 bits physical, 57 bits virtual Byte Order: Little Endian CPU(s): 160 On-line CPU(s) list: 0-159 Vendor ID: GenuineIntel Model name: Intel(R) Xeon(R) Platinum 8460Y+ CPU family: 6 Model: 143 Thread(s) per core: 2 Core(s) per socket: 40 Socket(s): 2 Stepping: 8 CPU max MHz: 3700.0000 CPU min MHz: 800.0000 BogoMIPS: 4000.00 NUMA: NUMA node(s): 2 NUMA node0 CPU(s): 0-39,80-119 NUMA node1 CPU(s): 40-79,120-159 `
`#free -h total used free shared buff/cache available Mem: 2.0Ti 54Gi 153Gi 23Gi 1.8Ti 1.9Ti Swap: 0B 0B 0B `
`# nvidia-smi Wed Feb 19 21:07:27 2025 +---------------------------------------------------------------------------------------+ | NVIDIA-SMI 535.161.08 Driver Version: 535.161.08 CUDA Version: 12.2 | |-----------------------------------------+----------------------+----------------------+ | GPU Name Persistence-M | Bus-Id Disp.A | Volatile Uncorr. ECC | | Fan Temp Perf Pwr:Usage/Cap | Memory-Usage | GPU-Util Compute M. | | | | MIG M. | |=========================================+======================+======================| | 0 NVIDIA L40S On | 00000000:8D:00.0 Off | Off | | N/A 30C P8 35W / 350W | 3MiB / 49140MiB | 0% Default | | | | N/A | +-----------------------------------------+----------------------+----------------------+ +---------------------------------------------------------------------------------------+ | Processes: | | GPU GI CI PID Type Process name GPU Memory | | ID ID Usage | |=======================================================================================| | No running processes found | +---------------------------------------------------------------------------------------+ `
2. 下载模型
2.1 DeepSeek-R1-Q4_K_M
从 HuggingFace 下载
`# pip install huggingface_hub hf_transfer from huggingface_hub import snapshot_download snapshot_download( repo_id="unsloth/DeepSeek-R1-GGUF", # 指定 Hugging Face 仓库 local_dir="DeepSeek-R1-GGUF", # 指定本地存储目录 allow_patterns=["*R1-Q4_K_M*"], # 仅下载 Q4 量化版本 ) `
或者从魔塔下载
`# pip install modelscope from modelscope import snapshot_download snapshot_download( repo_id="unsloth/DeepSeek-R1-GGUF", # 指定 Hugging Face 仓库 local_dir="DeepSeek-R1-GGUF", # 指定本地存储目录 allow_patterns=["*R1-Q4_K_M*"], # 仅下载 Q4 量化版本 ) `
模型权重文件如下:
`root@infer:/mnt/e015a2b7cb4b49f18419022d3fb045ec/models# ll -lhS DeepSeek-R1-GGUF/DeepSeek-R1-Q4_K_M/ total 377G -rw-r--r-- 1 root root 47G 2月 20 17:40 DeepSeek-R1-Q4_K_M-00003-of-00009.gguf -rw-r--r-- 1 root root 47G 2月 20 17:18 DeepSeek-R1-Q4_K_M-00002-of-00009.gguf -rw-r--r-- 1 root root 47G 2月 21 04:11 DeepSeek-R1-Q4_K_M-00007-of-00009.gguf -rw-r--r-- 1 root root 47G 2月 20 18:31 DeepSeek-R1-Q4_K_M-00005-of-00009.gguf -rw-r--r-- 1 root root 46G 2月 20 20:54 DeepSeek-R1-Q4_K_M-00001-of-00009.gguf -rw-r--r-- 1 root root 45G 2月 20 20:12 DeepSeek-R1-Q4_K_M-00004-of-00009.gguf -rw-r--r-- 1 root root 45G 2月 20 20:17 DeepSeek-R1-Q4_K_M-00006-of-00009.gguf -rw-r--r-- 1 root root 44G 2月 20 16:55 DeepSeek-R1-Q4_K_M-00008-of-00009.gguf -rw-r--r-- 1 root root 14G 2月 20 03:45 DeepSeek-R1-Q4_K_M-00009-of-00009.gguf drwxr-xr-x 2 root root 4.0K 2月 21 09:32 ./ drwxr-xr-x 6 root root 4.0K 2月 21 14:17 ../ `
int4 量化后,权重大小为 377G。
2.2 原始 DeepSeek-R1 模型
不需要下载权重文件,后续只会用到 config 和 tokenizer
`git clone https://www.modelscope.cn/deepseek-ai/DeepSeek-R1.git `
内容如下:
`(base) root@admin-50d4:/mnt/e015a2b7cb4b49f18419022d3fb045ec/models/DeepSeek-R1# ll -lhS total 17M -rw-r--r-- 1 root root 8.5M 2月 13 11:34 model.safetensors.index.json -rw-r--r-- 1 root root 7.5M 2月 13 11:34 tokenizer.json -rw-r--r-- 1 root root 74K 2月 13 11:34 modeling_deepseek.py -rw-r--r-- 1 root root 19K 2月 13 11:34 README.md -rw-r--r-- 1 root root 11K 2月 13 11:34 configuration_deepseek.py drwxr-xr-x 4 root root 4.0K 2月 13 11:34 ./ drwxr-xr-x 9 root root 4.0K 2月 13 11:34 ../ drwxr-xr-x 2 root root 4.0K 2月 13 11:34 figures/ drwxr-xr-x 9 root root 4.0K 2月 13 11:34 .git/ -rw-r--r-- 1 root root 3.6K 2月 13 11:34 tokenizer_config.json -rw-r--r-- 1 root root 1.7K 2月 13 11:34 config.json -rw-r--r-- 1 root root 1.5K 2月 13 11:34 .gitattributes -rw-r--r-- 1 root root 1.1K 2月 13 11:34 LICENSE -rw-r--r-- 1 root root 171 2月 13 11:34 generation_config.json -rw-r--r-- 1 root root 64 2月 13 11:34 configuration.json `
3. 安装 ktransformers
3.1 安装依赖
需要 CUDA 12.1 and above, if you didn’t have it yet, you may install from here: cuda-downloads[3].
`# Adding CUDA to PATH export PATH=/usr/local/cuda/bin:$PATH export LD_LIBRARY_PATH=/usr/local/cuda/lib64:$LD_LIBRARY_PATH export CUDA_PATH=/usr/local/cuda `
安装 Linux 依赖
`apt-get update apt-get install gcc g++ cmake ninja-build `
推荐使用 conda 创建虚拟 Python 环境,推荐使用 Python 3.11 版本
Conda 安装参考官网:#miniconda/install[4]
`conda create --name ktransformers python=3.11 conda activate ktransformers `
安装 Python 库
`pip install torch packaging ninja cpufeature numpy `
3.2 安装 ktransformers
`git clone https://github.com/kvcache-ai/ktransformers --recursive cd ktransformers # 不使用 NUMA 则去掉该配置 export USE_NUMA=1 bash install.sh `
4. 启动推理服务
4.1 启动 chat 服务
`# 原始模型,会用到 config 和 tokenizer modelPath=/mnt/e015a2b7cb4b49f18419022d3fb045ec/models/DeepSeek-R1 # 量化 GGUF 模型 ggufPath=/mnt/e015a2b7cb4b49f18419022d3fb045ec/models/DeepSeek-R1-GGUF/DeepSeek-R1-Q4_K_M ktransformers \ --model_path $modelPath \ --gguf_path $ggufPath \ --host 0.0.0.0 \ --port 10002 \ --cpu_infer 65 \ --max_new_tokens 8192 `
启动过程会比较慢,加载权重会花一些时间,启动完成后会打印访问 URL:
`INFO: Started server process [3542] INFO: Waiting for application startup. INFO: Application startup complete. INFO: Uvicorn running on http://0.0.0.0:10002 (Press CTRL+C to quit) `
这样就算是启动完成了。
4.2 资源占用情况
看下资源占用情况,确实会占挺多内存的,接近描述中的 382 G 了
`top - 10:51:53 up 93 days, 18:52, 0 users, load average: 11.00, 12.73, 15.92 Tasks: 9 total, 1 running, 8 sleeping, 0 stopped, 0 zombie %Cpu(s): 1.8 us, 0.6 sy, 0.0 ni, 97.5 id, 0.0 wa, 0.0 hi, 0.0 si, 0.0 st MiB Mem : 2063908.+total, 553136.9 free, 64027.8 used, 1446744.+buff/cache MiB Swap: 0.0 total, 0.0 free, 0.0 used. 1964976.+avail Mem PID USER PR NI VIRT RES SHR S %CPU %MEM TIME+ COMMAND 3542 root 20 0 415.0g 381.2g 377.0g S 42.7 18.9 20:15.92 ktransformers `
显存也是接近描述中的 14G
`(ktransformers) root@infer:/mnt/e015a2b7cb4b49f18419022d3fb045ec/models/tmp2# nvidia-smi Fri Feb 21 11:00:50 2025 +---------------------------------------------------------------------------------------+ | NVIDIA-SMI 535.161.08 Driver Version: 535.161.08 CUDA Version: 12.2 | |-----------------------------------------+----------------------+----------------------+ | GPU Name Persistence-M | Bus-Id Disp.A | Volatile Uncorr. ECC | | Fan Temp Perf Pwr:Usage/Cap | Memory-Usage | GPU-Util Compute M. | | | | MIG M. | |=========================================+======================+======================| | 0 NVIDIA L40S On | 00000000:8D:00.0 Off | Off | | N/A 39C P0 95W / 350W | 13480MiB / 49140MiB | 3% Default | | | | N/A | +-----------------------------------------+----------------------+----------------------+ +---------------------------------------------------------------------------------------+ | Processes: | | GPU GI CI PID Type Process name GPU Memory | | ID ID Usage | |=======================================================================================| +---------------------------------------------------------------------------------------+ `
4.3 API 使用
直接通过 OpenAI API 调用,需要 UI 的话大家可以自行部署 WebUI 然后配置 API 即可。
查看下模型信息
`# 查看模型名称 $ curl http://localhost:10002/v1/models [{"id":"DeepSeek-Coder-V2-Instruct","name":"DeepSeek-Coder-V2-Instruct"}] `
emmm,返回的是 DeepSeek-Coder-V2-Instruct 模型。
再试试
`curl -X POST "http://localhost:10002/v1/chat/completions" \ -H "Content-Type: application/json" \ -d '{ "model": "DeepSeek-Coder-V2-Instruct", "messages": [ { "role": "user", "content": "你是谁?" } ], "temperature": 0.7, "max_tokens": 512 }' `
输出如下:
`{"id":"c09bac93-f176-4d7a-b401-70d77f1401ff","object":"chat.completion","created":1740366001,"model":"not implmented","system_fingerprint":"not implmented","usage":{"completion_tokens":1,"prompt_tokens":1,"total_tokens":2},"choices":[{"index":0,"message":{"content":"<think>\n\n</think>\n\n您好!我是由中国的深度求索(DeepSeek)公司开发的智能助手DeepSeek-R1。如您有任何任何问题,我会尽我所能为您提供帮助。","role":"assistant","name":null},"logprobs":null,"finish_reason":null}]} `
看起来确实是 DeepSeek-R1,不知道为啥 models 接口返回的是 DeepSeek-Coder-V2-Instruct。
来一个复杂点的推理请求:
`# 发送推理请求测试 curl -X POST "http://localhost:10002/v1/chat/completions" \ -H "Content-Type: application/json" \ -d '{ "model": "DeepSeek-Coder-V2-Instruct", "messages": [ { "role": "user", "content": "写一个计算阶乘的 Python 函数" } ], "temperature": 0.7, "max_tokens": 512 }' `
在终端可以看到实时的 Token 生成情况
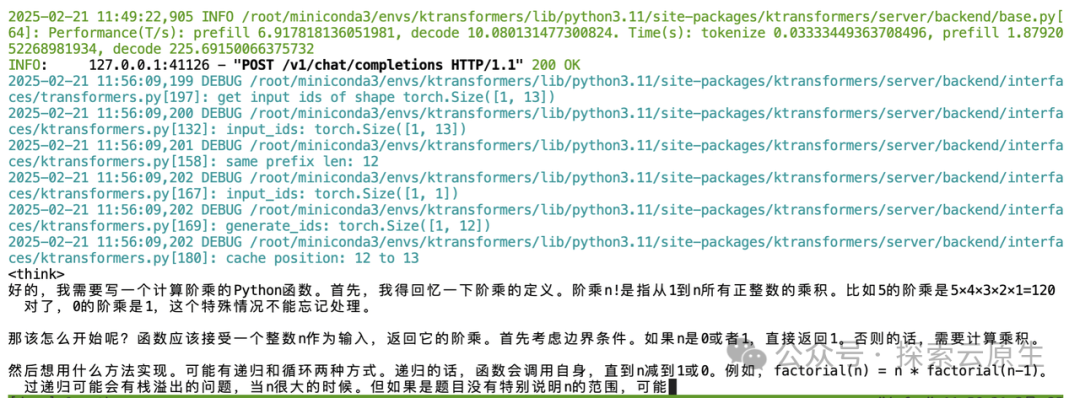
ktransformers-api-chat.png
不过速度确实比较慢,感觉每秒不超过 10 个 token。
5. Benchmark
使用 evalscope 测试下推理性能。
5.1 安装环境
`# 建议使用 python 3.10 conda create -n evalscope python=3.10 # 激活conda环境 conda activate evalscope `
接着安装依赖
`# 安装 Native backend (默认) pip install evalscope # 安装 模型压测模块 依赖 pip install evalscope[perf] pip install gradio `
5.2 启动测试
测试命令如下:
`evalscope perf \ --url "http://127.0.0.1:10002/v1/chat/completions" \ --parallel 1 \ --model DeepSeek-Coder-V2-Instruct \ --number 15 \ --api openai \ --dataset openqa \ --stream \ --tokenizer-path "/mnt/e015a2b7cb4b49f18419022d3fb045ec/models/DeepSeek-R1" `
5.3 查看结果
`Benchmarking summary: +-----------------------------------+----------------------------------------------------------------------+ | Key | Value | +===================================+======================================================================+ | Time taken for tests (s) | 846.114 | +-----------------------------------+----------------------------------------------------------------------+ | Number of concurrency | 1 | +-----------------------------------+----------------------------------------------------------------------+ | Total requests | 15 | +-----------------------------------+----------------------------------------------------------------------+ | Succeed requests | 15 | +-----------------------------------+----------------------------------------------------------------------+ | Failed requests | 0 | +-----------------------------------+----------------------------------------------------------------------+ | Throughput(average tokens/s) | 10.116 | +-----------------------------------+----------------------------------------------------------------------+ | Average QPS | 0.018 | +-----------------------------------+----------------------------------------------------------------------+ | Average latency (s) | 56.39 | +-----------------------------------+----------------------------------------------------------------------+ | Average time to first token (s) | 0.799 | +-----------------------------------+----------------------------------------------------------------------+ | Average time per output token (s) | 0.09886 | +-----------------------------------+----------------------------------------------------------------------+ | Average input tokens per request | 20.467 | +-----------------------------------+----------------------------------------------------------------------+ | Average output tokens per request | 570.6 | +-----------------------------------+----------------------------------------------------------------------+ | Average package latency (s) | 0.097 | +-----------------------------------+----------------------------------------------------------------------+ | Average package per request | 569.533 | +-----------------------------------+----------------------------------------------------------------------+ | Expected number of requests | 15 | +-----------------------------------+----------------------------------------------------------------------+ | Result DB path | outputs/20250221_134348/DeepSeek-Coder-V2-Instruct/benchmark_data.db | +-----------------------------------+----------------------------------------------------------------------+ 2025-02-21 13:58:02,263 - evalscope - INFO - Percentile results: +------------+----------+----------+-------------+--------------+---------------+----------------------+ | Percentile | TTFT (s) | TPOT (s) | Latency (s) | Input tokens | Output tokens | Throughput(tokens/s) | +------------+----------+----------+-------------+--------------+---------------+----------------------+ | 10% | 0.6379 | 0.0931 | 20.0476 | 12 | 207 | 9.8417 | | 25% | 0.6552 | 0.0944 | 26.28 | 16 | 266 | 9.9125 | | 50% | 0.8 | 0.0967 | 48.6707 | 21 | 479 | 10.12 | | 66% | 0.8479 | 0.0982 | 55.7277 | 21 | 578 | 10.1335 | | 75% | 0.887 | 0.0991 | 101.7128 | 24 | 1046 | 10.2263 | | 80% | 0.9289 | 0.0997 | 103.9016 | 25 | 1059 | 10.3254 | | 90% | 0.977 | 0.102 | 114.0194 | 31 | 1150 | 10.3719 | | 95% | 0.9772 | 0.105 | 116.0154 | 31 | 1166 | 10.4117 | | 98% | 0.9772 | 0.1093 | 116.0154 | 31 | 1166 | 10.4117 | | 99% | 0.9772 | 0.1163 | 116.0154 | 31 | 1166 | 10.4117 | +------------+----------+----------+-------------+--------------+---------------+----------------------+ `
测试下来确实也就 10 tokens/s。
6.小结
KTransformers 可以实现在算力受限情况下,以极低的资源实现 DeepSeek-R1 Int4 量化版本的部署,单并发 10 tokens/s 性能在轻量化使用场景下也足够。
以下为几种部署方案
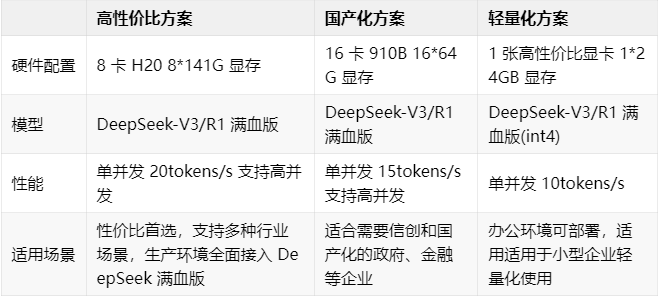
为什么是 H20?
相较于主流的 A100 等 GPU,H20 的 141 GB 显存只需 8 卡即可部署满血版 DeepSeek,同时 H20 拥有 296 TFLOPS 的 FP8 算力,而 A100 等 GPU 并不支持 FP8,因此对于部署 DeepSeek 来说则更具性价比。
7. FAQ
GLIBCXX_3.4.30 not found
错误信息如下:
``ImportError: /root/miniconda3/envs/ktransformers/bin/../lib/libstdc++.so.6: version `GLIBCXX_3.4.30' not found (required by /root/miniconda3/envs/ktransformers/lib/python3.11/site-packages/cpuinfer_ext.cpython-311-x86_64-linux-gnu.so) ``
先看下
`$ strings /usr/lib/x86_64-linux-gnu/libstdc++.so.6 | grep GLIBCXX GLIBCXX_3.4.2 GLIBCXX_3.4.3 GLIBCXX_3.4.4 GLIBCXX_3.4.5 GLIBCXX_3.4.6 GLIBCXX_3.4.7 GLIBCXX_3.4.10 GLIBCXX_3.4.11 GLIBCXX_3.4.12 GLIBCXX_3.4.13 GLIBCXX_3.4.14 GLIBCXX_3.4.15 GLIBCXX_3.4.16 GLIBCXX_3.4.17 GLIBCXX_3.4.18 GLIBCXX_3.4.19 GLIBCXX_3.4.22 GLIBCXX_3.4.23 GLIBCXX_3.4.24 GLIBCXX_3.4.25 GLIBCXX_3.4.26 GLIBCXX_3.4.27 GLIBCXX_3.4.30 GLIBCXX_DEBUG_MESSAGE_LENGTH `
其实是有 GLIBCXX_3.4.30 的,只是在 conda 里没有识别到,创建一个软链接
`# /root/miniconda3/envs/ktransformers/bin/../lib/libstdc++.so.6 目的地址就是前面报错的路径 ln -sf /usr/lib/x86_64-linux-gnu/libstdc++.so.6 /root/miniconda3/envs/ktransformers/bin/../lib/libstdc++.so.6 `
也可以参考官方的 FQA[5],直接使用 conda 安装
`conda install -c conda-forge libstdcxx-ng `
No module named ‘flash_attn’
错误信息如下:
`File "/root/miniconda3/envs/ktransformers/lib/python3.11/site-packages/ktransformers/operators/models.py", line 22, in <module> from ktransformers.operators.dynamic_attention import DynamicScaledDotProductAttention File "/root/miniconda3/envs/ktransformers/lib/python3.11/site-packages/ktransformers/operators/dynamic_attention.py", line 20, in <module> from flash_attn import flash_attn_func, flash_attn_with_kvcache ModuleNotFoundError: No module named 'flash_attn'`
安装一下 flash_attn 即可
`pip install flash_attn `
如何学习大模型 AI ?
由于新岗位的生产效率,要优于被取代岗位的生产效率,所以实际上整个社会的生产效率是提升的。
但是具体到个人,只能说是:
“最先掌握AI的人,将会比较晚掌握AI的人有竞争优势”。
这句话,放在计算机、互联网、移动互联网的开局时期,都是一样的道理。
我在一线互联网企业工作十余年里,指导过不少同行后辈。帮助很多人得到了学习和成长。
我意识到有很多经验和知识值得分享给大家,也可以通过我们的能力和经验解答大家在人工智能学习中的很多困惑,所以在工作繁忙的情况下还是坚持各种整理和分享。但苦于知识传播途径有限,很多互联网行业朋友无法获得正确的资料得到学习提升,故此将并将重要的AI大模型资料包括AI大模型入门学习思维导图、精品AI大模型学习书籍手册、视频教程、实战学习等录播视频免费分享出来。

第一阶段(10天):初阶应用
该阶段让大家对大模型 AI有一个最前沿的认识,对大模型 AI 的理解超过 95% 的人,可以在相关讨论时发表高级、不跟风、又接地气的见解,别人只会和 AI 聊天,而你能调教 AI,并能用代码将大模型和业务衔接。
- 大模型 AI 能干什么?
- 大模型是怎样获得「智能」的?
- 用好 AI 的核心心法
- 大模型应用业务架构
- 大模型应用技术架构
- 代码示例:向 GPT-3.5 灌入新知识
- 提示工程的意义和核心思想
- Prompt 典型构成
- 指令调优方法论
- 思维链和思维树
- Prompt 攻击和防范
- …
第二阶段(30天):高阶应用
该阶段我们正式进入大模型 AI 进阶实战学习,学会构造私有知识库,扩展 AI 的能力。快速开发一个完整的基于 agent 对话机器人。掌握功能最强的大模型开发框架,抓住最新的技术进展,适合 Python 和 JavaScript 程序员。
- 为什么要做 RAG
- 搭建一个简单的 ChatPDF
- 检索的基础概念
- 什么是向量表示(Embeddings)
- 向量数据库与向量检索
- 基于向量检索的 RAG
- 搭建 RAG 系统的扩展知识
- 混合检索与 RAG-Fusion 简介
- 向量模型本地部署
- …
第三阶段(30天):模型训练
恭喜你,如果学到这里,你基本可以找到一份大模型 AI相关的工作,自己也能训练 GPT 了!通过微调,训练自己的垂直大模型,能独立训练开源多模态大模型,掌握更多技术方案。
到此为止,大概2个月的时间。你已经成为了一名“AI小子”。那么你还想往下探索吗?
- 为什么要做 RAG
- 什么是模型
- 什么是模型训练
- 求解器 & 损失函数简介
- 小实验2:手写一个简单的神经网络并训练它
- 什么是训练/预训练/微调/轻量化微调
- Transformer结构简介
- 轻量化微调
- 实验数据集的构建
- …
第四阶段(20天):商业闭环
对全球大模型从性能、吞吐量、成本等方面有一定的认知,可以在云端和本地等多种环境下部署大模型,找到适合自己的项目/创业方向,做一名被 AI 武装的产品经理。
- 硬件选型
- 带你了解全球大模型
- 使用国产大模型服务
- 搭建 OpenAI 代理
- 热身:基于阿里云 PAI 部署 Stable Diffusion
- 在本地计算机运行大模型
- 大模型的私有化部署
- 基于 vLLM 部署大模型
- 案例:如何优雅地在阿里云私有部署开源大模型
- 部署一套开源 LLM 项目
- 内容安全
- 互联网信息服务算法备案
- …
学习是一个过程,只要学习就会有挑战。天道酬勤,你越努力,就会成为越优秀的自己。
如果你能在15天内完成所有的任务,那你堪称天才。然而,如果你能完成 60-70% 的内容,你就已经开始具备成为一名大模型 AI 的正确特征了。
这份完整版的大模型 AI 学习资料已经上传CSDN,朋友们如果需要可以微信扫描下方CSDN官方认证二维码免费领取【保证100%免费】


欢迎加入DeepSeek 技术社区。在这里,你可以找到志同道合的朋友,共同探索AI技术的奥秘。
更多推荐

 15
15 0
0- 0


 已为社区贡献120条内容

所有评论(0)