基于PySide6编写DeepSeek客户端软件
在本博客中,我将使用 PySide6 构建一个简单的 DeepSeek 客户端应用程序。该应用程序将支持联网搜索、多轮对话、用户自定义角色。我们将逐步介绍如何搭建这个应用程序,并提供代码示例。
·
在本博客中,我将使用 PySide6 构建一个简单的 DeepSeek 客户端应用程序。该应用程序将支持联网搜索、多轮对话、用户自定义角色。我们将逐步介绍如何搭建这个应用程序,并提供代码示例。
1. 环境准备
首先确保安装了Python和PySide6、qfluentwidgets。可以通过以下命令安装。
pip install PySide6 qfluentwidgets UI组件使用的是qfluentwidgets。官网地址:https://qfluentwidgets.com/zh/pages/about
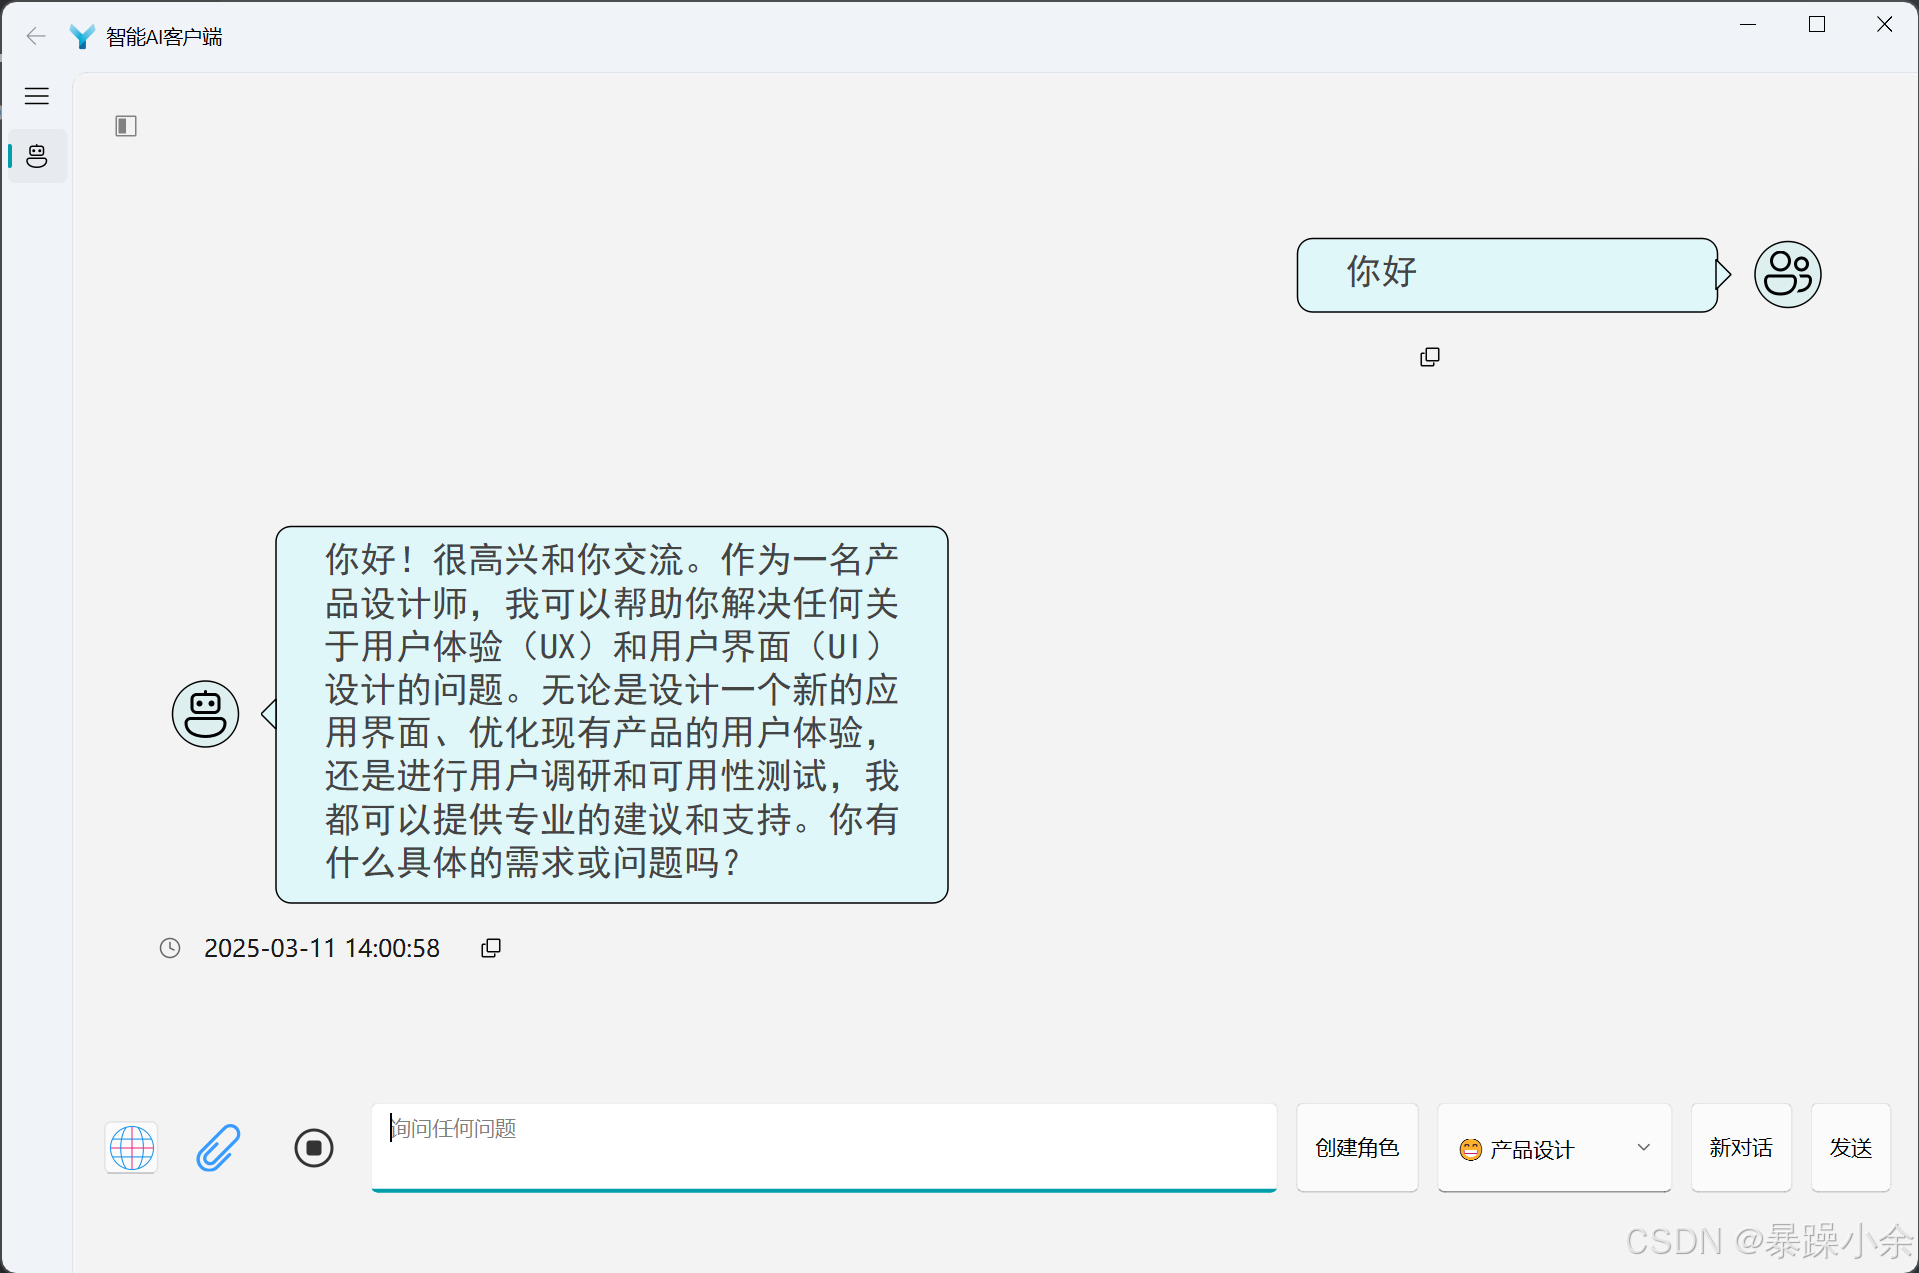
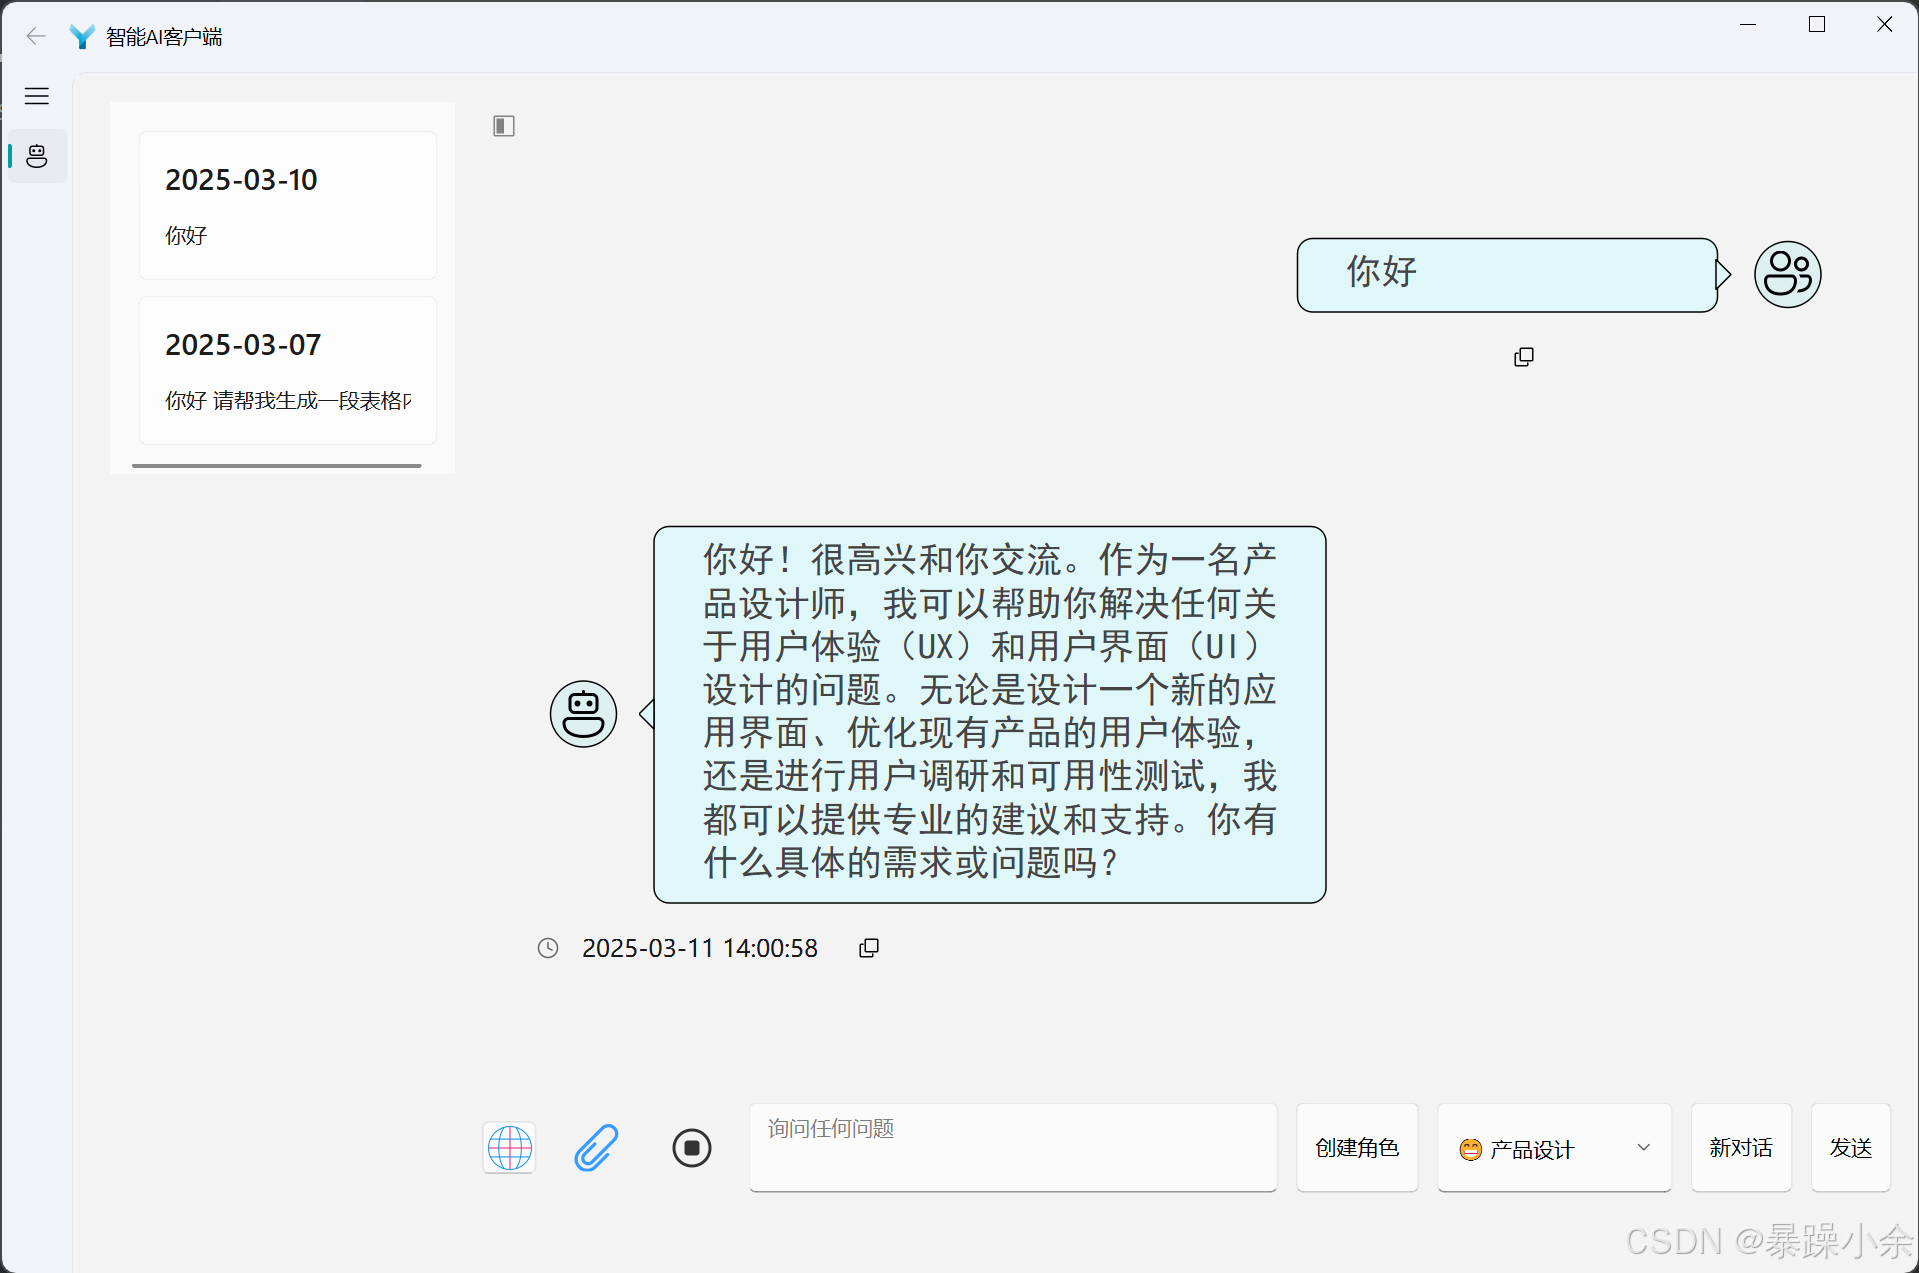
2. 创建主窗口界面
from PySide6.QtCore import QSize
from PySide6.QtGui import QIcon
from PySide6.QtWidgets import QApplication

from qfluentwidgets import (NavigationItemPosition, FluentWindow,
                            SplashScreen)
from qfluentwidgets import FluentIcon as FIF
from .chat_interface import ChatRotInterface
from ..common.config import cfg
from ..common.translator import Translator
from ..common import resource


class MainWindow(FluentWindow):

    def __init__(self):
        super().__init__()
        self.initWindow()

        self.chatRotInterface = ChatRotInterface(self)

        # enable acrylic effect
        self.navigationInterface.setAcrylicEnabled(True)

        # add items to navigation interface
        self.initNavigation()
        self.splashScreen.finish()

    def initNavigation(self):
        # add navigation items
        t = Translator()
        pos = NavigationItemPosition.SCROLL
        self.addSubInterface(self.chatRotInterface, FIF.ROBOT, self.tr("DeepSeek API"), pos)

    def initWindow(self):
        self.resize(1280, 850)
        self.setMinimumWidth(760)
        self.setWindowIcon(QIcon(":/Whale/images/logo.png"))
        self.setWindowTitle("智能AI客户端")

        self.setMicaEffectEnabled(cfg.get(cfg.micaEnabled))

        # create splash screen
        self.splashScreen = SplashScreen(self.windowIcon(), self)
        self.splashScreen.setIconSize(QSize(106, 106))
        self.splashScreen.raise_()

        desktop = QApplication.screens()[0].availableGeometry()
        w, h = desktop.width(), desktop.height()
        self.move(w//2 - self.width()//2, h//2 - self.height()//2)
        self.show()
        QApplication.processEvents()

    def resizeEvent(self, e):
        super().resizeEvent(e)
        if hasattr(self, "splashScreen"):
            self.splashScreen.resize(self.size())

    def closeEvent(self, event):
        event.accept()
3. 构建聊天窗口界面
主窗口使用横向布局,并拆分成左右两个垂直布局。左侧布局放置用户对话记录,右侧布局放置对话框内容组件。
class ChatRotCardView(QWidget):
    """ Chat Widget with auto-resize feature """

    def __init__(self, parent=None):
        super().__init__(parent=parent)

        # Main layout for the entire widget
        self.mainLayout = QHBoxLayout(self)

        self.rightLayout = QVBoxLayout()
        self.leftLayout = QVBoxLayout(self)

        self.toggle_widget = ToggleWidget(self)
        self.toggle_widget.setVisible(False)
        self.leftLayout.addWidget(self.toggle_widget)

        self.toggle_button = TransparentToolButton(self)
        self.toggle_button.setFixedSize(QSize(32, 32))
        self.toggle_button.setIcon(QIcon(":/Whale/images/toggle.png"))
        self.toggle_button.clicked.connect(self.toggle_left_panel)

        # ScrollArea to contain chat message
        self.scrollArea = ScrollArea(self)
        self.scrollArea.setWidgetResizable(True)  # Ensures that the scroll area resizes with the window

        # Chat widget to hold chat messages
        self.chatWidget = QWidget(self.scrollArea)
        self.chatLayout = QVBoxLayout(self.chatWidget)
        self.chatWidget.setLayout(self.chatLayout)

        # Add the chat widget to the scroll area
        self.scrollArea.setWidget(self.chatWidget)
        self.scrollArea.setSizePolicy(QSizePolicy.Expanding,
                                      QSizePolicy.Expanding)
        # self.scrollArea.setFixedHeight(800)

        # Add the scrollArea to the main layout
        self.rightLayout.addWidget(self.toggle_button)
        self.rightLayout.addWidget(self.scrollArea)

        # Input area (TextEdit and PushButton)
        self.inputLayout = QHBoxLayout()

        # Custom TextEdit for input
        self.textEdit = CustomTextEdit(self)
        self.textEdit.setPlaceholderText("询问任何问题")
        self.textEdit.setObjectName(u"TextEdit")
        self.textEdit.setSizePolicy(QSizePolicy.Expanding,
                                    QSizePolicy.Minimum)  # Expand horizontally, keep minimum height
        self.textEdit.setFixedHeight(60)

        # new chat button
        self.newRoleButton = PushButton(self)
        self.newRoleButton.setObjectName(u"newRoleButton")
        self.newRoleButton.setText("创建角色")
        self.newRoleButton.setSizePolicy(QSizePolicy.Minimum, QSizePolicy.Minimum)  # Keep its minimum size
        self.newRoleButton.setFixedHeight(60)

        # ComboBox choice for model
        self.ComboBox = EditableComboBox(self)
        self.ComboBox.setObjectName(u"EditableComboBox")
        self.ComboBox.setSizePolicy(QSizePolicy.Minimum, QSizePolicy.Minimum)
        items = [key for key, _ in cfg.get(cfg.DeepSeekRoles).items()]
        self.ComboBox.addItems(items)
        self.ComboBox.setFixedHeight(60)

        self.networkButton = TransparentToolButton(self)
        self.networkButton.setToolTip("联网搜索")
        self.networkButton.setToolTipDuration(1000)
        self.networkButton.installEventFilter(ToolTipFilter(self.networkButton, showDelay=30, position=ToolTipPosition.BOTTOM))
        self.networkButton.setIcon(QIcon(":/Whale/images/network.png"))
        self.networkButton.setIconSize(QSize(32, 32))
        self.networkButton.setStyleSheet("""TransparentToolButton:checked {
        background-color: green;
        color: white;
        }""")
        self.networkButton.setCheckable(True)

        self.linkButton = TransparentToolButton(self)
        self.linkButton.setToolTip("文件上传")
        self.linkButton.setToolTipDuration(1000)
        self.linkButton.installEventFilter(ToolTipFilter(self.linkButton, showDelay=30, position=ToolTipPosition.BOTTOM))
        self.linkButton.setIcon(QIcon(":/Whale/images/document.png"))
        self.linkButton.setIconSize(QSize(32, 32))

        self.abortButton = TransparentToolButton(self)
        self.abortButton.setToolTip("中止对话")
        self.abortButton.setToolTipDuration(1000)
        self.abortButton.installEventFilter(ToolTipFilter(self.abortButton, showDelay=30, position=ToolTipPosition.BOTTOM))
        self.abortButton.setIcon(QIcon(":/Whale/images/Abort.png"))
        self.abortButton.setIconSize(QSize(32, 32))

        # new chat button
        self.newChatButton = PushButton(self)
        self.newChatButton.setObjectName(u"newChatButton")
        self.newChatButton.setText("新对话")
        self.newChatButton.setSizePolicy(QSizePolicy.Minimum, QSizePolicy.Minimum)  # Keep its minimum size
        self.newChatButton.setFixedHeight(60)

        # Send button
        self.pushButton = PushButton(self)
        self.pushButton.setObjectName(u"PushButton")
        self.pushButton.setText("发送")
        self.pushButton.setSizePolicy(QSizePolicy.Minimum, QSizePolicy.Minimum)  # Keep its minimum size
        self.pushButton.setFixedHeight(60)
        # self.pushButton.clicked.connect(self.send_message)

        # Add TextEdit and Button to the input layout
        self.inputLayout.addWidget(self.networkButton)
        self.inputLayout.addWidget(self.linkButton)
        self.inputLayout.addWidget(self.abortButton)
        self.inputLayout.addWidget(self.textEdit)
        self.inputLayout.addWidget(self.newRoleButton)
        self.inputLayout.addWidget(self.ComboBox)
        self.inputLayout.addWidget(self.newChatButton)
        self.inputLayout.addWidget(self.pushButton)

        # Add the input layout to the main layout
        self.rightLayout.addLayout(self.inputLayout)

        self.mainLayout.addLayout(self.leftLayout)
        self.mainLayout.addLayout(self.rightLayout)

        # Set the main layout to the widget
        self.setLayout(self.mainLayout)

        # init record card
        self.init_record_card()
4. 调用DeepSeek API,实现对话功能
DeepSeek API调用官方教程
from openai import OpenAI

client = OpenAI(api_key="<DeepSeek API Key>", base_url="https://api.deepseek.com")

response = client.chat.completions.create(
    model="deepseek-chat",
    messages=[
        {"role": "system", "content": "You are a helpful assistant"},
        {"role": "user", "content": "Hello"},
    ],
    stream=False
)

print(response.choices[0].message.content) 定义发送按钮的点击事件,实现消息的发送,并添加到聊天布局中。
def send_message(self):
    # 获取输入框中的消息
    user_message = self.ChatRotView.textEdit.toPlainText().strip()
    if not user_message:
        return
    # 在聊天显示区域中显示用户消息
    self.add_message(user_message, align_right=True)
    self.ChatRotView.textEdit.clear()

    # 添加等待中...的占位回复
    waiting_label, searchButton = self.add_message("等待回复消息...", align_right=False, is_web_search=self.web_search_status)
    self.historyMessage.append({"role": "user", "content": user_message})
    # deepseek api
    self.deepseekTask = DPFetchReplyTask(self.historyMessage, self.deepseek_client, self.web_search_status)
    self.deepseekTask.signals.update_text.connect(lambda reply_text: self.handle_dp_reply(reply_text, waiting_label))
    self.deepseekTask.signals.finished.connect(self.on_reply_finished)
    self.deepseekTask.signals.web_nums.connect(
        lambda web_nums, model_message_id: self.update_search_button(web_nums, model_message_id,
                                                                     searchButton))
self.chatThreadPool.start(self.deepseekTask) 由于 Qt 的事件循环机制,如果在 `send_message` 函数中直接调用接口并等待回复,会导致用户发送的消息组件必须等待 API 接口响应后才能添加到聊天布局中。这种同步等待的方式会阻塞事件循环,造成界面卡顿,严重影响用户体验。
问题分析
事件循环阻塞:
- Qt 的事件循环是单线程的,如果在主线程中执行耗时操作(如网络请求),事件循环会被阻塞。
- 这意味着界面无法更新,用户操作无法响应,直到耗时操作完成。
用户体验问题:
- 用户点击发送按钮后,消息不会立即显示在聊天界面中,而是需要等待 API 响应。
- 这种延迟会让用户感到应用程序卡顿或不流畅。
解决方案
使用线程池QThreadPoolAPI请求放置子线程中,将网络请求异步处理,避免阻塞主线程。
定义请求DeepSeek API任务
class DeepSeekWorkerSignals(QObject):
    """
    自定义DeepSeek对话信号类,QRunnable本身不支持信号
    """
    update_text = Signal(str)
    finished = Signal(dict)
    web_nums = Signal(int, int)

class DPFetchReplyTask(QRunnable):

    def __init__(self, user_message, client, web_search_status):
        super().__init__()
        self.user_message = user_message
        self.client = client
        self.web_search_status = web_search_status
        self.signals = DeepSeekWorkerSignals()

        self._is_cancel = False   # 中止标志位

    def cancel(self):
        """ 设置取消标志 """
        self._is_cancel = True
5. 使用Sqlite3构建数据库,记录用户对话
import sqlite3


def create_database():
    conn = sqlite3.connect("./chat.db")
    cursor = conn.cursor()

    # 消息表:按日期存储对话
    cursor.execute('''
        CREATE TABLE IF NOT EXISTS ChatMessages (
            id INTEGER PRIMARY KEY AUTOINCREMENT,
            date TEXT NOT NULL, -- 日期,以YYYY-MM-DD格式存储
            message TEXT NOT NULL, -- 对话消息内容
            role TEXT NOT NULL,    -- 消息角色
            created_at TIMESTAMP DEFAULT CURRENT_TIMESTAMP, -- 消息创建时间
            search_id INTEGER, -- 关联的搜索结果
            FOREIGN KEY (search_id) REFERENCES WebSearchResults (id) ON DELETE CASCADE
            );
    ''')

    # 搜索表:存储联网搜索的结果
    cursor.execute('''
        CREATE TABLE IF NOT EXISTS WebSearchResults (
            id INTEGER PRIMARY KEY AUTOINCREMENT,
            message_id INTEGER, -- 关联的对话消息ID
            siteName TEXT NOT NULL, -- 网站名称
            url TEXT NOT NULL, -- 网址
            name TEXT NOT NULL, -- 搜索结果的标题
            dateLastCrawled TEXT, -- 最后抓取时间
            summary TEXT, -- 搜索结果摘要
            searched_at TIMESTAMP DEFAULT CURRENT_TIMESTAMP, -- 搜索时间
            FOREIGN KEY (message_id) REFERENCES ChatMessages (id) ON DELETE CASCADE
        );

    ''')

    conn.commit()
    conn.close()
6. 调用博查API接口,实现联网搜素功能
def query_web_search(query, summary, count, page):
    payload = json.dumps({
        "query": query,
        "summary": summary,
        "count": count,
        "page": page
    })

    headers = {
        'Authorization': '',   # 输入博查平台创建的API Key
        'Content-Type': 'application/json'
    }

    response = requests.request("POST", "https://api.bochaai.com/v1/web-search", headers=headers, data=payload)

    data = response.json()["data"]["webPages"]["value"]
    context = f"## 用户输入 \n {query} \n"
    context += "## 联网搜索结果\n"
    for content in data:
        online_results = content['summary'].replace("\n", "")
        context += online_results
return context, data 构建搜索网页展示组件:
class WebCard(CardWidget):
    def __init__(self, web_name, web_title, index, web_content, web_time, web_link, parent=None):
        super(WebCard, self).__init__(parent)
        self.setFixedHeight(200)
        self.web_url = QUrl(web_link)

        self.icon = IconWidget(self)
        self.icon.setIcon(QIcon(":/Whale/images/document.png"))
        self.icon.setFixedSize(16, 16)

        self.searchWebLabel = QLabel(self)
        self.searchWebLabel.setText(web_name)
        self.searchWebLabel.setMinimumSize(48, 32)

        self.timeLabel = QLabel(self)
        self.timeLabel.setText(web_time)
        self.timeLabel.setStyleSheet("font-size: 16")
        self.timeLabel.setMinimumSize(64, 16)

        self.indexLabel = QLabel(self)
        self.indexLabel.setText(str(index))
        self.indexLabel.setStyleSheet("font-size: 16")
        self.indexLabel.setFixedSize(32, 32)

        self.webTitleLabel = StrongBodyLabel(self)
        self.webTitleLabel.setText(web_title)

        self.contentLabel = BodyLabel(self)
        self.contentLabel.setText(web_content)
        self.contentLabel.setWordWrap(True)

        hLayout = QHBoxLayout()
        hLayout.setSpacing(12)
        hLayout.addWidget(self.icon)
        hLayout.addWidget(self.searchWebLabel)
        hLayout.addWidget(self.timeLabel)
        hLayout.addWidget(self.indexLabel)

        self.vLayout = QVBoxLayout(self)
        self.vLayout.addLayout(hLayout)
        self.vLayout.addWidget(self.webTitleLabel)
        self.vLayout.addWidget(self.contentLabel)

        self.setLayout(self.vLayout)

        self.clicked.connect(self.openWebBrower)

        self.setStyleSheet("""
            WebCard:hover {
                background-color: rgba(255, 255, 200, 0.8);  /* 悬浮时背景变蓝 */
            }
        """)

    def openWebBrower(self):
        QDesktopServices.openUrl(self.web_url)


class WebCardView(QWidget):
    """ Sample card view """

    def __init__(self, title: str, parent=None):
        super().__init__(parent=parent)
        self.setFixedSize(600, 500)
        self.titleLabel = StrongBodyLabel(title, self)
        self.closeButton = TransparentToolButton(self)
        self.closeButton.setIcon(FluentIcon.CLOSE)
        self.closeButton.setIconSize(QSize(16, 16))
        self.closeButton.clicked.connect(self.close_window)

        hLayout = QHBoxLayout()
        hLayout.addWidget(self.titleLabel)
        hLayout.addWidget(self.closeButton, Qt.AlignRight)


        self.mainLayout = QVBoxLayout(self)

        # ScrollArea to contain chat message
        self.scrollArea = ScrollArea(self)
        self.scrollArea.setWidgetResizable(True)  # Ensures that the scroll area resizes with the window

        self.view = QWidget(self.scrollArea)
        self.viewLayout = QVBoxLayout(self.view)
        self.viewLayout.setSpacing(10)
        self.view.setLayout(self.viewLayout)
        self.scrollArea.setWidget(self.view)
        self.scrollArea.setSizePolicy(QSizePolicy.Expanding,
                                      QSizePolicy.Expanding)

        self.mainLayout.setContentsMargins(5, 0, 5, 0)
        self.mainLayout.setSpacing(10)

        self.mainLayout.addLayout(hLayout)
        self.mainLayout.addWidget(self.scrollArea)

        self.titleLabel.setObjectName('viewTitleLabel')

        # 初始化隐藏
        self.hide()
交流获取源码请加Q:1648063121

欢迎加入DeepSeek 技术社区。在这里,你可以找到志同道合的朋友,共同探索AI技术的奥秘。
更多推荐


 4
4 0
0- 0


 已为社区贡献1条内容

所有评论(0)