用 DeepSeek 生成 Java代码,实现一个简单的问答机器人
用 Java 编写一个问答机器人,它可以从用户输入接收问题,并返回 DeepSeek 生成的回答。本篇文章将教你如何使用 DeepSeek 生成 Java 代码,实现一个。,通过调用 DeepSeek API 获取 DeepSeek 生成的结果。,它可以接收用户输入,并返回 AI 生成的回答。,让我们的机器人真正具备 AI 问答能力!,你的 AI 机器人就可以和你对话了!,并在网页上调用 AI 机
即使没有编程经验,你也可以用 AI 帮助你编写代码,创建属于自己的 AI 机器人!本篇文章将教你如何使用 DeepSeek 生成 Java 代码,实现一个 简单的问答机器人,并在本地运行它!
一、让 DeepSeek 生成 Java 代码
我们想要一个 简单的 AI 机器人,它可以接收用户输入,并返回 AI 生成的回答。
💬 示例指令:
“用 Java 编写一个问答机器人,它可以从用户输入接收问题,并返回 DeepSeek 生成的回答。”
DeepSeek 可能会返回如下代码:
import java.util.Scanner;

public class ChatBot {
    public static void main(String[] args) {
        Scanner scanner = new Scanner(System.in);
        System.out.println("欢迎使用 AI 机器人!请输入你的问题(输入 '退出' 结束):");

        while (true) {
            System.out.print("你:");
            String question = scanner.nextLine();

            if ("退出".equalsIgnoreCase(question)) {
                System.out.println("AI 机器人:再见!");
                break;
            }

            String response = getAIResponse(question);
            System.out.println("AI 机器人:" + response);
        }
        scanner.close();
    }

    // 这里模拟 AI 响应,后续我们会优化
    public static String getAIResponse(String question) {
        return "这是 AI 机器人对你的问题 '" + question + "' 的回答!";
    }
}
🔹 代码解析:
✅ Scanner 读取用户输入
✅ 无限循环等待用户提问
✅ 用户输入 "退出" 结束程序
✅ getAIResponse 方法返回 AI 生成的回答(目前是固定回复)
🔹 运行结果如下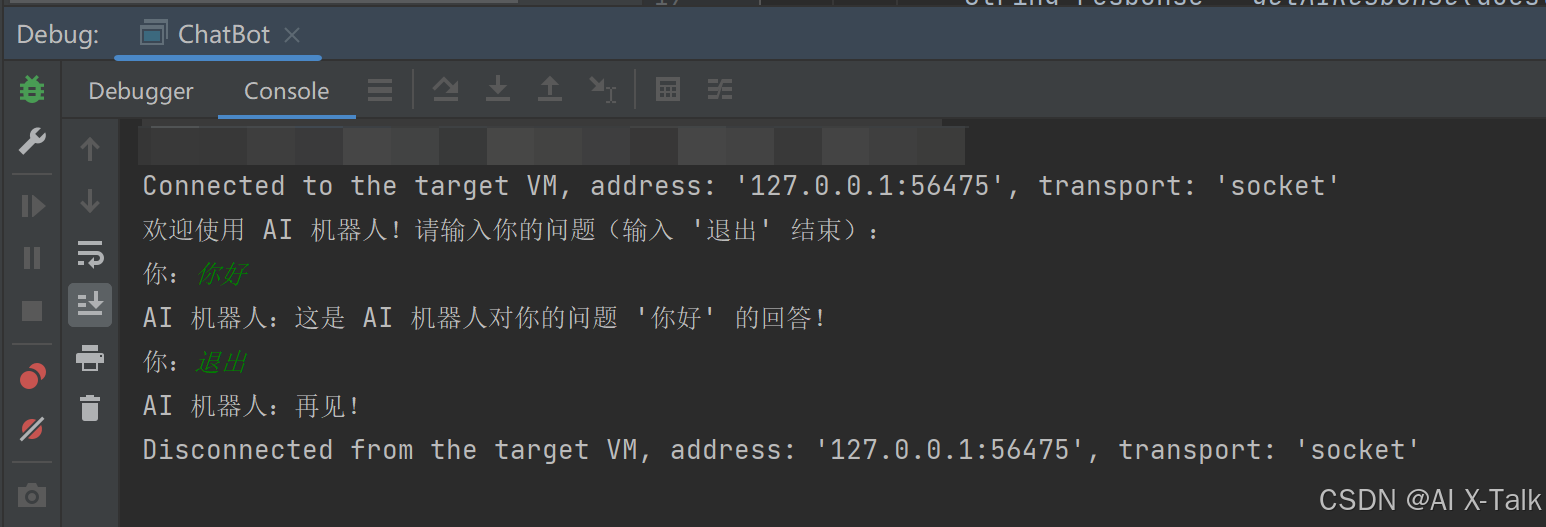
二、优化机器人,接入 DeepSeek API
目前机器人返回的是固定文本,我们可以让 AI 生成更智能的回答,通过调用 DeepSeek API 获取 DeepSeek 生成的结果。
💡 DeepSeek API 的调用方式:
1️⃣ 通过 Java 发送 HTTP 请求给 DeepSeeky
2️⃣ 获取并解析 AI 的返回内容
下面是 优化后的 Java 代码,让我们的机器人真正具备 AI 问答能力!
import java.util.Scanner;
import okhttp3.*;

public class ChatBot {
    private static final String API_KEY = "your_openai_api_key";
    private static final String API_URL = "https://api.openai.com/v1/chat/completions";

    public static void main(String[] args) {
        Scanner scanner = new Scanner(System.in);
        System.out.println("欢迎使用 AI 机器人!请输入你的问题(输入 '退出' 结束):");

        while (true) {
            System.out.print("你:");
            String question = scanner.nextLine();

            if ("退出".equalsIgnoreCase(question)) {
                System.out.println("AI 机器人:再见!");
                break;
            }

            String response = getAIResponse(question);
            System.out.println("AI 机器人:" + response);
        }
        scanner.close();
    }

    public static String getAIResponse(String question) {
        // 构造 JSON 请求体
        String json = String.format("{"
                + "\"model\": \"deepseek-r1:1.5b\","
                + "\"messages\": [{\"role\": \"user\", \"content\": \"%s\"}]"
                + "}", question);

        // 创建请求体
        RequestBody body = RequestBody.create(json, MediaType.parse("application/json"));

        // 构建 HTTP 请求
        Request request = new Request.Builder()
                .url(API_URL)
                .post(body)
                .build();

        // 发送请求并获取响应
        try (Response response = client.newCall(request).execute()) {
            if (response.isSuccessful() && response.body() != null) {
                Gson gson = new Gson();
                DeepSeekResponse deepSeekResponse = gson.fromJson(response.body().string(), DeepSeekResponse.class);
                return deepSeekResponse.getChoices().get(0).getMessage().getContent();
            }
            return "AI 机器人出错了,请稍后再试!";
        } catch (IOException e) {
            return "AI 机器人出错了,请稍后再试!";
        }
    }


    @Data
    @NoArgsConstructor
    @AllArgsConstructor
    public static class DeepSeekResponse {
        private String id;
        private String object;
        private long created;
        private String model;
        private String systemFingerprint;
        private List<Choice> choices;
        private Usage usage;

        @Data
        @NoArgsConstructor
        @AllArgsConstructor
        public static class Choice {
            private int index;
            private Message message;
            private String finishReason;
        }

        @Data
        @NoArgsConstructor
        @AllArgsConstructor
        public static class Message {
            private String role;
            private String content;
        }

        @Data
        @NoArgsConstructor
        @AllArgsConstructor
        public static class Usage {
            private int promptTokens;
            private int completionTokens;
            private int totalTokens;
        }
    }
}
三、运行你的 AI 机器人
1️⃣ 安装依赖:
使用 OkHttp 发送 HTTP 请求,需要添加 Maven 依赖:
 <dependency>
  <groupId>com.squareup.okhttp3</groupId>
  <artifactId>okhttp</artifactId>
  <version>4.12.0</version>
</dependency>
<dependency>
  <groupId>org.projectlombok</groupId>
  <artifactId>lombok</artifactId>
  <version>1.18.30</version>
</dependency>
<dependency>
  <groupId>com.google.code.gson</groupId>
  <artifactId>gson</artifactId>
</dependency>
2️⃣ 运行 Java 代码,你的 AI 机器人就可以和你对话了!
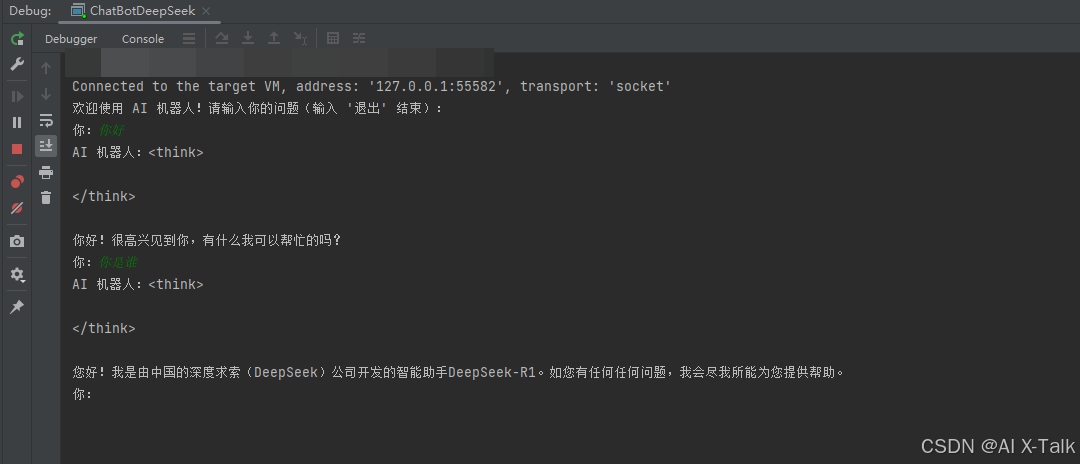
运行结果如下
四、下一步:让 AI 机器人支持网页调用
目前,我们的 AI 机器人只能在 终端 运行。下一篇文章,我们将教你 如何让 AI 生成 API 接口,并在网页上调用 AI 机器人,实现 更强大的 AI 交互体验! 🚀

欢迎加入DeepSeek 技术社区。在这里,你可以找到志同道合的朋友,共同探索AI技术的奥秘。
更多推荐


 10
10 0
0- 0


 已为社区贡献18条内容

所有评论(0)