如何基于Unsloth微调DeepSeek R1,构建一个专属你的医疗专家模型
如何基于Unsloth微调DeepSeek R1,构建一个专属你的医疗专家模型
文章目录
colab链接:
https://colab.research.google.com/drive/1iH59I9HMBTbJ3eIMfh9WwbYQ9YK4rTgY?usp=sharing#scrollTo=yl5Qoz2HzSUq
一、模型微调训练
Unsloth Fine-tuning DeepSeek R1 Distilled Qwen 1.5B
在这个笔记本中,将展示如何使用 Unsloth 并借助一个医疗数据集对 DeepSeek - R1 - Distill - Qwen - 1.5B 模型进行微调。
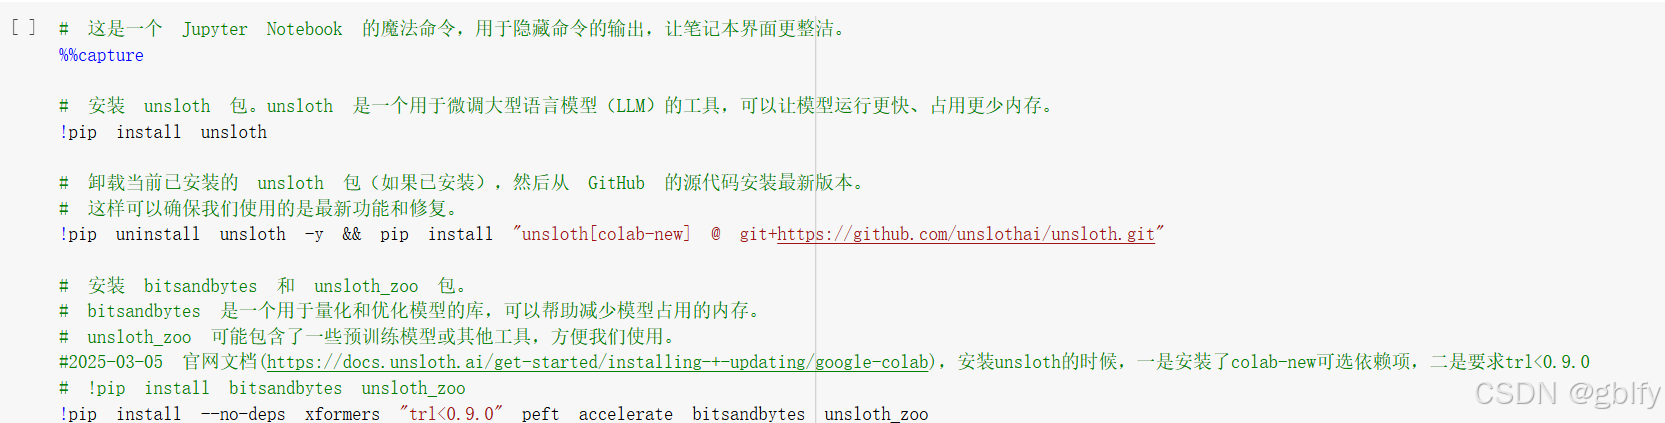
1. 安装unsloth微调工具
# 这是一个 Jupyter Notebook 的魔法命令,用于隐藏命令的输出,让笔记本界面更整洁。
%%capture

# 安装 unsloth 包。unsloth 是一个用于微调大型语言模型(LLM)的工具,可以让模型运行更快、占用更少内存。
!pip install unsloth

# 卸载当前已安装的 unsloth 包(如果已安装),然后从 GitHub 的源代码安装最新版本。
# 这样可以确保我们使用的是最新功能和修复。
!pip uninstall unsloth -y && pip install "unsloth[colab-new] @ git+https://github.com/unslothai/unsloth.git"

# 安装 bitsandbytes 和 unsloth_zoo 包。
# bitsandbytes 是一个用于量化和优化模型的库,可以帮助减少模型占用的内存。
# unsloth_zoo 可能包含了一些预训练模型或其他工具,方便我们使用。
#2025-03-05 官网文档(https://docs.unsloth.ai/get-started/installing-+-updating/google-colab),安装unsloth的时候,一是安装了colab-new可选依赖项,二是要求trl<0.9.0
# !pip install bitsandbytes unsloth_zoo
!pip install --no-deps xformers "trl<0.9.0" peft accelerate bitsandbytes unsloth_zoo
2. 选择预训练基础模型
1.选择一个与你的用例相匹配的模型
2.评估你的存储、计算能力和数据集
3.选择一个模型和参数
4.在基础模型和指令模型之间做出选择
from unsloth import FastLanguageModel # 导入FastLanguageModel类,用来加载和使用模型
import torch  # 导入torch工具,用于处理模型的数学运算
max_seq_length = # 设置模型处理文本的最大长度,相当于给模型设置一个“最大容量”
dtype = None  # 设置数据类型,让模型自动选择最适合的精度
load_in_4bit = True # 使用4位量化来节省内存,就像把大箱子压缩成小箱子

# 加载预训练模型,并获取tokenizer工具
model, tokenizer = FastLanguageModel.from_pretrained(
    model_name = "unsloth/DeepSeek-R1-Distill-Qwen-1.5B", # 指定要加载的模型名称
    max_seq_length = max_seq_length, # 使用前面设置的最大长度
    dtype = dtype, # 使用前面设置的数据类型
    load_in_4bit = load_in_4bit, # 使用4位量化
    # token="hf_...",  # 如果需要访问授权模型,可以在这里填入密钥
)

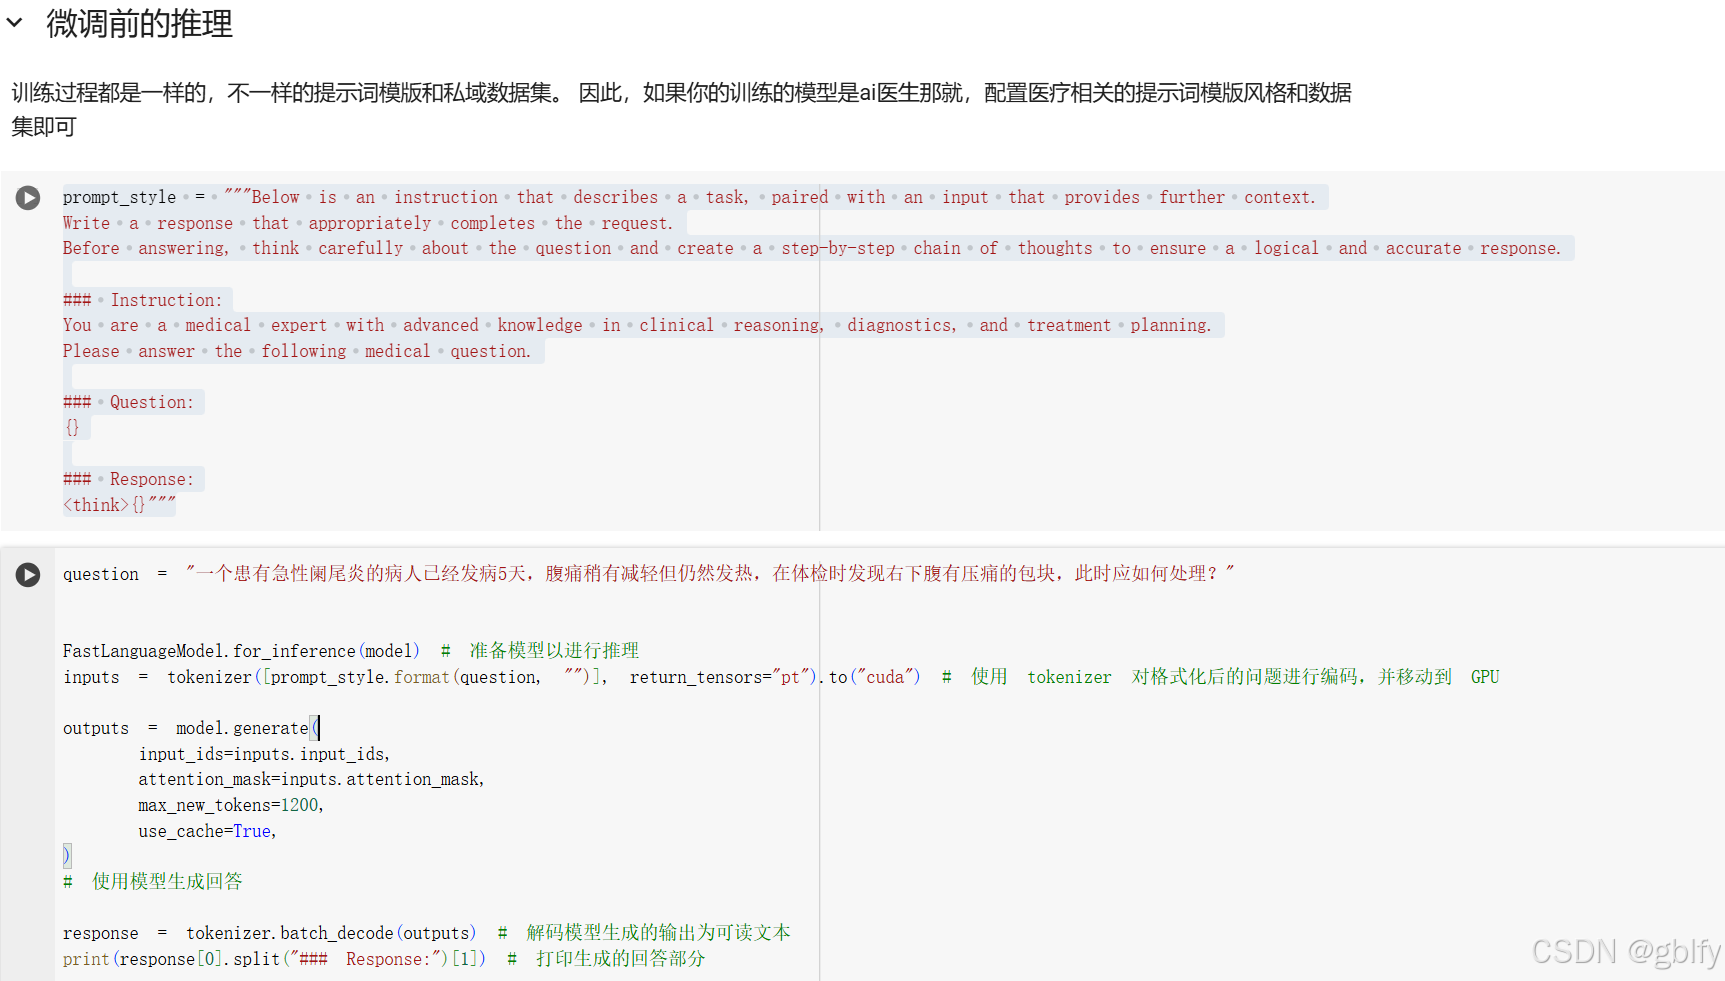
3. 微调前的推理
训练过程都是一样的,不一样的提示词模版和私域数据集。 因此,如果你的训练的模型是ai医生那就,配置医疗相关的提示词模版风格和数据集即可
prompt_style = """Below is an instruction that describes a task, paired with an input that provides further context.
Write a response that appropriately completes the request.
Before answering, think carefully about the question and create a step-by-step chain of thoughts to ensure a logical and accurate response.

### Instruction:
You are a medical expert with advanced knowledge in clinical reasoning, diagnostics, and treatment planning.
Please answer the following medical question.

### Question:
{}

### Response:
<think>{}"""
question = "一个患有急性阑尾炎的病人已经发病5天,腹痛稍有减轻但仍然发热,在体检时发现右下腹有压痛的包块,此时应如何处理?"


FastLanguageModel.for_inference(model) # 准备模型以进行推理
inputs = tokenizer([prompt_style.format(question, "")], return_tensors="pt").to("cuda") # 使用 tokenizer 对格式化后的问题进行编码,并移动到 GPU

outputs = model.generate(
    input_ids=inputs.input_ids,
    attention_mask=inputs.attention_mask,
    max_new_tokens=1200,
    use_cache=True,
)
# 使用模型生成回答

response = tokenizer.batch_decode(outputs) # 解码模型生成的输出为可读文本
print(response[0].split("### Response:")[1]) # 打印生成的回答部分
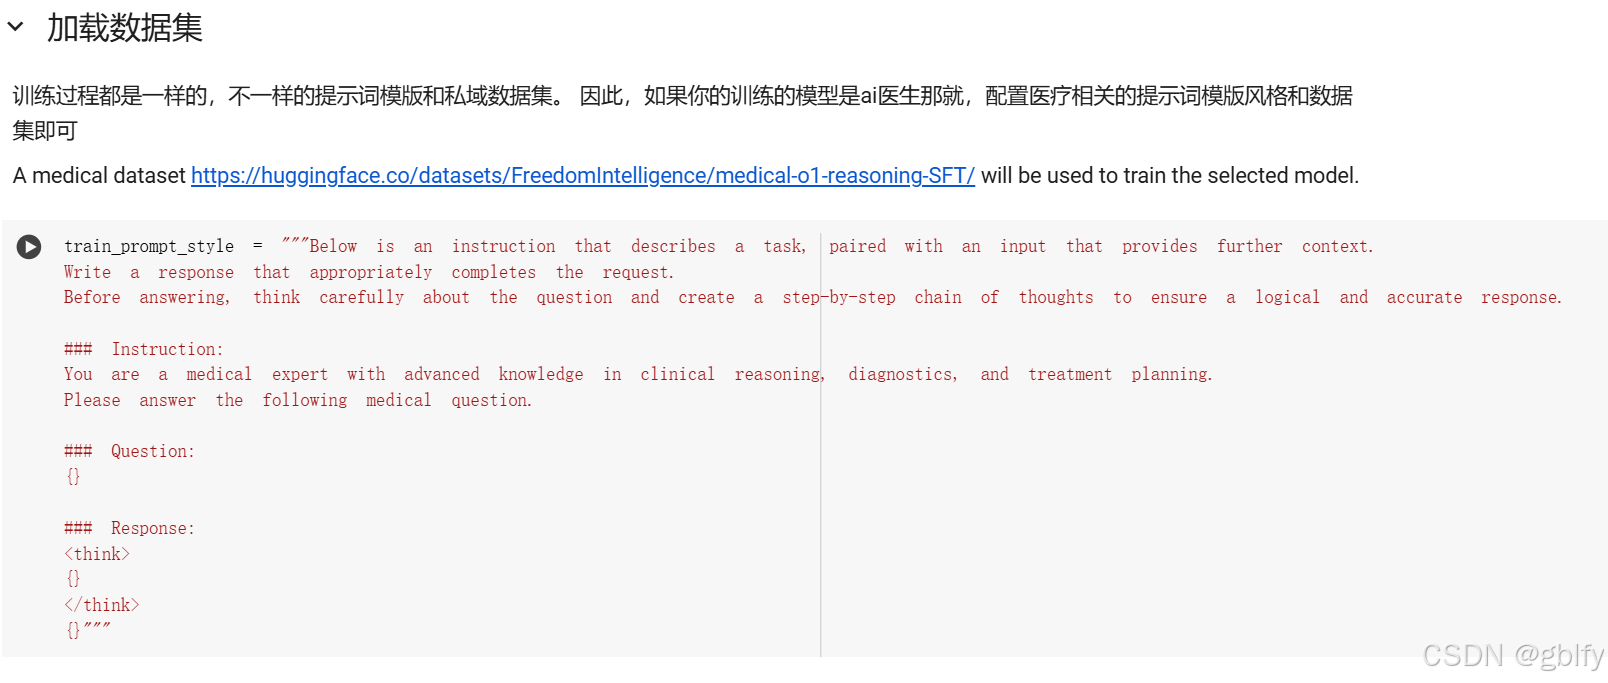
4. 加载数据集
训练过程都是一样的,不一样的提示词模版和私域数据集。 因此,如果你的训练的模型是ai医生那就,配置医疗相关的提示词模版风格和数据集即可
A medical dataset https://huggingface.co/datasets/FreedomIntelligence/medical-o1-reasoning-SFT/ will be used to train the selected model.
train_prompt_style = """Below is an instruction that describes a task, paired with an input that provides further context.
Write a response that appropriately completes the request.
Before answering, think carefully about the question and create a step-by-step chain of thoughts to ensure a logical and accurate response.

### Instruction:
You are a medical expert with advanced knowledge in clinical reasoning, diagnostics, and treatment planning.
Please answer the following medical question.

### Question:
{}

### Response:
<think>
{}
</think>
{}"""
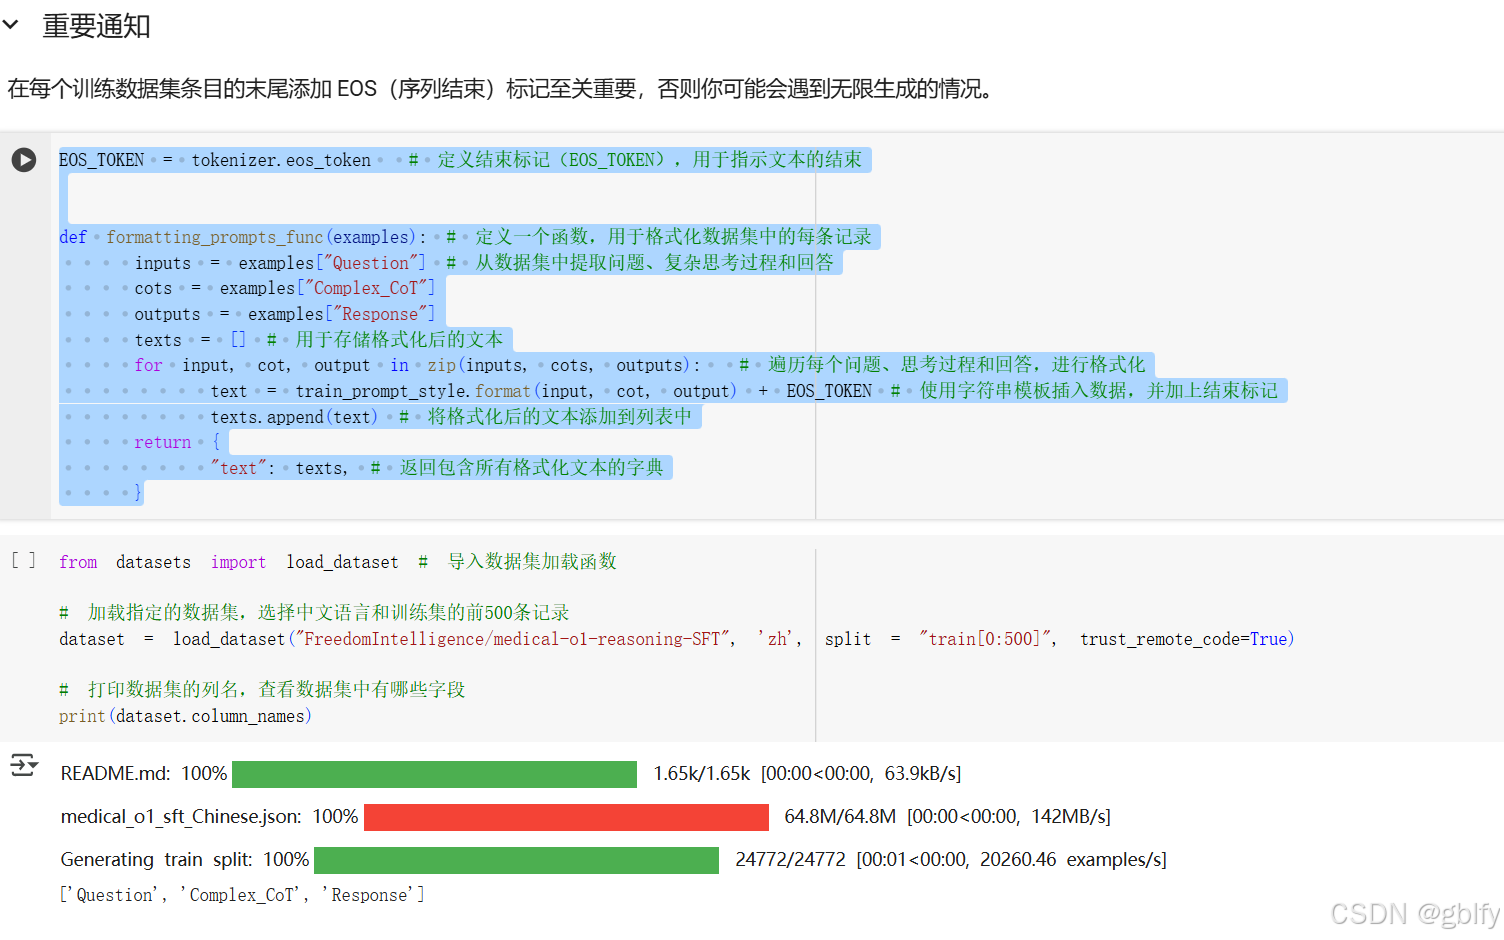
- 重要通知
在每个训练数据集条目的末尾添加 EOS(序列结束)标记至关重要,否则你可能会遇到无限生成的情况。
EOS_TOKEN = tokenizer.eos_token  # 定义结束标记(EOS_TOKEN),用于指示文本的结束


def formatting_prompts_func(examples): # 定义一个函数,用于格式化数据集中的每条记录
    inputs = examples["Question"] # 从数据集中提取问题、复杂思考过程和回答
    cots = examples["Complex_CoT"]
    outputs = examples["Response"]
    texts = [] # 用于存储格式化后的文本
    for input, cot, output in zip(inputs, cots, outputs):  # 遍历每个问题、思考过程和回答,进行格式化
        text = train_prompt_style.format(input, cot, output) + EOS_TOKEN # 使用字符串模板插入数据,并加上结束标记
        texts.append(text) # 将格式化后的文本添加到列表中
    return {
        "text": texts, # 返回包含所有格式化文本的字典
    }
from datasets import load_dataset # 导入数据集加载函数

# 加载指定的数据集,选择中文语言和训练集的前500条记录
dataset = load_dataset("FreedomIntelligence/medical-o1-reasoning-SFT", 'zh', split = "train[0:500]", trust_remote_code=True)

# 打印数据集的列名,查看数据集中有哪些字段
print(dataset.column_names)
为了让 Ollama 和 llama.cpp 能像定制的 ChatGPT 聊天机器人那样运行,我们的数据表必须只能有两列 —— 一列是指令列,一列是输出列。我们需要将数据集转换成合适的结构。
dataset = dataset.map(formatting_prompts_func, batched = True)
dataset["text"][0]

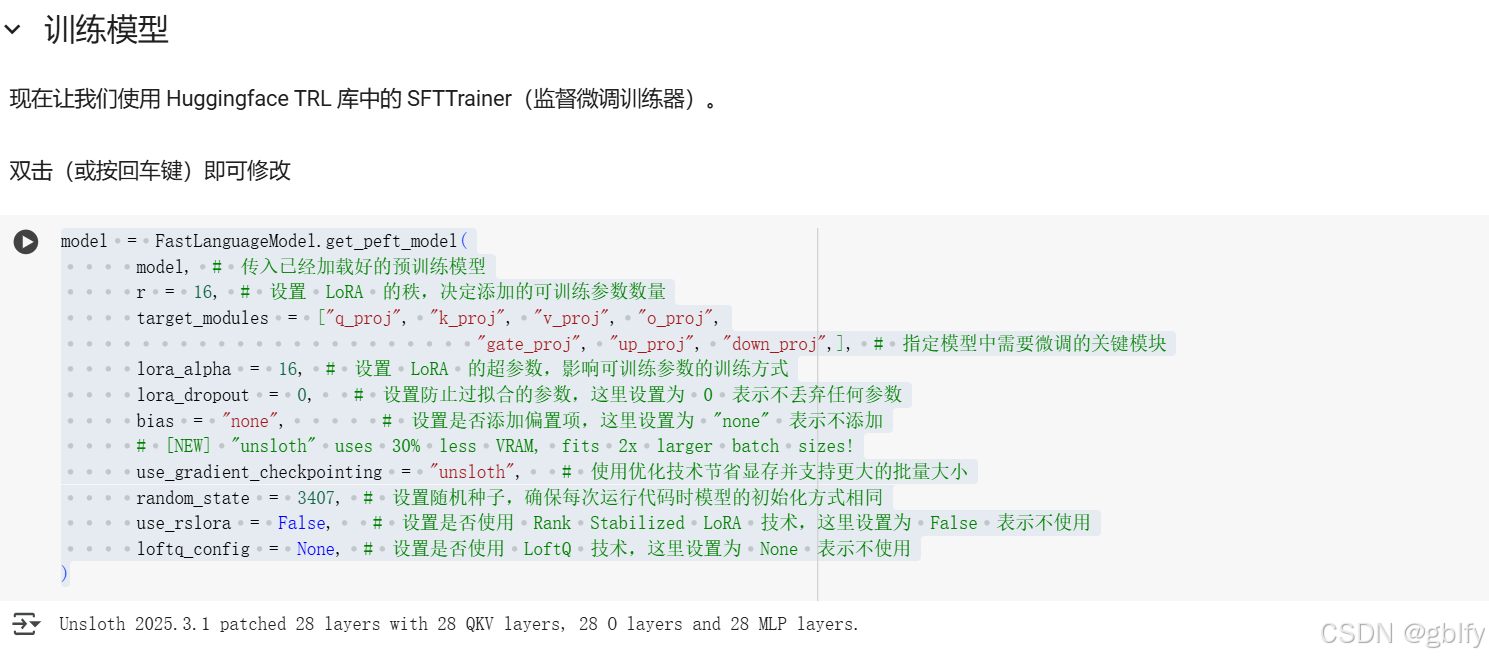
5. 训练模型
现在让我们使用 Huggingface TRL 库中的 SFTTrainer(监督微调训练器)。
model = FastLanguageModel.get_peft_model(
    model, # 传入已经加载好的预训练模型
    r = 16, # 设置 LoRA 的秩,决定添加的可训练参数数量
    target_modules = ["q_proj", "k_proj", "v_proj", "o_proj",
                      "gate_proj", "up_proj", "down_proj",], # 指定模型中需要微调的关键模块
    lora_alpha = 16, # 设置 LoRA 的超参数,影响可训练参数的训练方式
    lora_dropout = 0,  # 设置防止过拟合的参数,这里设置为 0 表示不丢弃任何参数
    bias = "none",     # 设置是否添加偏置项,这里设置为 "none" 表示不添加
    # [NEW] "unsloth" uses 30% less VRAM, fits 2x larger batch sizes!
    use_gradient_checkpointing = "unsloth",  # 使用优化技术节省显存并支持更大的批量大小
    random_state = 3407, # 设置随机种子,确保每次运行代码时模型的初始化方式相同
    use_rslora = False,  # 设置是否使用 Rank Stabilized LoRA 技术,这里设置为 False 表示不使用
    loftq_config = None, # 设置是否使用 LoftQ 技术,这里设置为 None 表示不使用
)
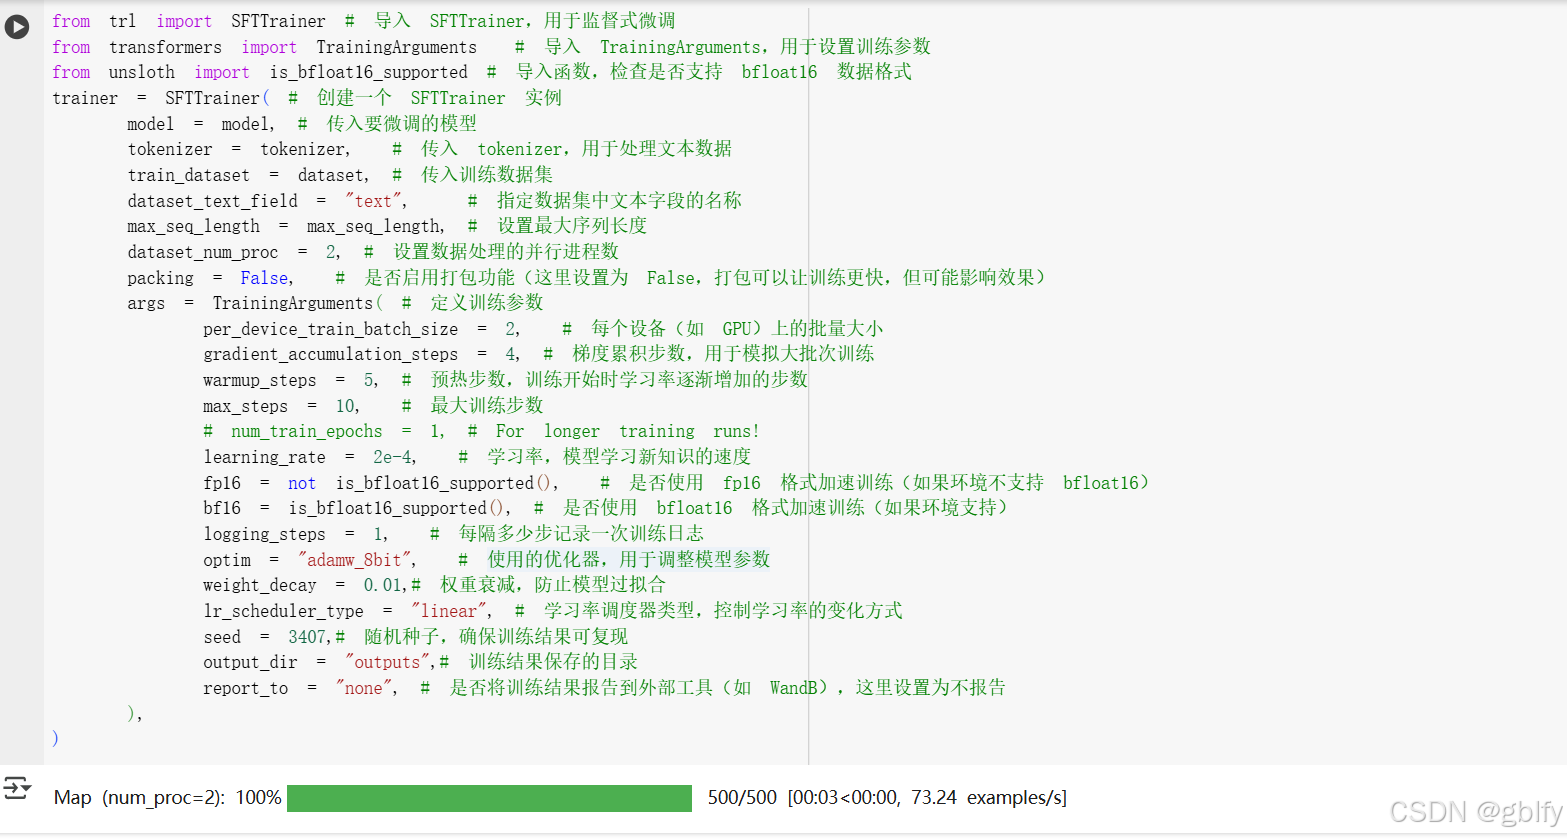
from trl import SFTTrainer # 导入 SFTTrainer,用于监督式微调
from transformers import TrainingArguments  # 导入 TrainingArguments,用于设置训练参数
from unsloth import is_bfloat16_supported # 导入函数,检查是否支持 bfloat16 数据格式
trainer = SFTTrainer( # 创建一个 SFTTrainer 实例
    model = model, # 传入要微调的模型
    tokenizer = tokenizer,  # 传入 tokenizer,用于处理文本数据
    train_dataset = dataset, # 传入训练数据集
    dataset_text_field = "text",   # 指定数据集中文本字段的名称
    max_seq_length = max_seq_length, # 设置最大序列长度
    dataset_num_proc = 2, # 设置数据处理的并行进程数
    packing = False,  # 是否启用打包功能(这里设置为 False,打包可以让训练更快,但可能影响效果)
    args = TrainingArguments( # 定义训练参数
        per_device_train_batch_size = 2,  # 每个设备(如 GPU)上的批量大小
        gradient_accumulation_steps = 4, # 梯度累积步数,用于模拟大批次训练
        warmup_steps = 5, # 预热步数,训练开始时学习率逐渐增加的步数
        max_steps = 10,  # 最大训练步数
        # num_train_epochs = 1, # For longer training runs!
        learning_rate = 2e-4,  # 学习率,模型学习新知识的速度
        fp16 = not is_bfloat16_supported(),  # 是否使用 fp16 格式加速训练(如果环境不支持 bfloat16)
        bf16 = is_bfloat16_supported(), # 是否使用 bfloat16 格式加速训练(如果环境支持)
        logging_steps = 1,  # 每隔多少步记录一次训练日志
        optim = "adamw_8bit",  # 使用的优化器,用于调整模型参数
        weight_decay = 0.01,# 权重衰减,防止模型过拟合
        lr_scheduler_type = "linear", # 学习率调度器类型,控制学习率的变化方式
        seed = 3407,# 随机种子,确保训练结果可复现
        output_dir = "outputs",# 训练结果保存的目录
        report_to = "none", # 是否将训练结果报告到外部工具(如 WandB),这里设置为不报告
    ),
)
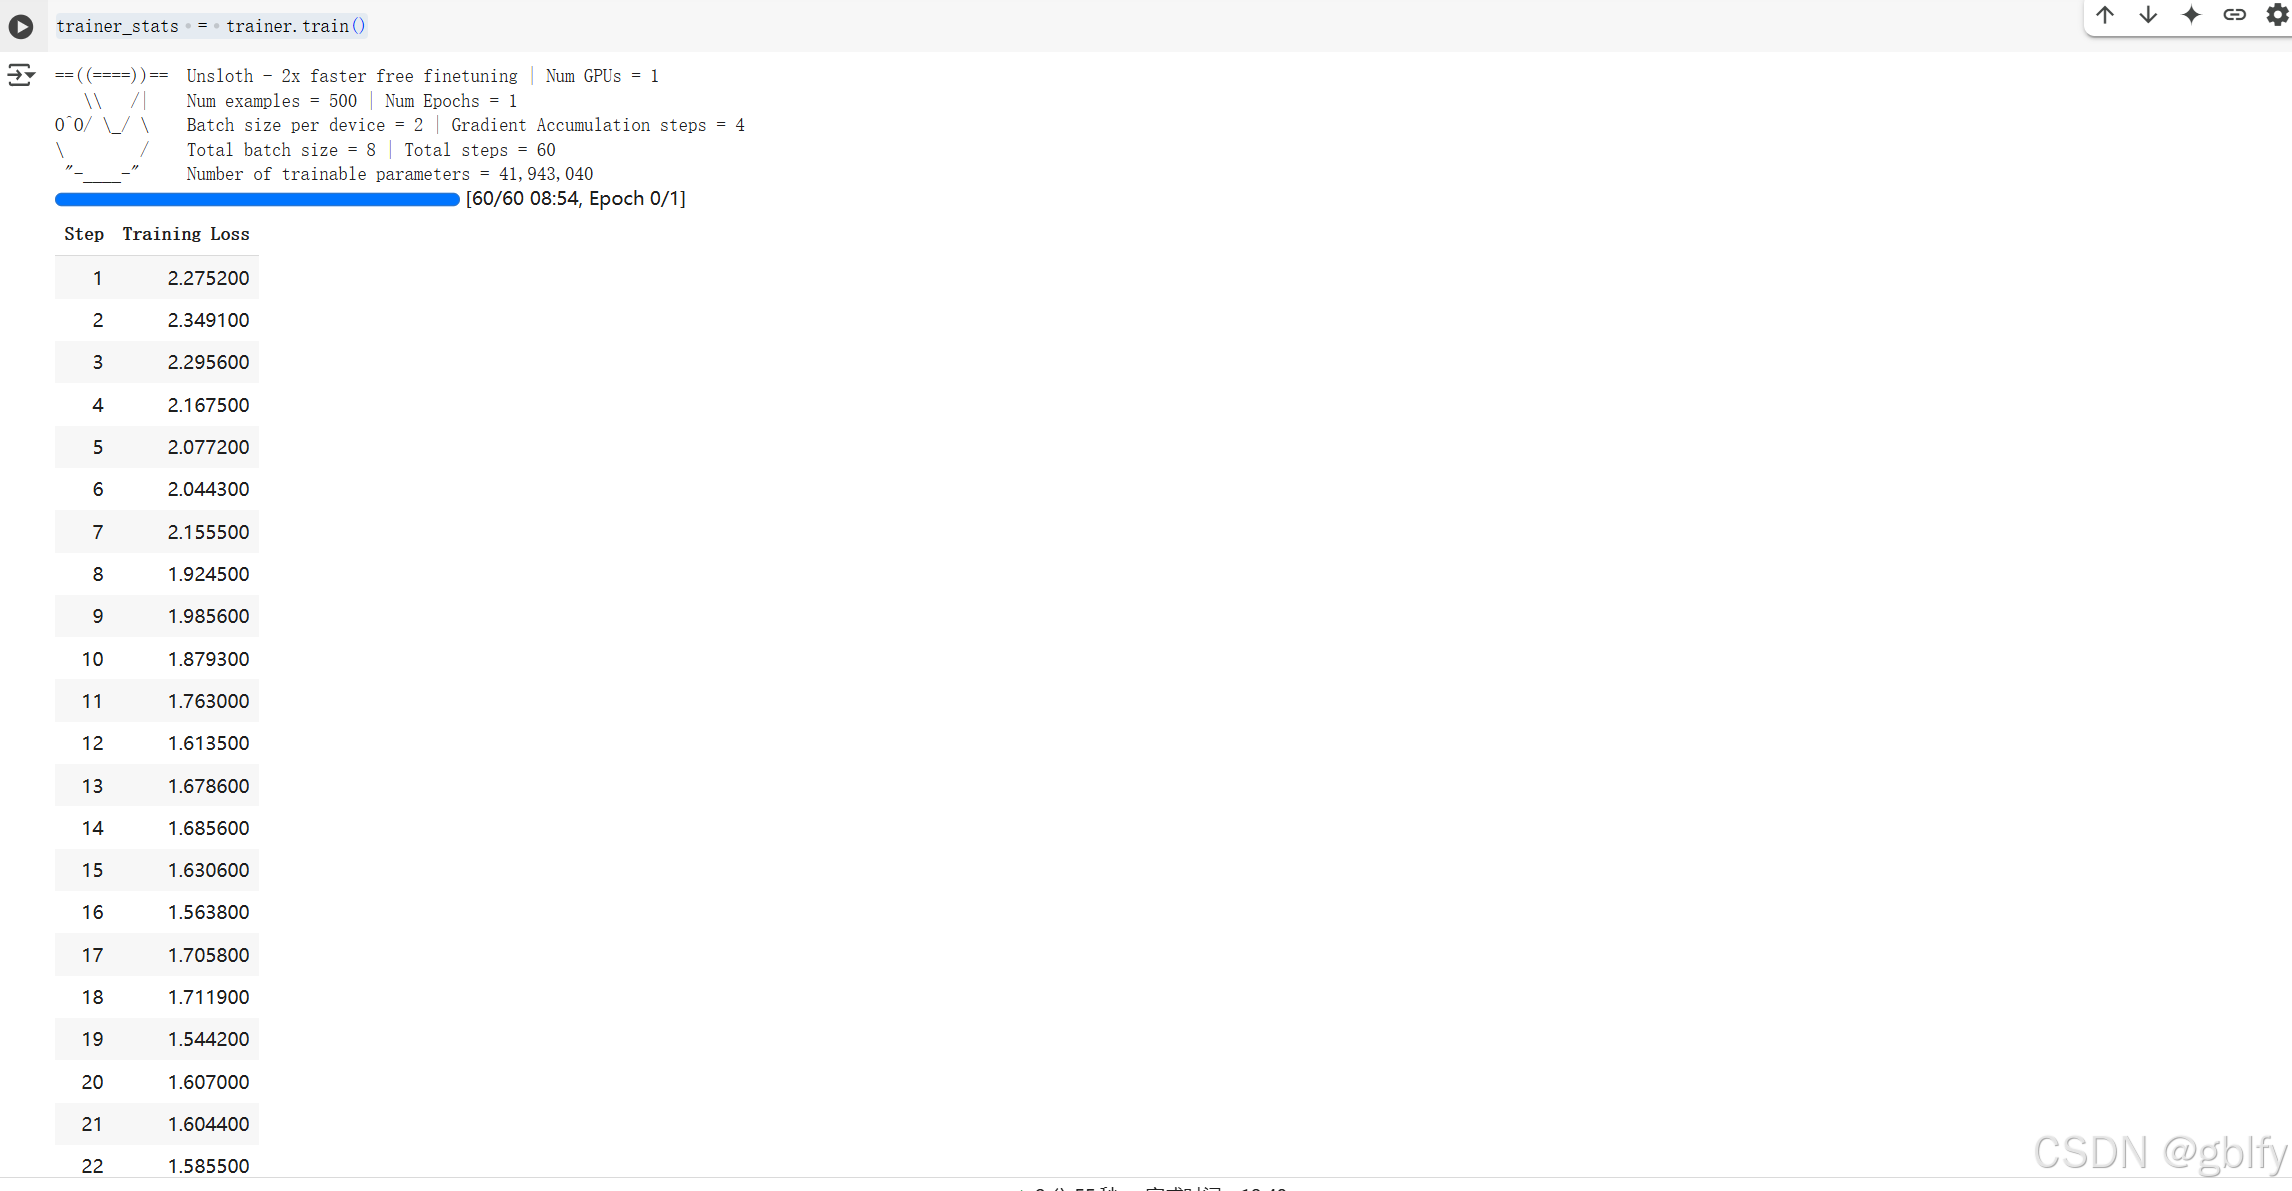
开始训练你
trainer_stats = trainer.train()
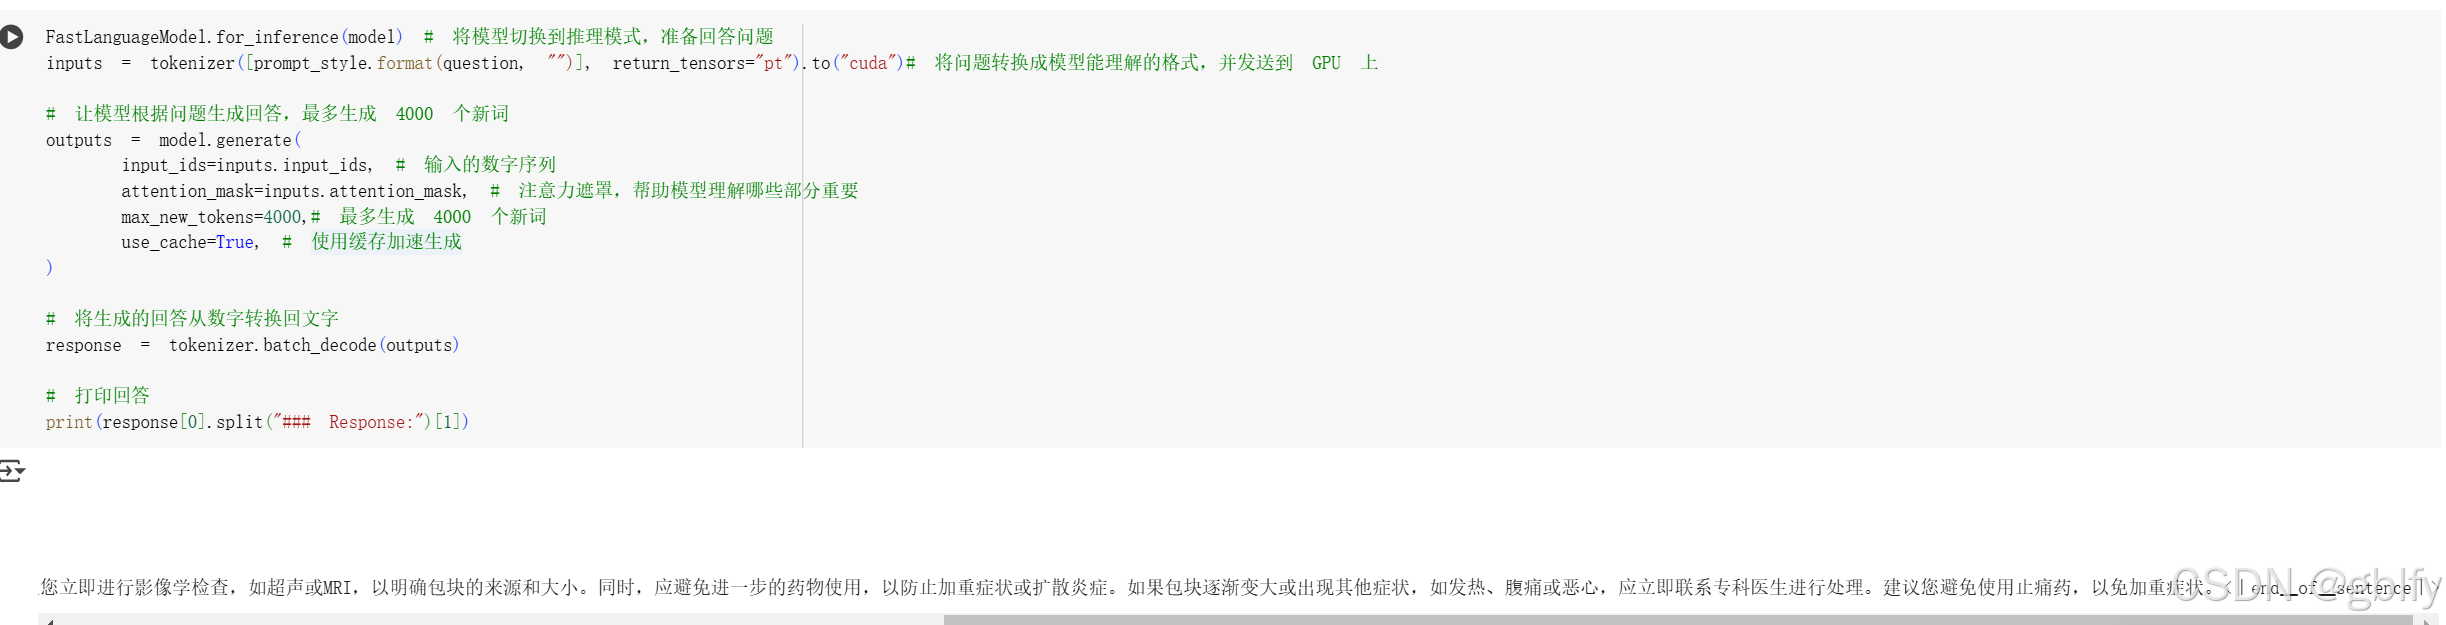
6. 微调后的推理
让我们再次针对同一个问题进行推理,然后看看有什么不同。
print(question)

FastLanguageModel.for_inference(model) # 将模型切换到推理模式,准备回答问题
inputs = tokenizer([prompt_style.format(question, "")], return_tensors="pt").to("cuda")# 将问题转换成模型能理解的格式,并发送到 GPU 上

# 让模型根据问题生成回答,最多生成 4000 个新词
outputs = model.generate(
    input_ids=inputs.input_ids, # 输入的数字序列
    attention_mask=inputs.attention_mask, # 注意力遮罩,帮助模型理解哪些部分重要
    max_new_tokens=4000,# 最多生成 4000 个新词
    use_cache=True, # 使用缓存加速生成
)

# 将生成的回答从数字转换回文字
response = tokenizer.batch_decode(outputs)

# 打印回答
print(response[0].split("### Response:")[1])
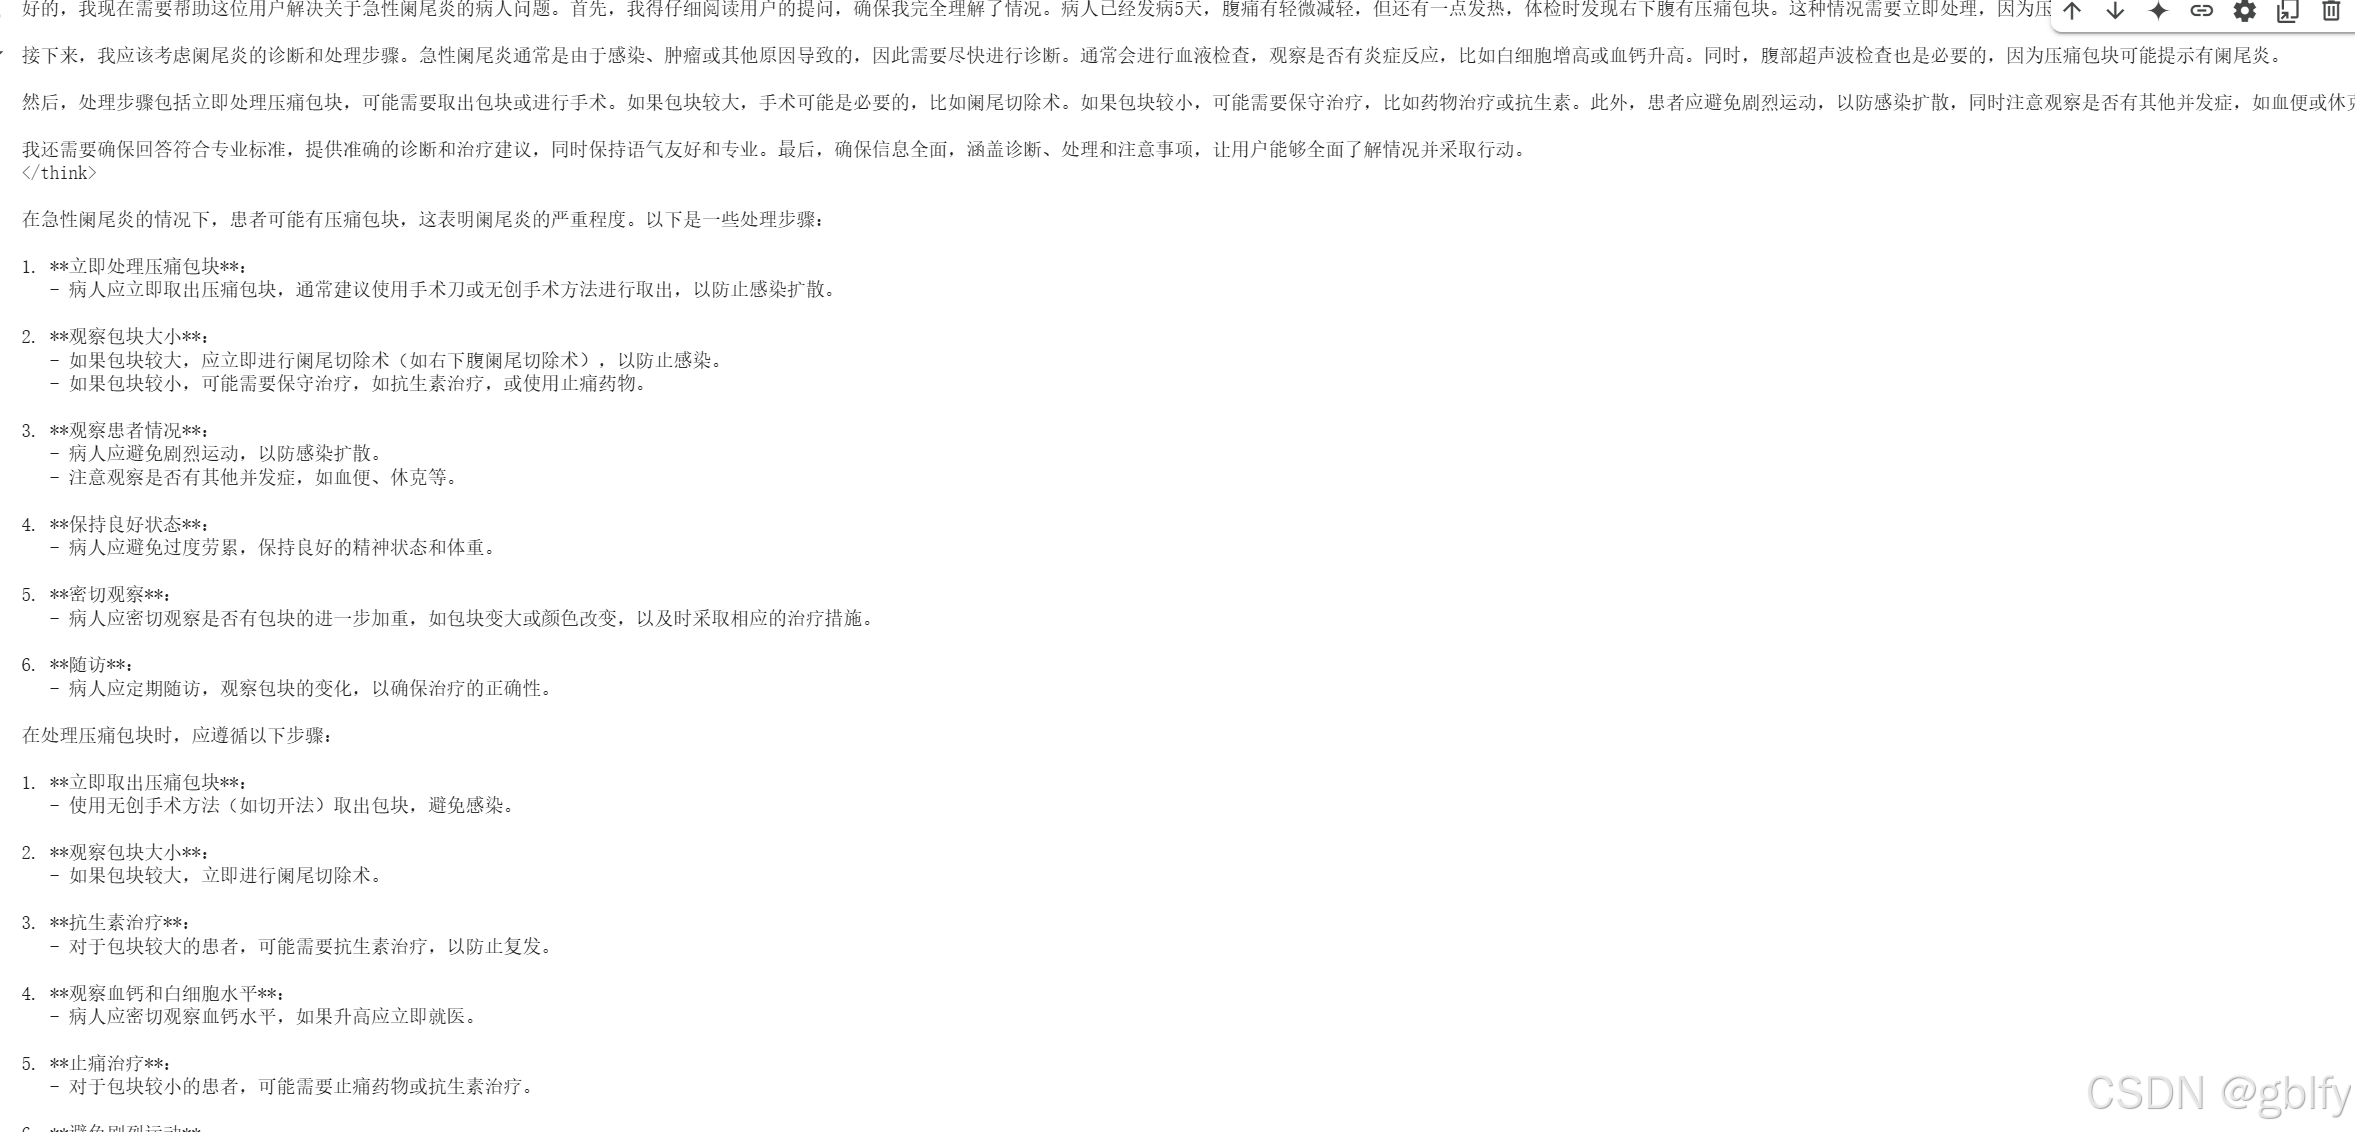
- 输出效果
<think>

</think>

急性阑尾炎是一种严重的炎症性疾病的严重并发症,患者在发病后应及时就医,积极进行治疗。在您的情况下,右下腹出现压痛包块,这可能与阑尾炎的炎症反应有关。建议您立即进行影像学检查,如超声或MRI,以明确包块的来源和大小。同时,应避免进一步的药物使用,以防止加重症状或扩散炎症。如果包块逐渐变大或出现其他症状,如发热、腹痛或恶心,应立即联系专科医生进行处理。建议您避免使用止痛药,以免加重症状。<|end▁of▁sentence|>
二、上传模型到HuggingFace
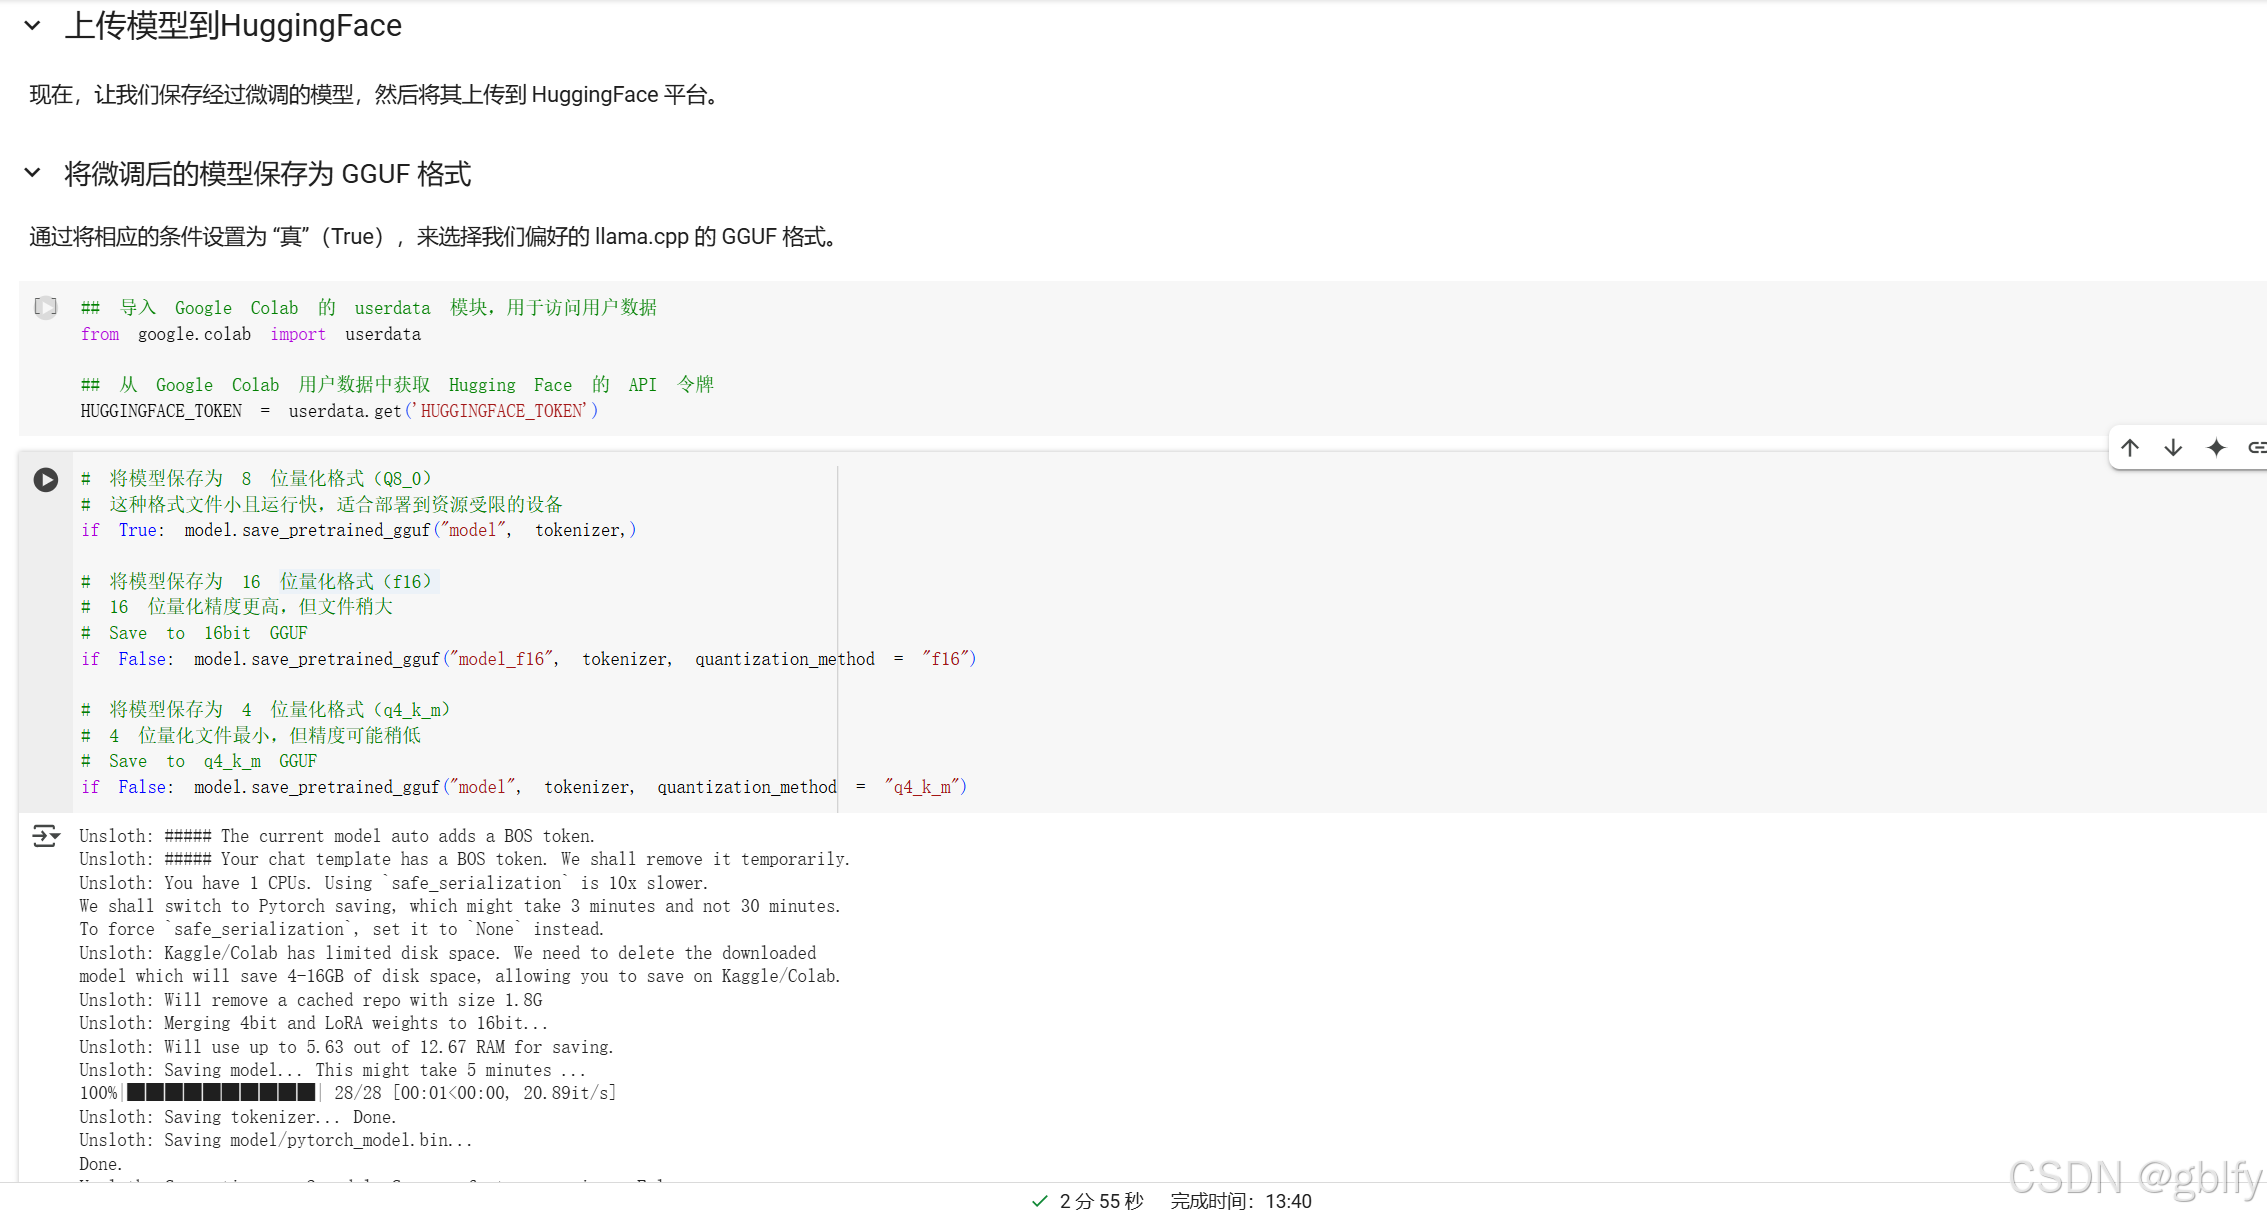
2.1. 将微调后的模型保存为 GGUF 格式
## 导入 Google Colab 的 userdata 模块,用于访问用户数据
from google.colab import userdata

## 从 Google Colab 用户数据中获取 Hugging Face 的 API 令牌
HUGGINGFACE_TOKEN = userdata.get('HUGGINGFACE_TOKEN')
# 将模型保存为 8 位量化格式(Q8_0)
# 这种格式文件小且运行快,适合部署到资源受限的设备
if True: model.save_pretrained_gguf("model", tokenizer,)

# 将模型保存为 16 位量化格式(f16)
# 16 位量化精度更高,但文件稍大
# Save to 16bit GGUF
if False: model.save_pretrained_gguf("model_f16", tokenizer, quantization_method = "f16")

# 将模型保存为 4 位量化格式(q4_k_m)
# 4 位量化文件最小,但精度可能稍低
# Save to q4_k_m GGUF
if False: model.save_pretrained_gguf("model", tokenizer, quantization_method = "q4_k_m")
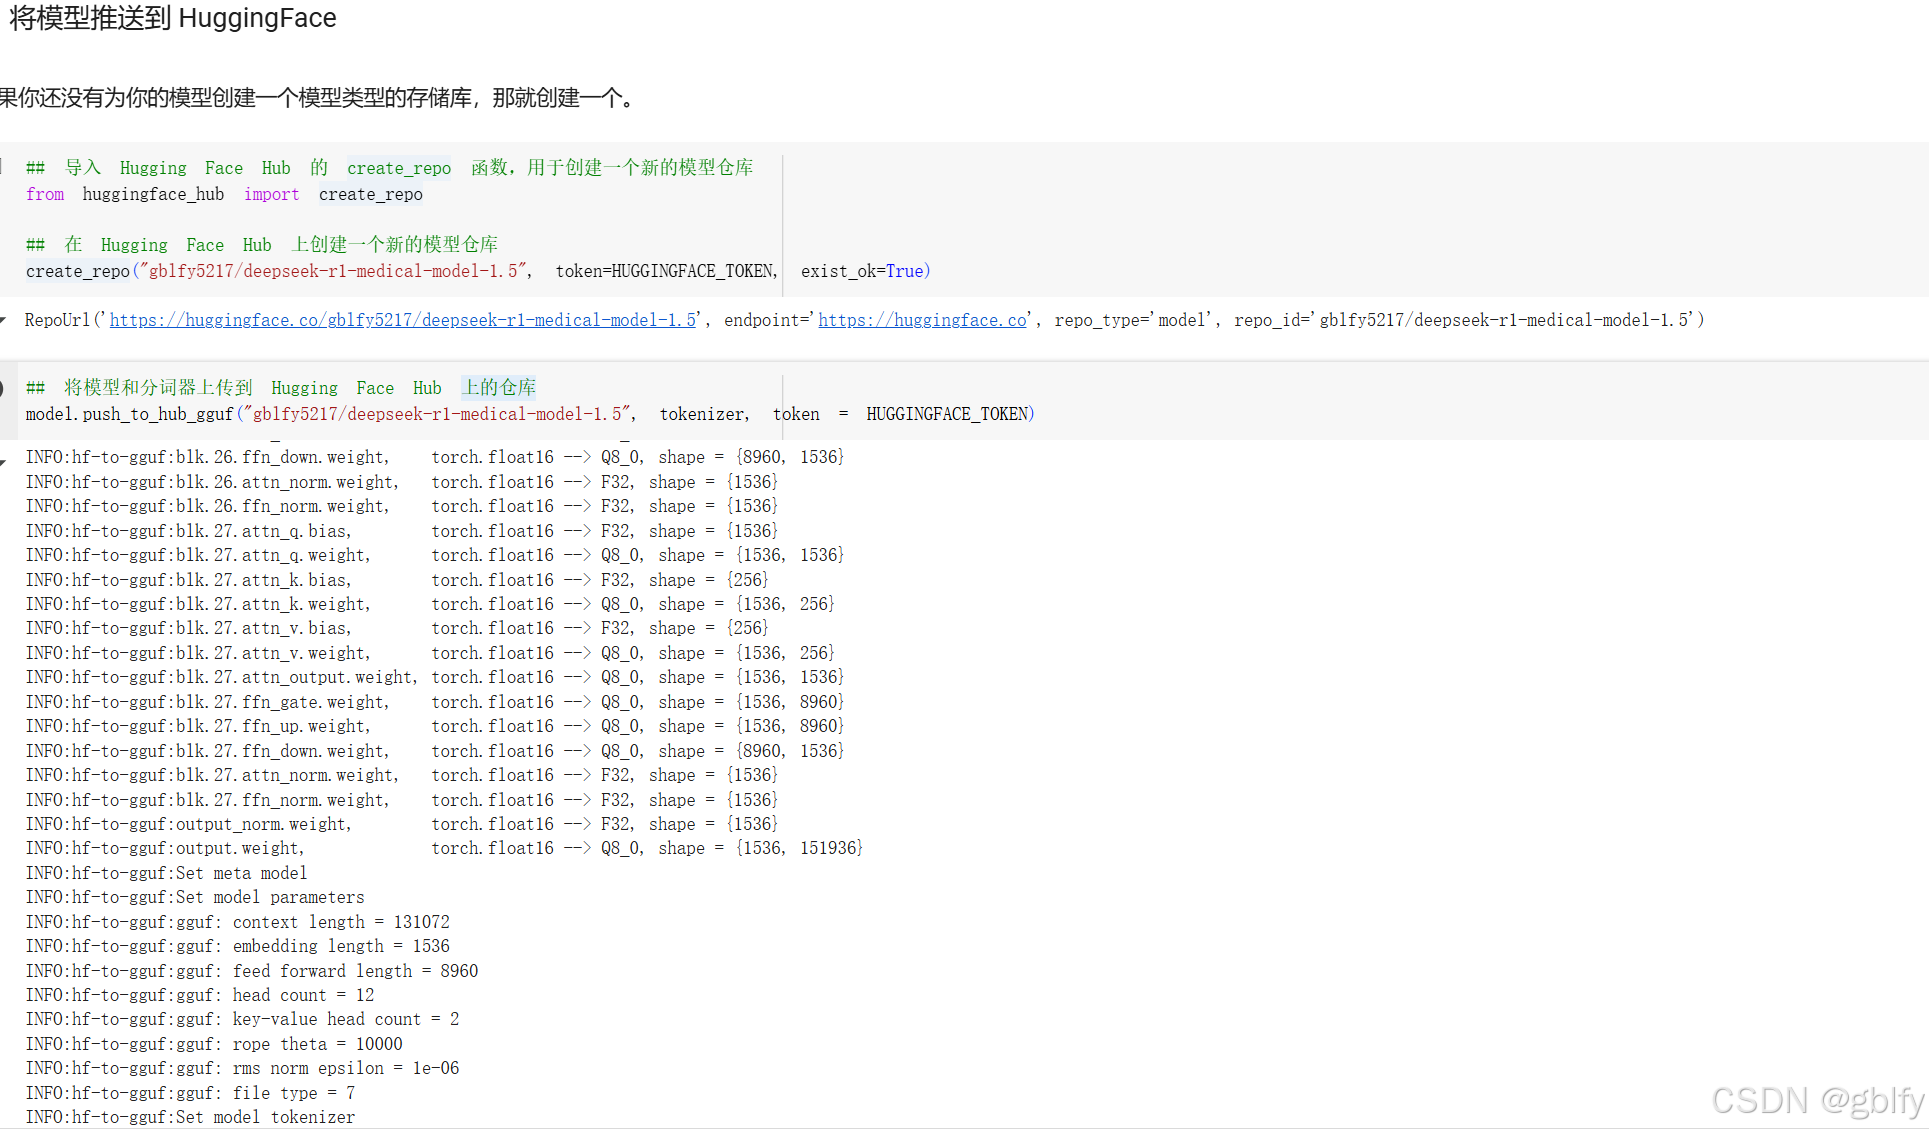
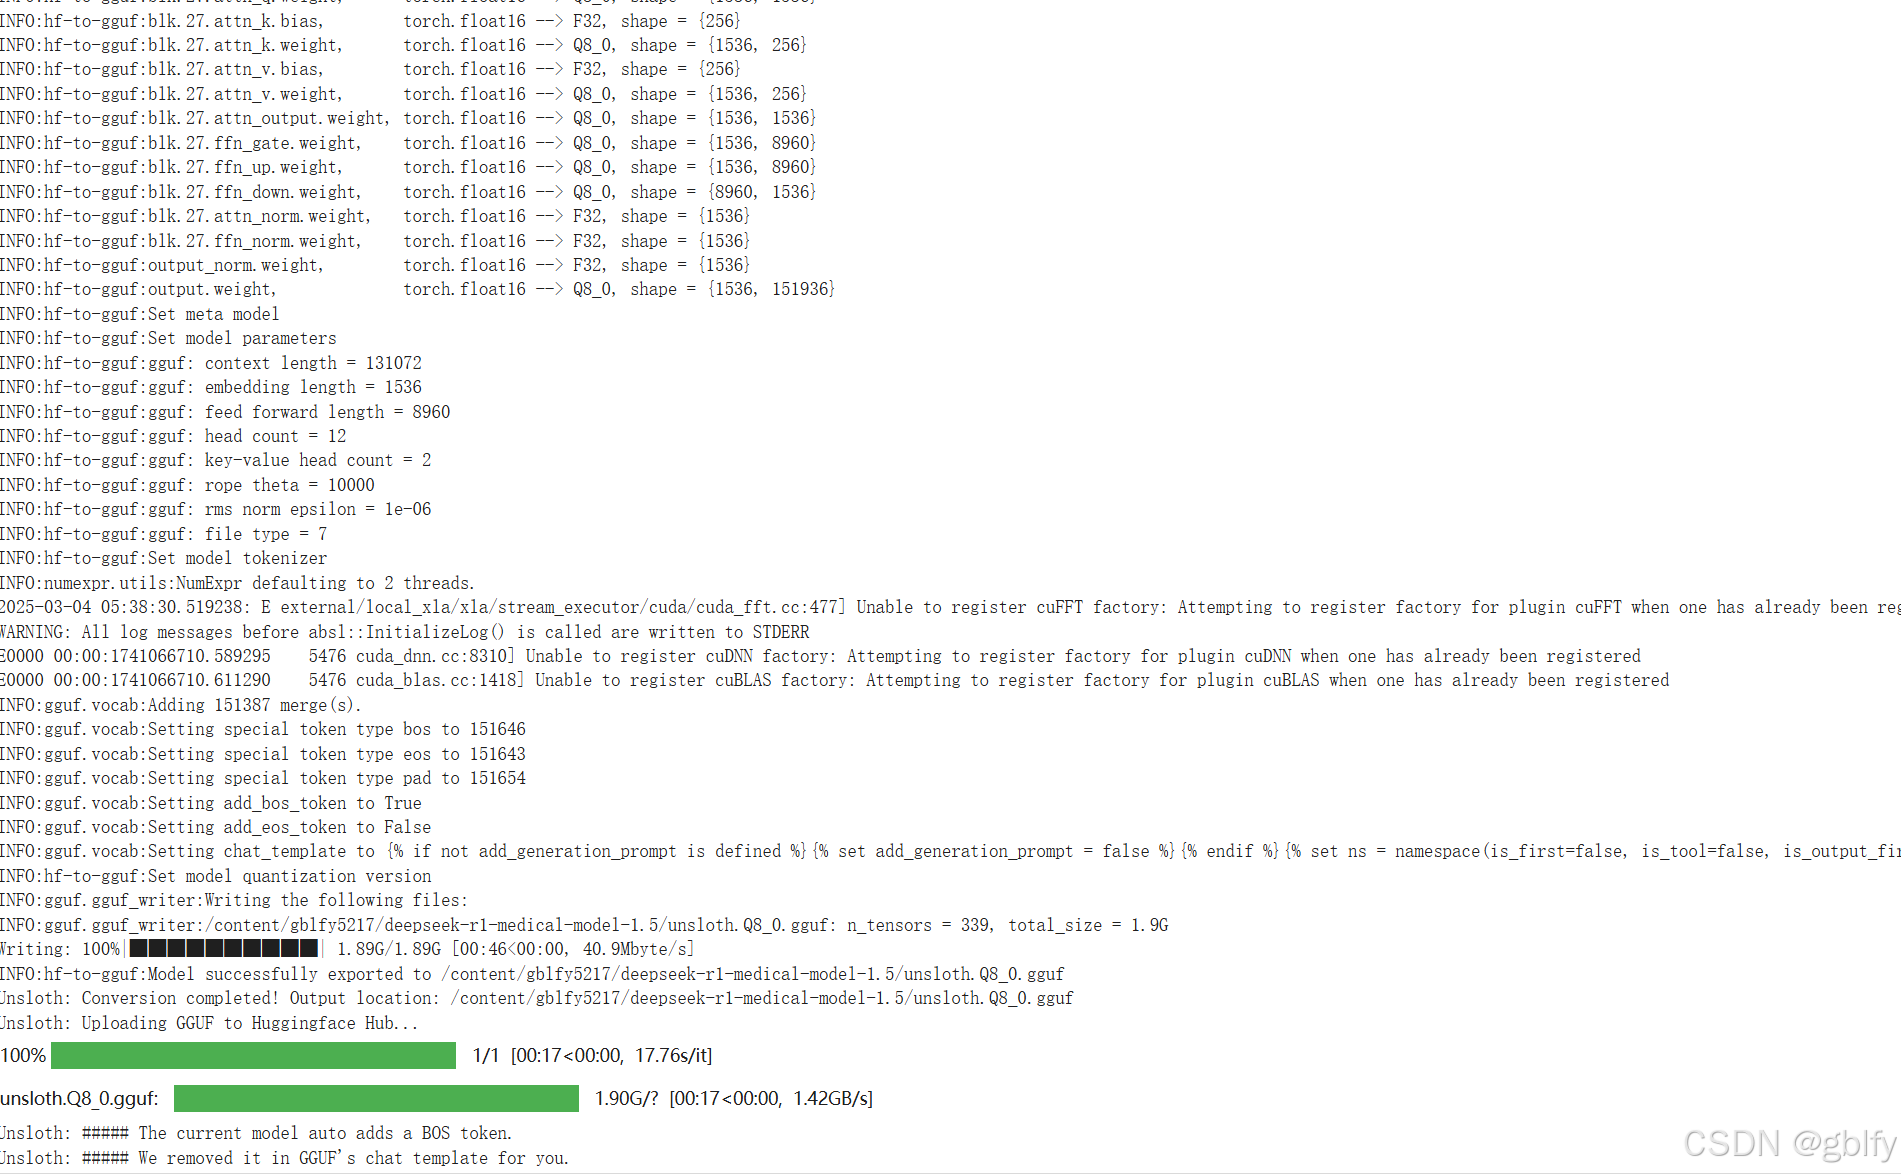
2.2. 将模型推送到 HuggingFace
## 导入 Hugging Face Hub 的 create_repo 函数,用于创建一个新的模型仓库
from huggingface_hub import create_repo

## 在 Hugging Face Hub 上创建一个新的模型仓库
create_repo("gblfy5217/deepseek-r1-medical-model-1.5", token=HUGGINGFACE_TOKEN, exist_ok=True)
## 将模型和分词器上传到 Hugging Face Hub 上的仓库
model.push_to_hub_gguf("gblfy5217/deepseek-r1-medical-model-1.5", tokenizer, token = HUGGINGFACE_TOKEN)
三、Ollama部署模型
3.1. Ollama run HuggingFace model
ollama run hf.co/gblfy5217/deepseek-r1-medical-model-1.5
或者
ollama run hf-mirror.com/gblfy5217/deepseek-r1-medical-model-1.5
3.2. Ollama inference
curl http://localhost:11434/api/chat -d '{ \
  "model": "", \
  "messages": [ \
    { "role": "user", "content": "一个患有急性阑尾炎的病人已经发病5天,腹痛稍有减轻但仍然发热,在体检时发现右下腹有压痛的包块,此时应如何处理?" } \
  }'

欢迎加入DeepSeek 技术社区。在这里,你可以找到志同道合的朋友,共同探索AI技术的奥秘。
更多推荐

 14
14 0
0- 0


 已为社区贡献17条内容

所有评论(0)