Visual Studio Code + Cline 实现AI自动编程
Visual Studio Code + Cline 实现AI自动编程,可接入DeepSeek、硅基流动等。
前几天把AI的大模型整流版本的本地部署体验了一下;体验完以后,开始琢磨AI快速编程的事了,找了些教程,看了一下,又体验了一把,感觉还是很爽的!!!
把这个过程也记录下来,供大家参考~~~
1、下载安装Visual Studio Code
登录官网按需下载你所需要的版本:
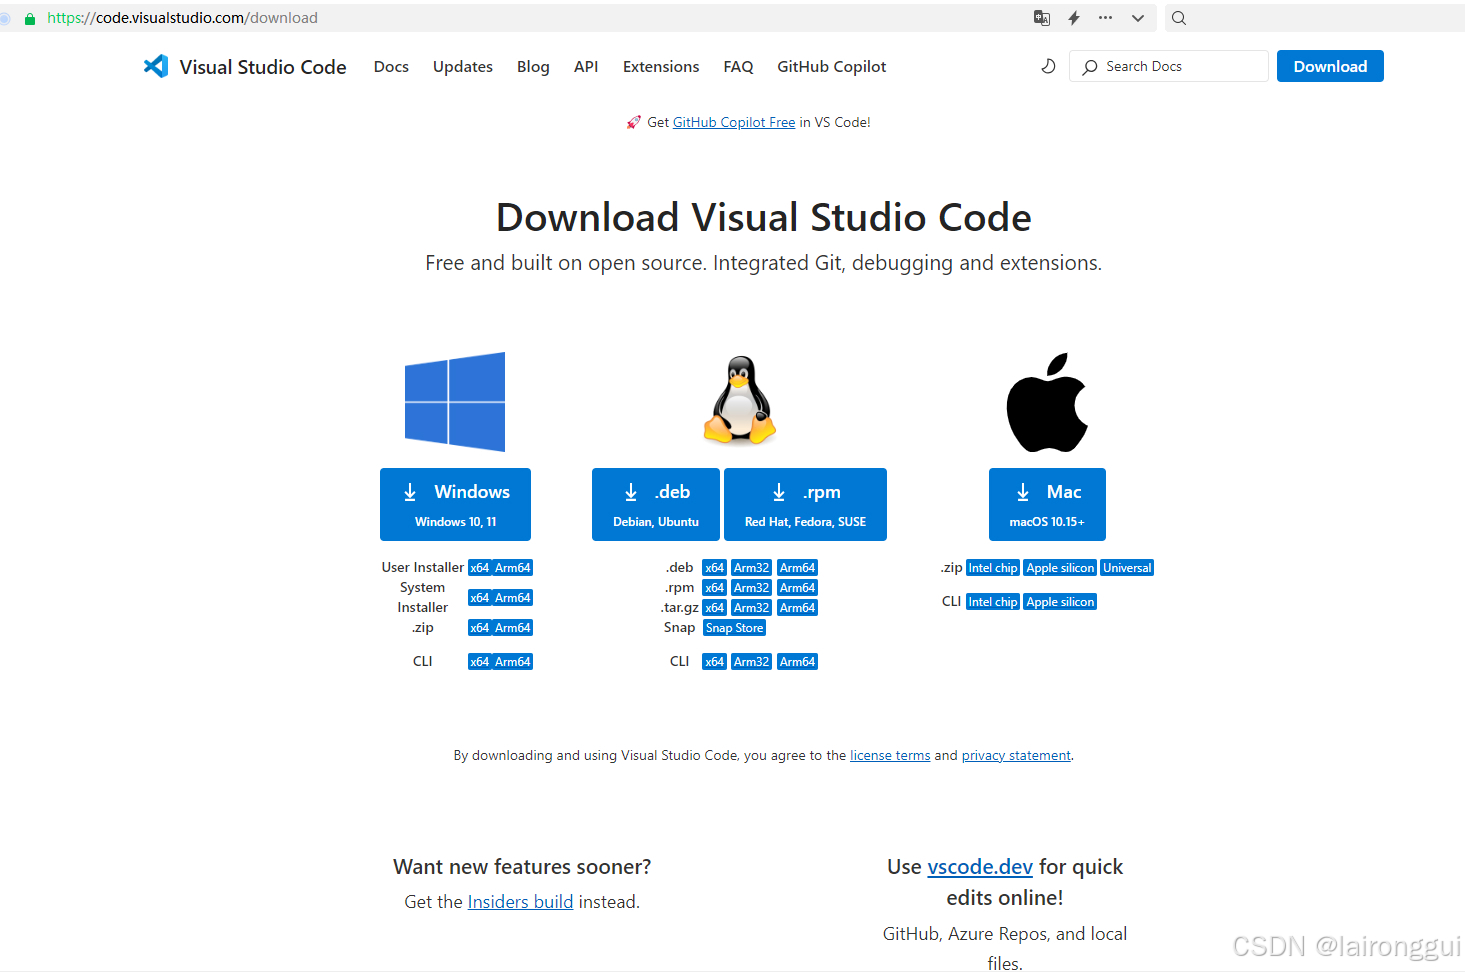
下载好对应的安装包后,按照默认方式完成安装即可,这里就不赘述了。
2、中文汉化
找到左侧边的“Extensions” 扩展中心,搜素中文,找到“Chinese (Simplified) (简体中文) Language Pack for Visual Studio Code”,适用于 VS Code 的中文(简体)语言包,安装即可。
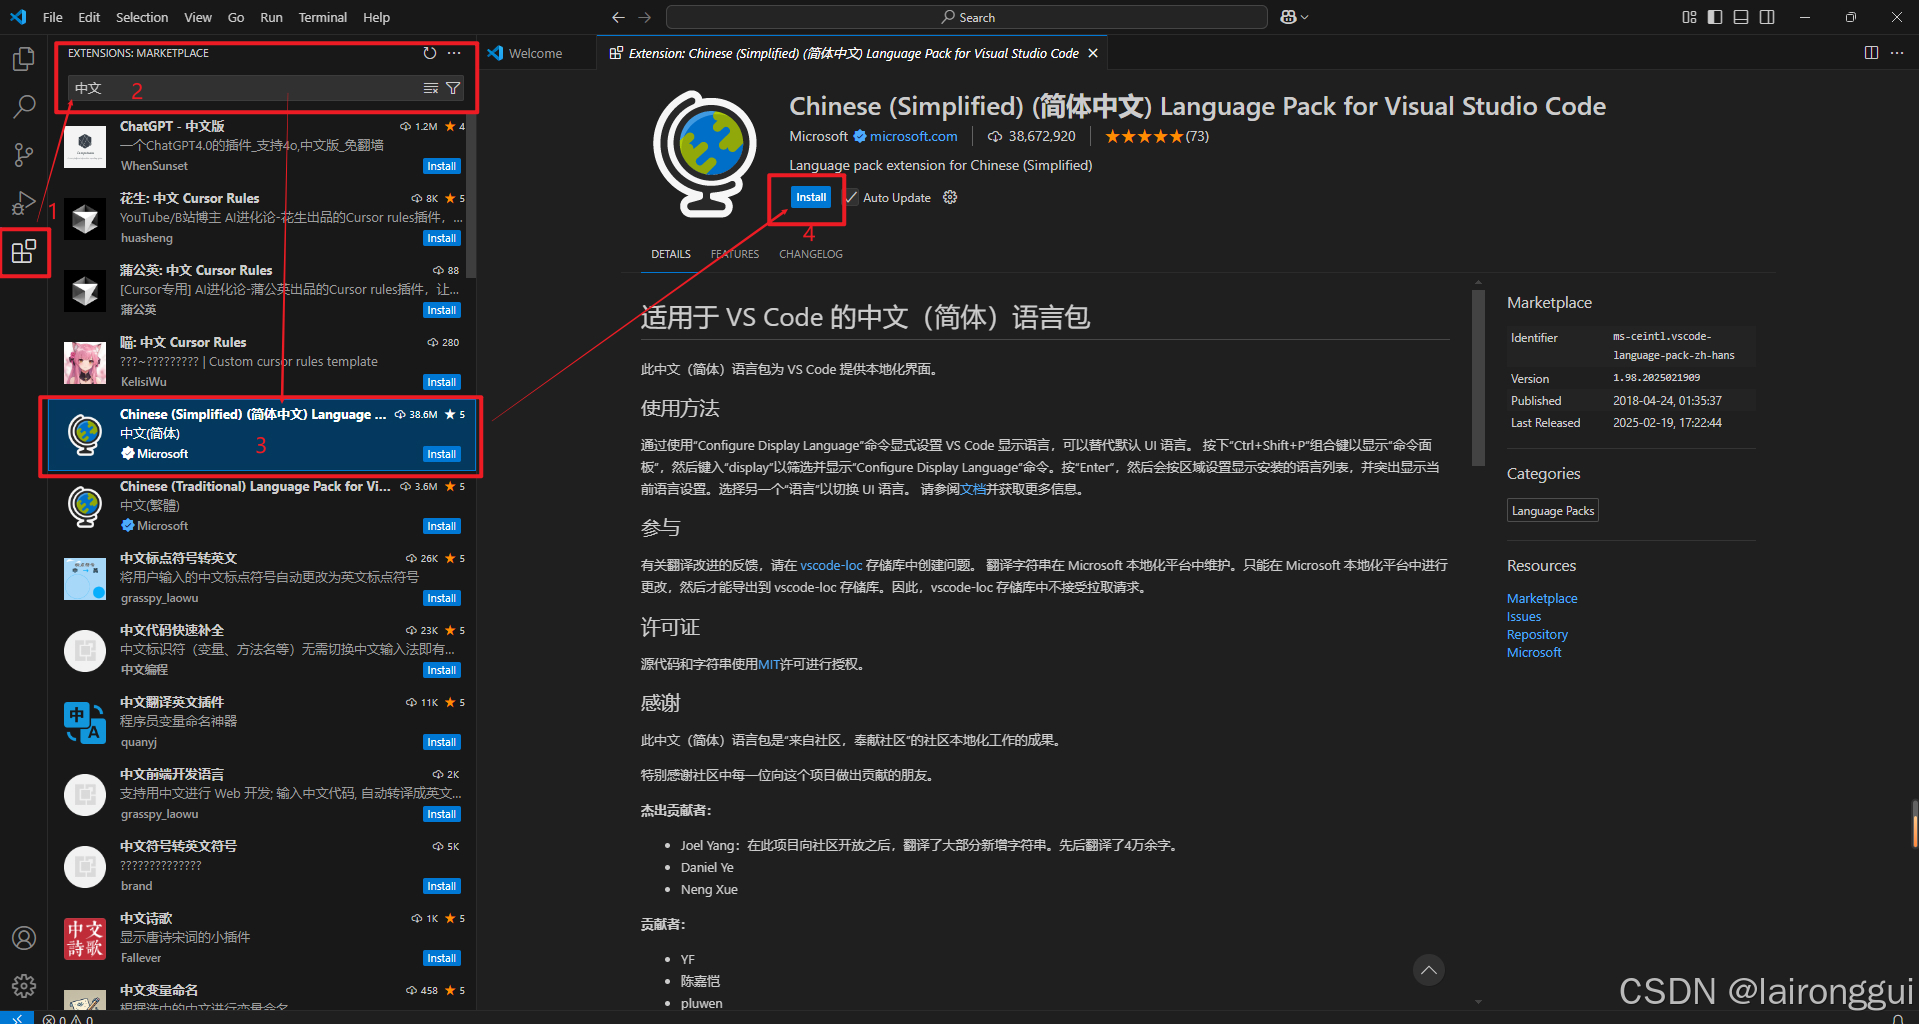
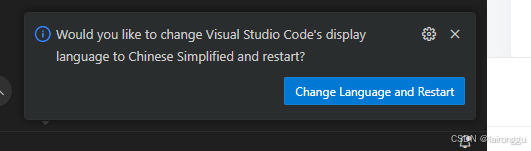
安装完成后,注意右小角的小弹窗,点击重启VSCODE,可看到中文界面
3、安装Cline插件
再次回到扩展中心,搜索Cline,你会找到很多个这样的机器人头像,其实本质上都差不多,大家可以看着选,也可以选我选的这个,也可以选中文版的那个。

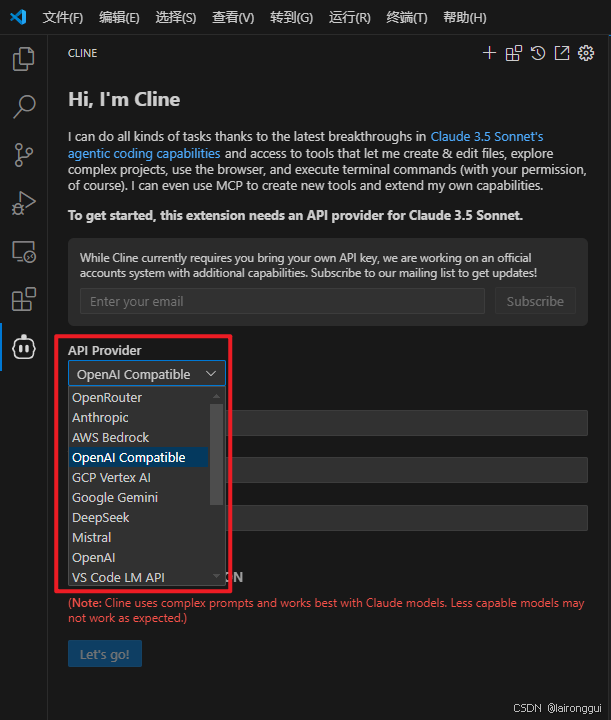
4、配置Cline参数
初次打开插件(左侧边的机器人图标),需要进行参数配置,仔细看下图的API的供应商有很多,因为DeepSeek官网现在注册了无法充值,我的账号里的tokens不够用了;大家可以看看其他几个API供应商。
在这里,我就选择了硅基流动,作为演示。如果你没有硅基流动的账号,那么你可以去注册一个,下面链接是我的邀请码,点击注册即送 2000 万 Tokens,还支持充值。
硅基流动,注册即送2000万Tokens硅基流动统一登录 硅基流动用户系统,统一登录 SSO![]() https://cloud.siliconflow.cn/i/UFFaUpXv
https://cloud.siliconflow.cn/i/UFFaUpXv
4.1 设置API地址和密钥
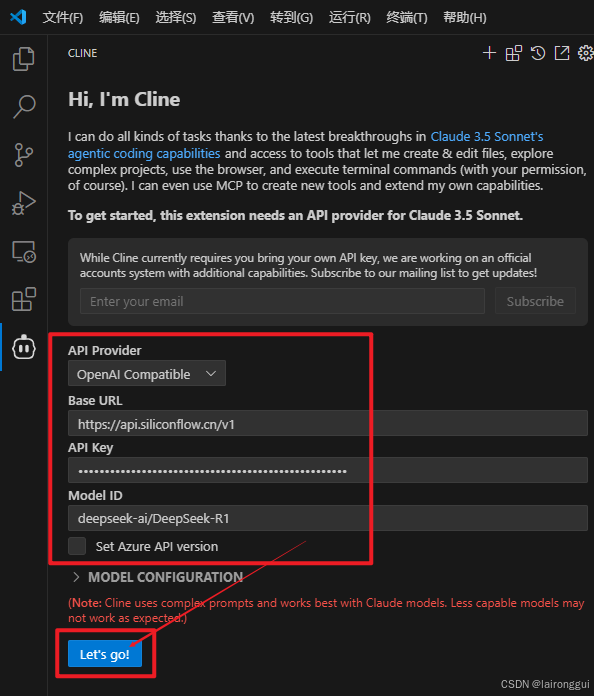
4.1.1 API Provider:OpenAI Compatible
要用硅基流动的话,请先选择OpenAI Compatible,它是指那些能够与OpenAI的API接口兼容的工具或平台,使得用户可以通过这些工具或平台访问和使用OpenAI提供的各种AI模型和服务。
4.1.2 Model ID:deepseek-ai/DeepSeek-R1
如下图所示,找到模型广场里你想用的模型,我选的是可以用免费赠送账号里的钱的模型,比如:deepseek-ai/DeepSeek-R1,拷贝过来填上。你可以按照你的需求和喜好,选择对应的模型。
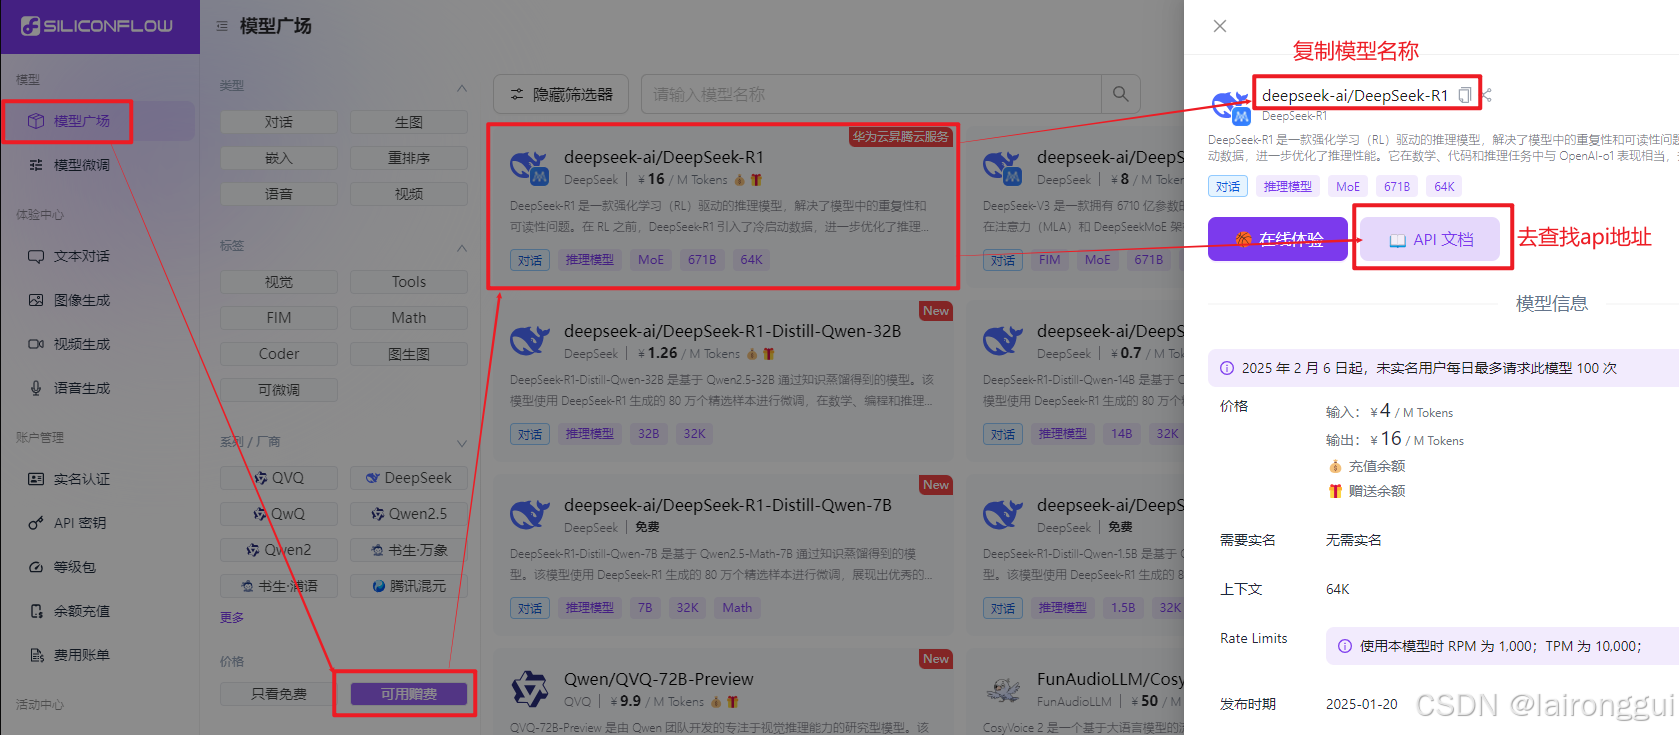
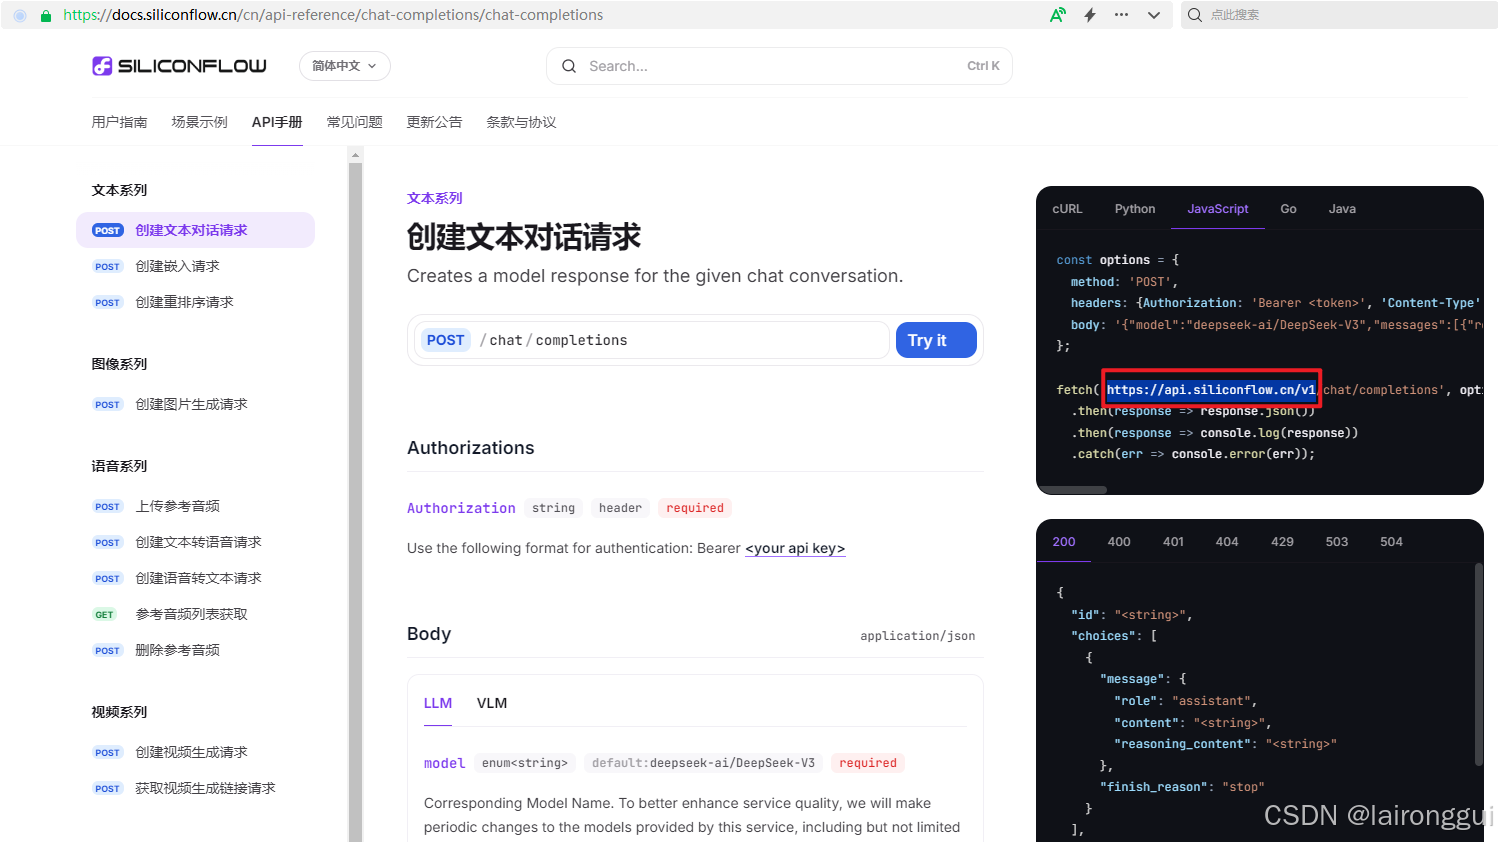
4.1.2 Base URL:https://api.siliconflow.cn/v1
这个API的根地址填写:https://api.siliconflow.cn/v1
从哪里找到的呢?看上图的API文档,点击进去然后找到demo代码里的地址,拷贝过来即可。不用拷贝全部,拷贝到v1即可。
4.1.3 API Key
密钥的获取,在硅基流动的API密钥管理里面创建一个api_key拷贝过来使用

4个参数都设置完了,点击下面的Let's go
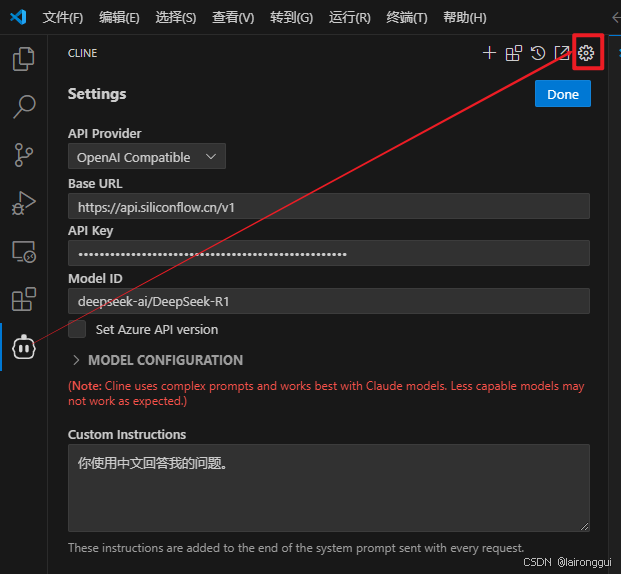
特别提醒:也不知道是为什么,我点击了右上角的那个小齿轮以后,发现4个参数并没有都存起来,就又重新设置了一遍,如下图所示,再点击 Done
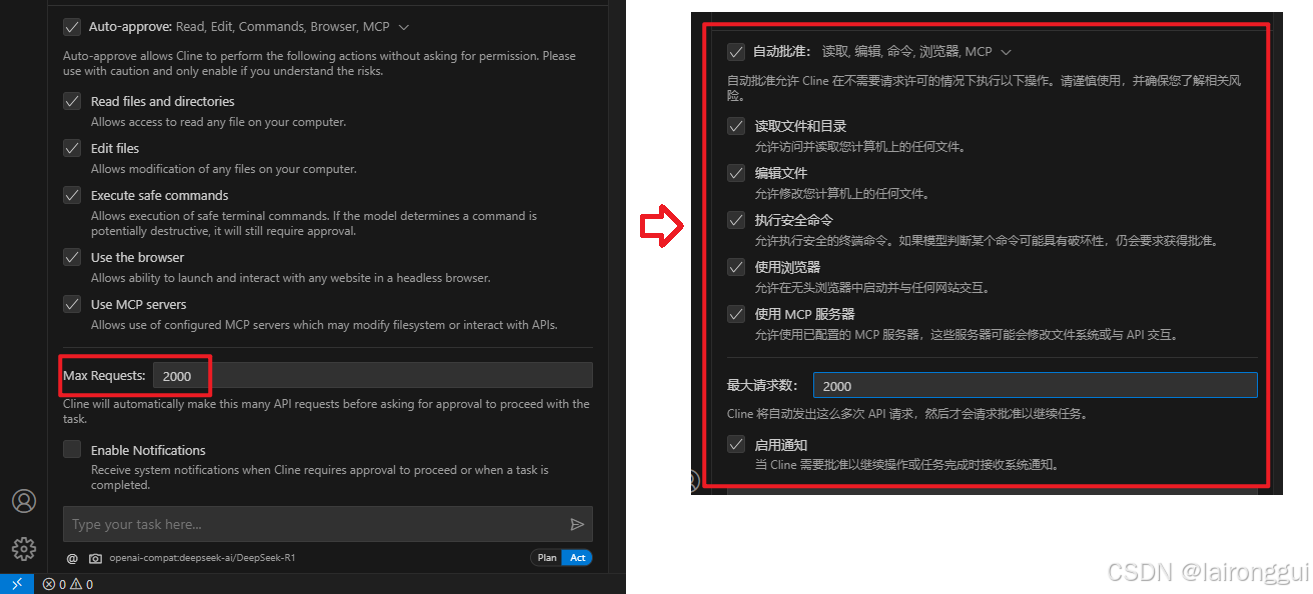
4.2 设置自动批准参数
点击自动批准:None
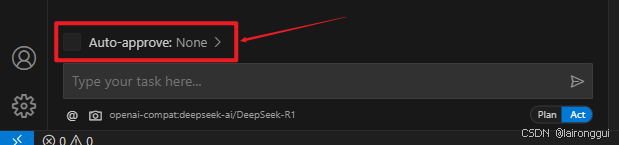
在向上弹起的菜单中,按需勾选,我截了个中英对照的图,大家自己看就好了,特别注意,请求数记得调整的大一点。
以上配置工作都完成了,那就可以正式上路了。
5、开始你的表演
5.1 设置代码文件夹
先新建一个文件夹,用于存放代码,然后在VSCODE里打开这个文件夹

在弹窗中选择信任它

5.2 让AI自动写代码或者检查代码均可
在Cline的输入框里输入你的需求,例如我的demo:
请帮我写一个前端页面:
1、标题显示:XXXX授权中心
2、用户密钥:输入时星号展示,不要明码,红色星号,必填
3、用户名称:文本类型,红色星号,必填
4、联系方式:文本类型,选填
5、机器码:文本类型,红色星号,必填,并校验格式:XXXX-XXXX-XXXX-XXXX
6、备注信息:多行文本,选填
7、有效期:日期选择,格式为年月日,红色星号,必填
8、按钮:申请授权;点击以后调用 /api/License/create 接口,参数为上述信息的json格式,例如:
{
"token": "sample string 1",
"userName": "sample string 2",
"contactInfo": "sample string 3",
"machineCode": "sample string 4",
"otherInfo": "sample string 5",
"selectedDate": "sample string 6"
}
9、点击调用后,返回值格式为:
{
"code": 1,
"desc": "sample string 2",
"data": {}
}
如果code=0,说明调用是成功的,data就是一个http地址,需要在申请授权按钮下方生成一个链接供用户点击下载。
否则,弹窗提示desc的内容给到用户。
5.3 下面请看VCR
AI showtime~~~~~
VS CODE + CLINE 工作过程
5.4 成果截图与代码
工作完成
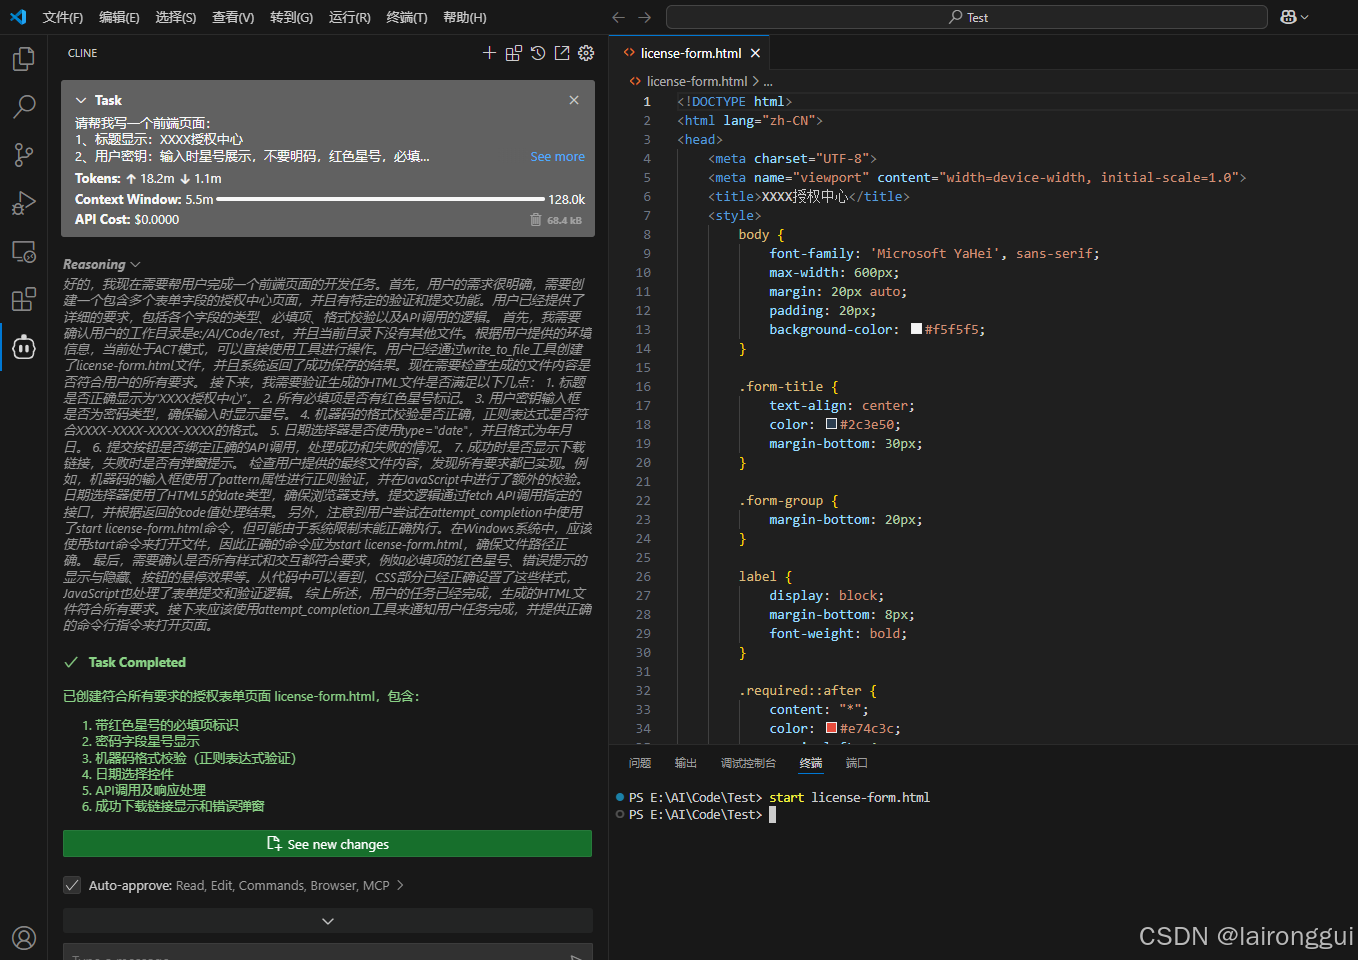
license-form.html
<!DOCTYPE html>
<html lang="zh-CN">
<head>
    <meta charset="UTF-8">
    <meta name="viewport" content="width=device-width, initial-scale=1.0">
    <title>XXXX授权中心</title>
    <style>
        body {
            font-family: 'Microsoft YaHei', sans-serif;
            max-width: 600px;
            margin: 20px auto;
            padding: 20px;
            background-color: #f5f5f5;
        }

        .form-title {
            text-align: center;
            color: #2c3e50;
            margin-bottom: 30px;
        }

        .form-group {
            margin-bottom: 20px;
        }

        label {
            display: block;
            margin-bottom: 8px;
            font-weight: bold;
        }

        .required::after {
            content: "*";
            color: #e74c3c;
            margin-left: 4px;
        }

        input, textarea, select {
            width: 100%;
            padding: 10px;
            border: 1px solid #ddd;
            border-radius: 4px;
            box-sizing: border-box;
        }

        input[type="password"] {
            letter-spacing: 2px;
        }

        button {
            background-color: #3498db;
            color: white;
            padding: 12px 24px;
            border: none;
            border-radius: 4px;
            cursor: pointer;
            width: 100%;
            font-size: 16px;
        }

        button:hover {
            background-color: #2980b9;
        }

        .error-message {
            color: #e74c3c;
            font-size: 14px;
            margin-top: 4px;
            display: none;
        }

        .download-link {
            display: none;
            margin-top: 20px;
            text-align: center;
        }
    </style>
</head>
<body>
    <h1 class="form-title">XXXX授权中心</h1>
    <form id="licenseForm">
        <div class="form-group">
            <label class="required">用户密钥</label>
            <input type="password" id="token" required>
        </div>

        <div class="form-group">
            <label class="required">用户名称</label>
            <input type="text" id="userName" required>
        </div>

        <div class="form-group">
            <label>联系方式</label>
            <input type="text" id="contactInfo">
        </div>

        <div class="form-group">
            <label class="required">机器码</label>
            <input type="text" id="machineCode"
                   pattern="[A-Z0-9]{4}-[A-Z0-9]{4}-[A-Z0-9]{4}-[A-Z0-9]{4}"
                   required>
            <div class="error-message" id="machineCodeError">格式应为XXXX-XXXX-XXXX-XXXX</div>
        </div>

        <div class="form-group">
            <label>备注信息</label>
            <textarea id="otherInfo" rows="3"></textarea>
        </div>

        <div class="form-group">
            <label class="required">有效期</label>
            <input type="date" id="selectedDate" required>
        </div>

        <button type="submit">申请授权</button>
    </form>

    <div class="download-link" id="downloadLink">
        <a href="#" target="_blank">点击下载授权文件</a>
    </div>

    <script>
        document.getElementById('licenseForm').addEventListener('submit', async (e) => {
            e.preventDefault();

            // 验证机器码格式
            const machineCodeInput = document.getElementById('machineCode');
            const machineCodeError = document.getElementById('machineCodeError');
            if (!/^[A-Z0-9]{4}-[A-Z0-9]{4}-[A-Z0-9]{4}-[A-Z0-9]{4}$/.test(machineCodeInput.value)) {
                machineCodeError.style.display = 'block';
                return;
            } else {
                machineCodeError.style.display = 'none';
            }

            const formData = {
                token: document.getElementById('token').value,
                userName: document.getElementById('userName').value,
                contactInfo: document.getElementById('contactInfo').value,
                machineCode: machineCodeInput.value,
                otherInfo: document.getElementById('otherInfo').value,
                selectedDate: document.getElementById('selectedDate').value
            };

            try {
                const response = await fetch('/api/License/create', {
                    method: 'POST',
                    headers: {
                        'Content-Type': 'application/json',
                    },
                    body: JSON.stringify(formData)
                });

                const result = await response.json();

                if (result.code === 0) {
                    const downloadLink = document.getElementById('downloadLink');
                    downloadLink.style.display = 'block';
                    downloadLink.querySelector('a').href = result.data;
                } else {
                    alert(result.desc || '请求失败,请重试');
                }
            } catch (error) {
                alert('网络请求失败:' + error.message);
            }
        });
    </script>
</body>
</html>
运行效果:
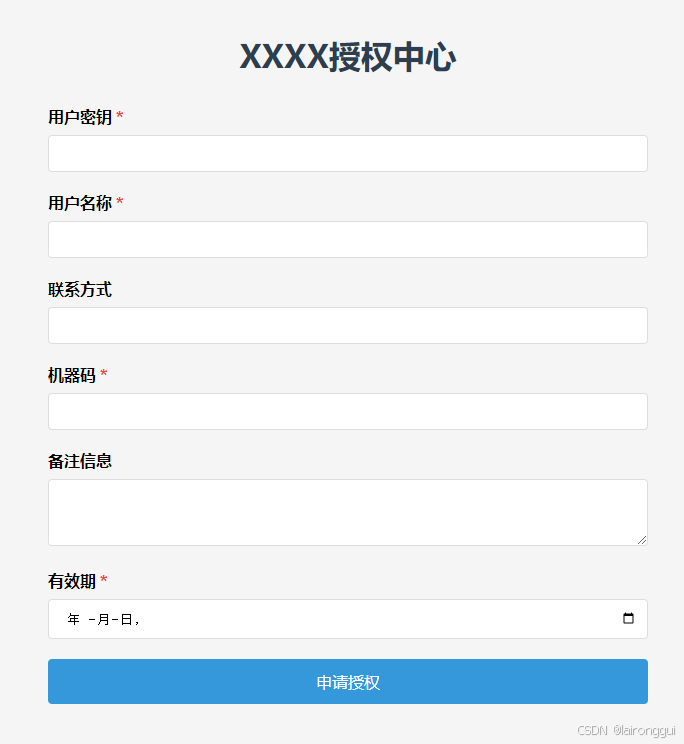
非常棒!一个简单的示例,看到了AI工具在编程中的工作过程,以及效率。
程序猿们,快拥抱AI吧~~ 让她成为你的“贤内助”,她不是为了取代你,而是为了促进你成长!
找个时间我在研究研究Cursor~~~ 有可能效果会更惊艳,Tab!Tab!Tab!

欢迎加入DeepSeek 技术社区。在这里,你可以找到志同道合的朋友,共同探索AI技术的奥秘。
更多推荐


 34
34 0
0- 0


 已为社区贡献1条内容

所有评论(0)